To use your own branded domain (like example.com) or a subdomain (like test.example.com) with your TinyURL links, you’ll need to add a CNAME record in your Cloudflare dashboard. This tells your domain to point to TinyURL’s servers.
This guide covers both setups. Follow the section that matches what you’re connecting:
- Setting Up a Domain (e.g. example.com)
- Setting Up a Subdomain (e.g. test.example.com)
Both processes take just a few minutes.
Setting Up a Domain
Use these steps to connect a full domain (such as example.com) that you’ve added to TinyURL.
Step 1: Open your DNS settings
- Log in to your Cloudflare Domain Management dashboard.
Step 2: Configure DNS
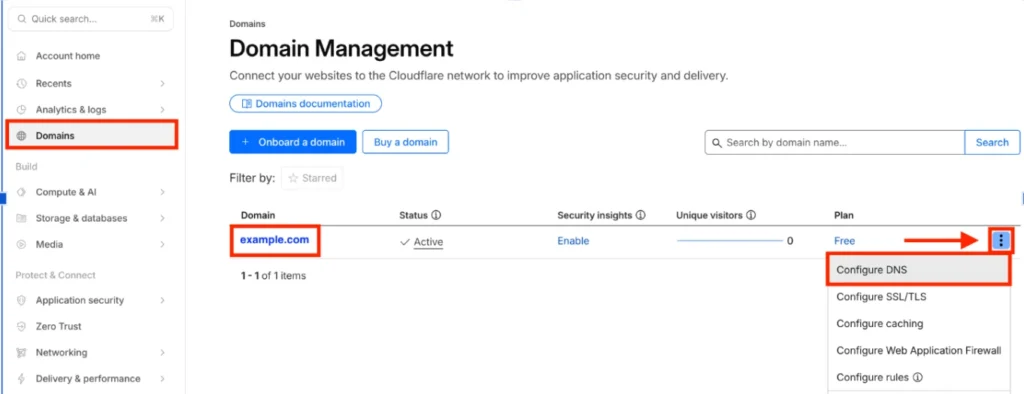
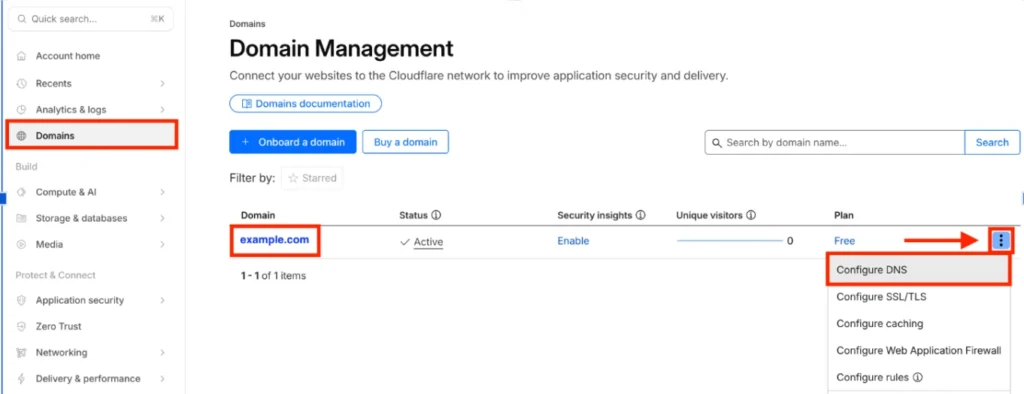
- On the Domain Management dashboard, find the domain you added to TinyURL. Click the kebab icon (the three dots ⋮) on the same row as that domain, then select Configure DNS.
Step 3: Add a new record
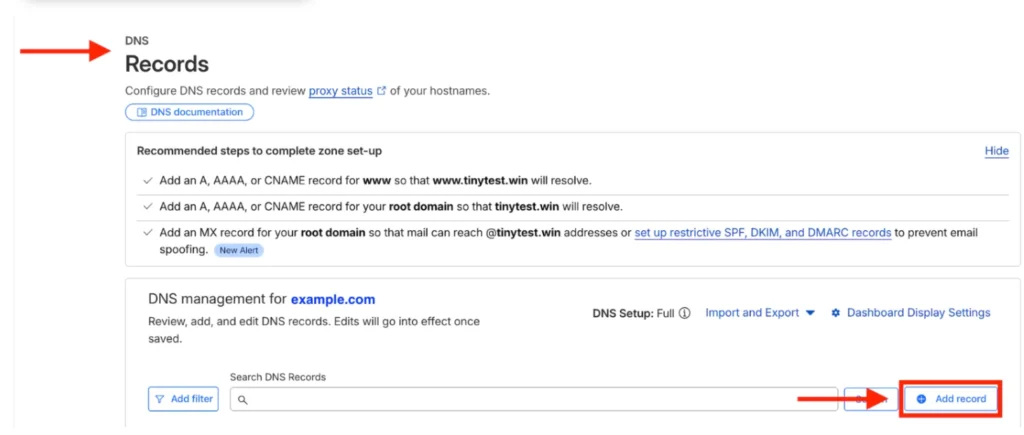
- On the DNS Records page, scroll down to DNS management for your selected domain and click + Add Record.
Step 4: Enter the CNAME details
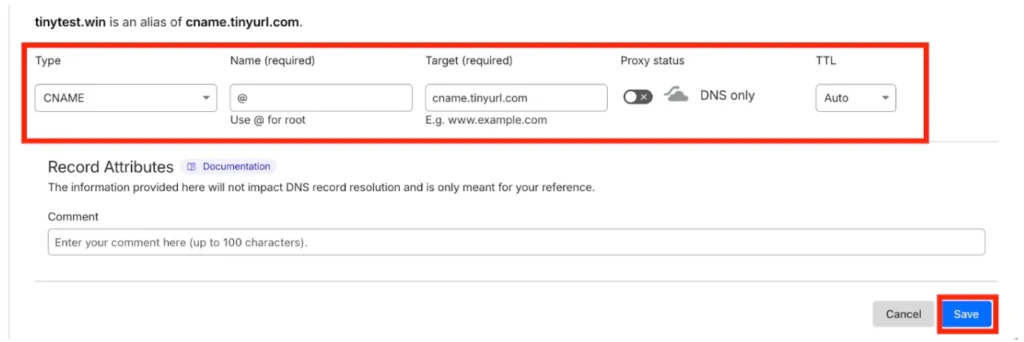
- Choose CNAME as the record type and enter the following values exactly:
| Field | Value |
|---|---|
| Type | CNAME |
| Name (required) | @ (this represents the root domain) |
| Target (required) | cname.tinyurl.com |
| Proxy status | DNS only (grey cloud) |
| TTL | Auto |
Important: The proxy status must be set to DNS only—shown as a grey cloud, not an orange one. If the cloud is orange (proxied), your domain won’t connect correctly.
Step 5: Save
- Click Save to confirm your changes.
Step 6: Contact and let us know
- Once you’ve saved, contact us again and share a screenshot of your setup (like the Step 4 reference). We’ll complete the setup on our end so your domain shows as Active on your TinyURL dashboard.
Setting Up a Subdomain
Use these steps to connect a subdomain (such as test.example.com) that you’ve added to TinyURL.
Step 1: Open your DNS settings
- Log in to your Cloudflare Domain Management dashboard.
Step 2: Configure DNS
- On the Domain Management dashboard, find the root domain of your subdomain (for test.example.com, that’s example.com). Click the kebab icon (⋮) on that row, then select Configure DNS.
Step 3:
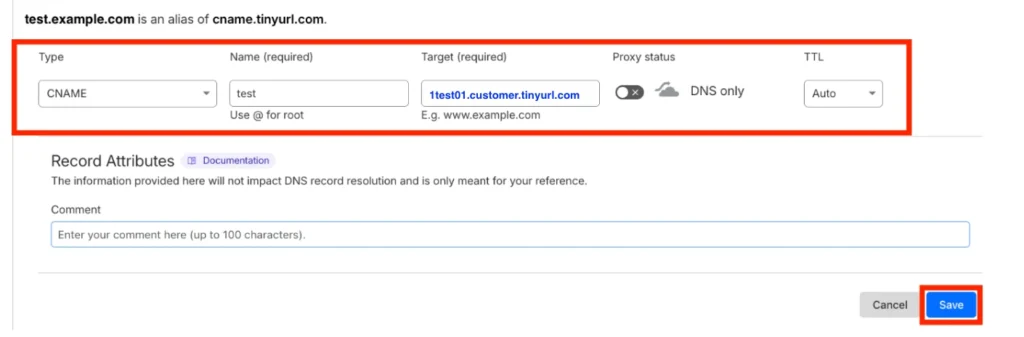
- Add the CNAME record Create a new CNAME record and enter the following values. In this example, the subdomain is test.example.com:
| Field | Value |
|---|---|
| Type | CNAME |
| Name (required) | test (just the subdomain portion, not the full address) |
| Target (required) | Copy the value from your Branded Domains page, or from the email you received when you set up your subdomain. Yours will look similar to 1test01.customer.tinyurl.com (your exact value will be different). |
| Proxy status | DNS only (grey cloud) |
| TTL | Auto |
Note: For the Name field, enter only the subdomain part. If your subdomain is test.example.com, enter just test.
Step 4: Save
- Click Save to confirm your changes.
Step 5: Turn off CNAME flattening
- In your Cloudflare dashboard, go to the DNS Settings page and turn off CNAME flattening for all CNAME records. This step is required for subdomains to resolve correctly.
For the subdomain setup, there is no need to contact us after completing the steps above.
What Do These Settings Mean? (Plain-English Glossary)
- CNAME record – A DNS rule that points your domain or subdomain to another address. Here, it points yours to TinyURL’s servers.
- Proxy status / DNS only (grey cloud) – Tells Cloudflare not to route traffic through its own network. TinyURL needs this turned off (grey cloud) to work.
- TTL (Time To Live) – How long DNS information is cached. Auto lets Cloudflare manage this for you.
- CNAME flattening – A Cloudflare feature that can interfere with subdomain routing, which is why it needs to be turned off for subdomains.
Quick Summary
| Setup | Name field | Target |
|---|---|---|
| Domain (example.com) | @ | cname.tinyurl.com |
| Subdomain (test.example.com) | test | Value from your Branded Domains page or setup email |
For both: set Type to CNAME, Proxy status to DNS only (grey cloud), and TTL to Auto.