Model Boat Mayhem

Please login or register.

Login with username, password and session length.
Pages: [1] 2 3 4 5   Go Down

Author Topic: Solent steam launch build log  (Read 38914 times)

SailorGreg

  • Full Mayhemer
  • *****
  • Offline Offline
  • Posts: 1,326
  • Money talks - it says goodbye
  • Location: Hayling Island, Hants
Solent steam launch build log
« on: January 03, 2013, 10:43:14 pm »

Hi all,

I have been recording the build of my TVR1A steam plant on another thread here ("Oh no, not another TVR1A!"), and have just embarked on the build of the boat that it will power (I hope!).  I have bought a Solent steam launch hull from Models by Design, and this is what you get when you take it out of the packaging (although the simple stand is my own concoction, not part of the deal).  I should say straight away that my choice of hull was influenced heavily by Andy Wright's lovely build here http://www.modelboatmayhem.co.uk/forum/index.php?topic=3755.msg49829#msg49829 and if mine turns out half as good as his I'll be well pleased.


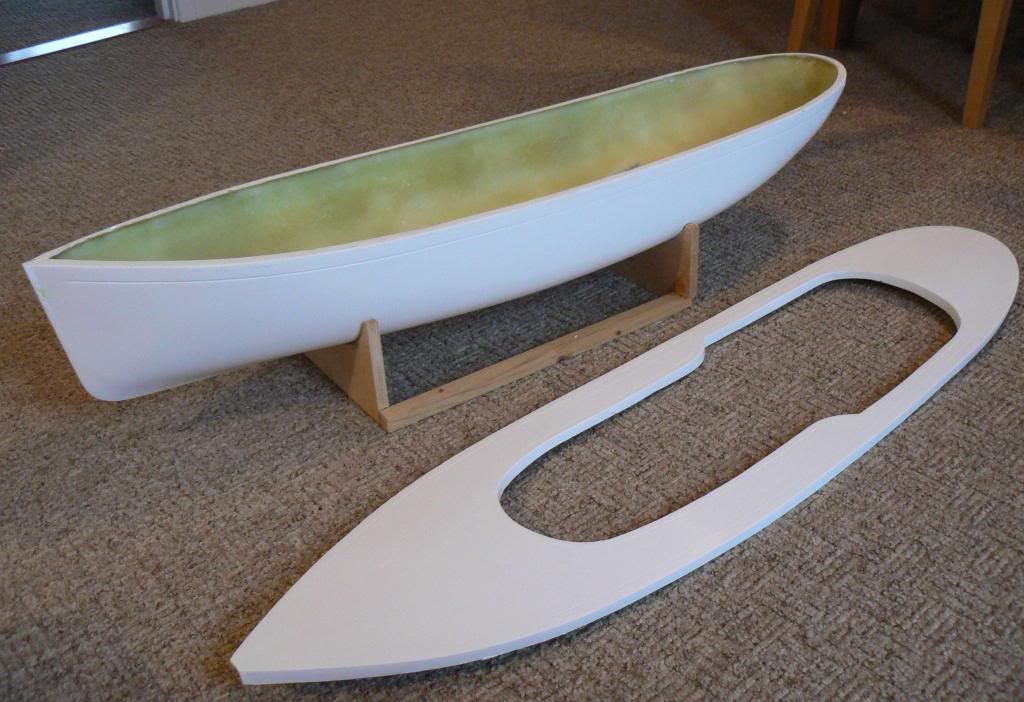
You also get a full size drawing of the side and top elevations of the finished boat with some construction suggestions, although the dimensions of the drawing don't exactly match the moulding.  This isn't a particular problem - I find the drawing very useful for planning and doodling, but all measurements need to be taken from the actual hull.  The hull is nominally 1/8 scale, which fits pretty well with my engine and boiler (for example, the boiler is 6" long, which would make it 4 feet at full size - sounds about right for a small boiler).

I decided that I wasn't all that keen on the deck moulding.  Nothing wrong with the moulding itself, but I didn't take to the way the cockpit narrows in the forward part and I have decided to build a wooden deck straight onto the hull.  This also allows me to make more room for the steam plant - the drawing shows a vertical boiler, while I have a horizontal one and this obviously takes up a little more space.

My first alteration was purely cosmetic; with a wood deck, I wanted a wood stem showing above the bow.  This meant removing part of the moulding and inserting a wooden replacement.  This only had to be enough to show above the deck, as the hull will be painted, so I only removed enough to give my wood insert a good gluing surface.  Here's the original bow with my cut lines marked -


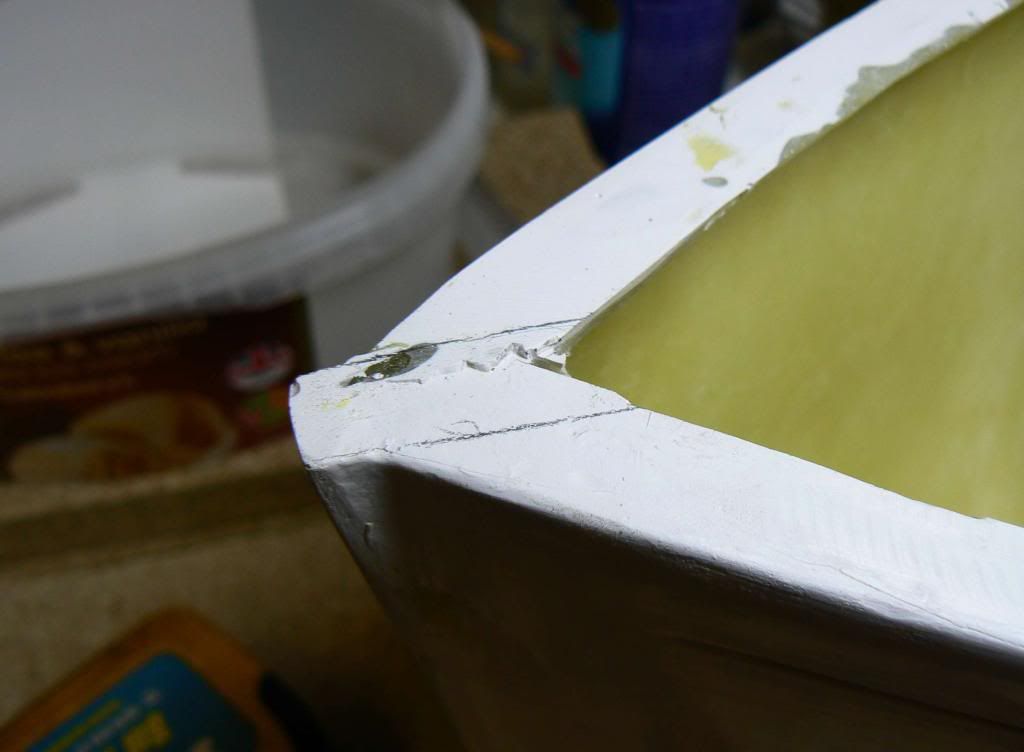
and here's the section cut out -


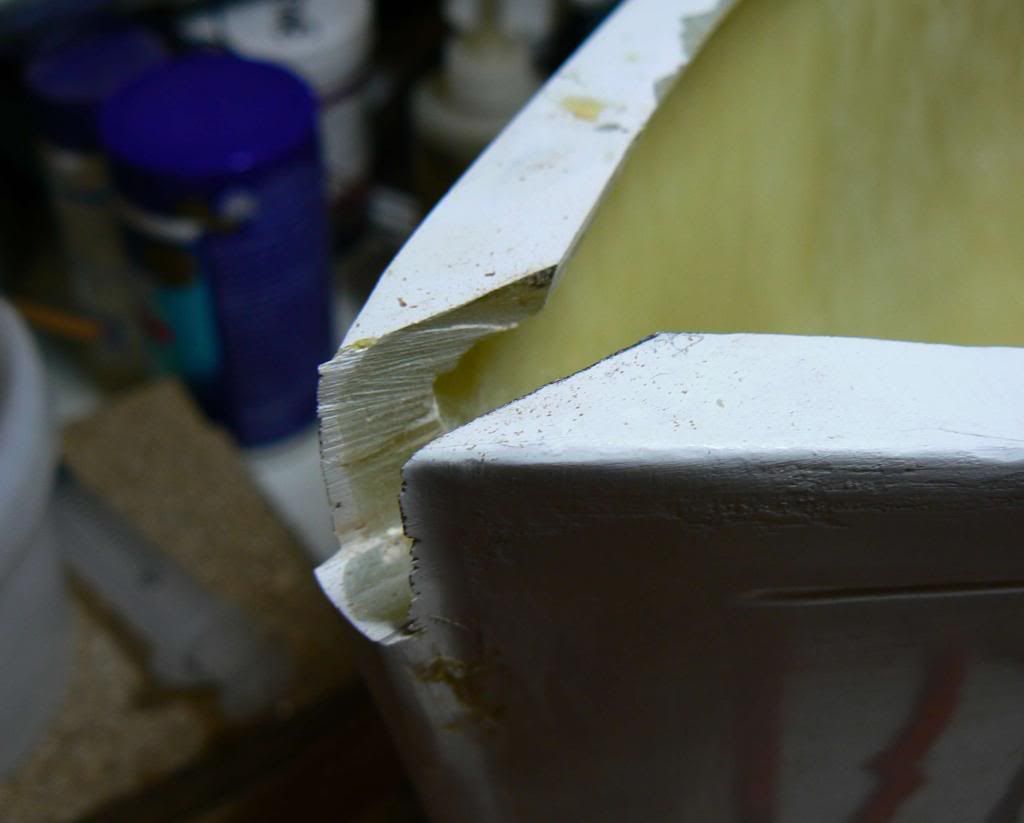
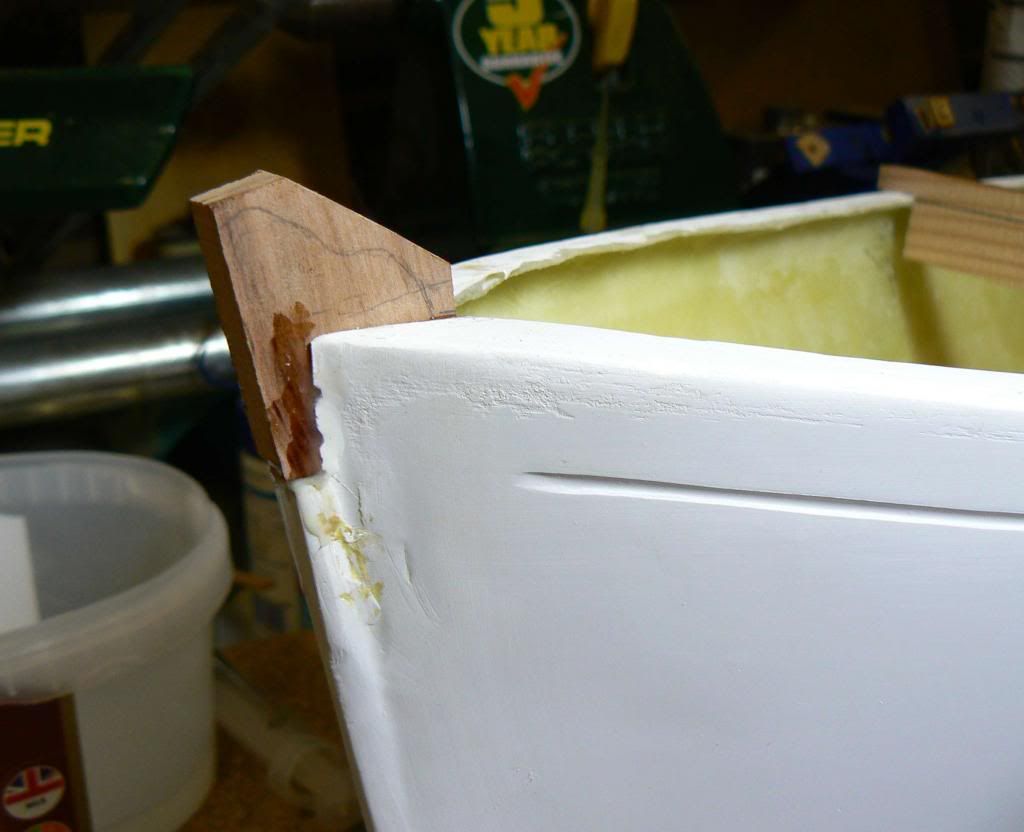
I am undecided about the exact design of the deck planking at the moment, but the margin board around the gunwhale and the top strake of the hull will be varnished sapele.  That said, I actually used a piece of apple for the insert (just because I like it) and here it is glued in place with a very rough sketch of the final shape on it.


All the internal structure is going to be douglas fir, if only because I have plentiful offcuts from a small (but full scale) boat I built a couple of years ago.  It is also easy to work, reasonably light and flexible.   I made up some 10mm square pieces for the major deck beams as well as some temporary hull braces - the hull is quite flexible around the top until some structure is inserted. 


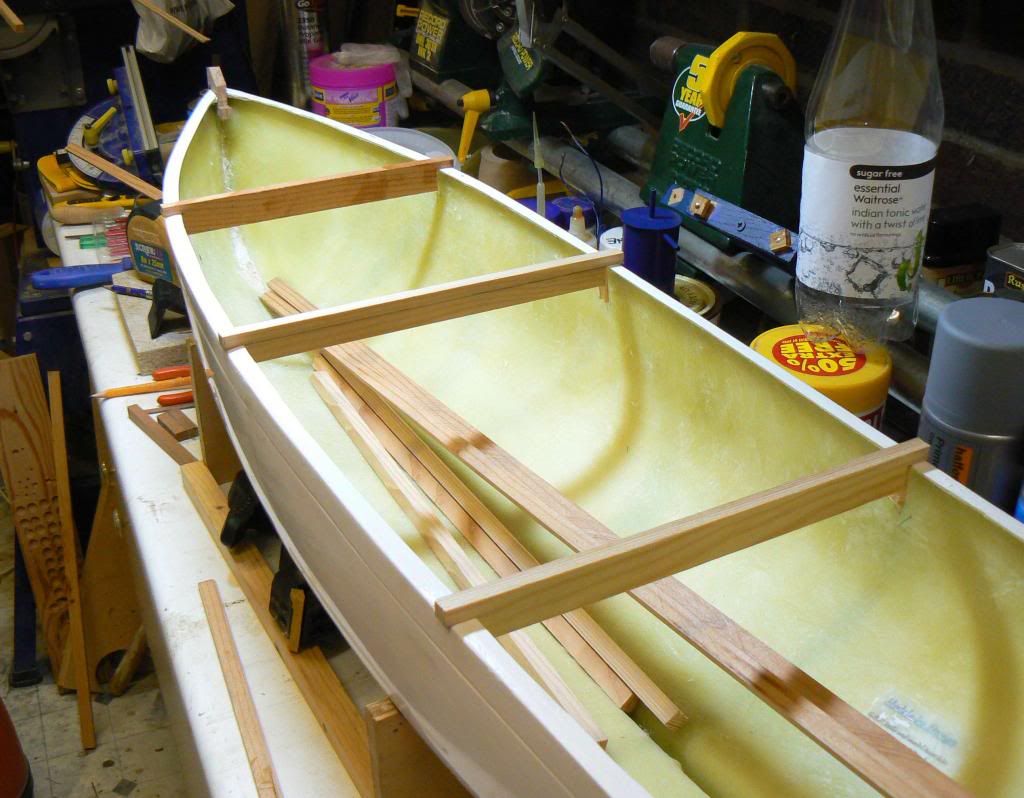
The first real structural parts to be put in place are the floors that will carry the steam plant.  I need to get the position of that fixed before I finalise the details of the surrounding structure.  Shaping the floors to fit the hull is fairly easy if you follow logical steps.  I used some 6mm ply to make patterns, as follows.  First, I marked on the hull where I wanted the floors to be, then I cut a piece of ply to roughly fit into one side of the hull at the first of these positions.  Holding it in place, I spiled the shape of the hull onto this by running a pencil around the inside of the hull.  Take the ply to the disc sander, sand to the pencil line and the piece should fit nicely.  Of course, it doesn't, so have another go until you get it acceptable.  Make a duplicate for the other side of the hull, then clamp the two pieces together  - it is much easier to get the first pass with two halves rather than trying to do a full pattern straight off.  Put the pattern back into the hull and check for fit -


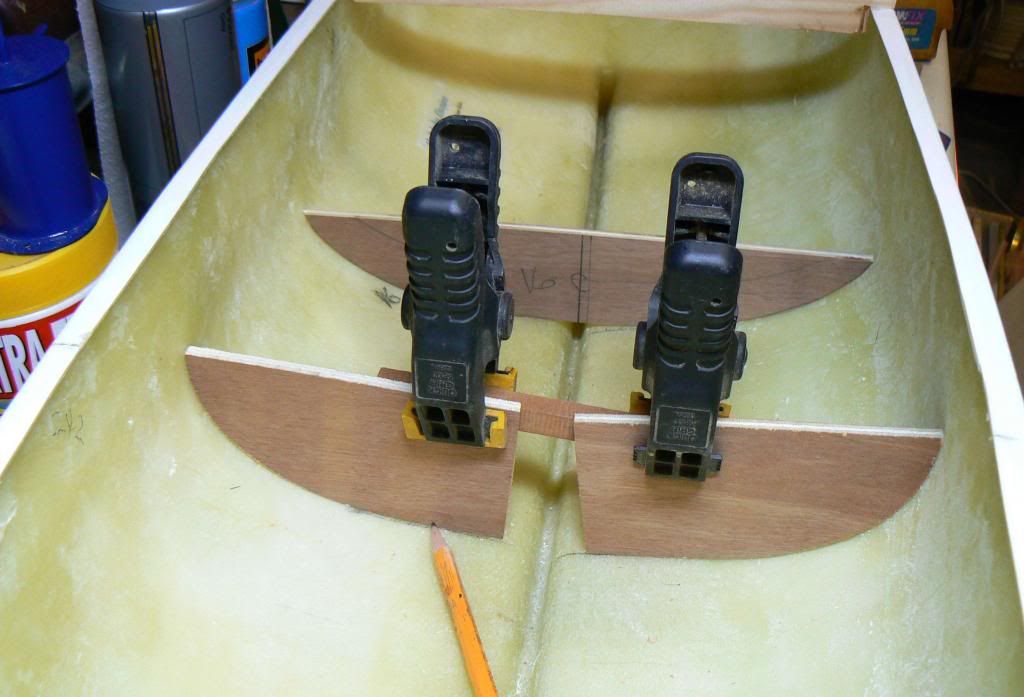
Assuming you have a reasonable fit, copy the full pattern onto another piece of ply, cut that out and put into place.  I also made sure that the top of the pattern was horizontal with a small spirit level, then spiled the full pattern one more time.  You can see a finished pattern in the background of the picture above, and here are three complete ones -


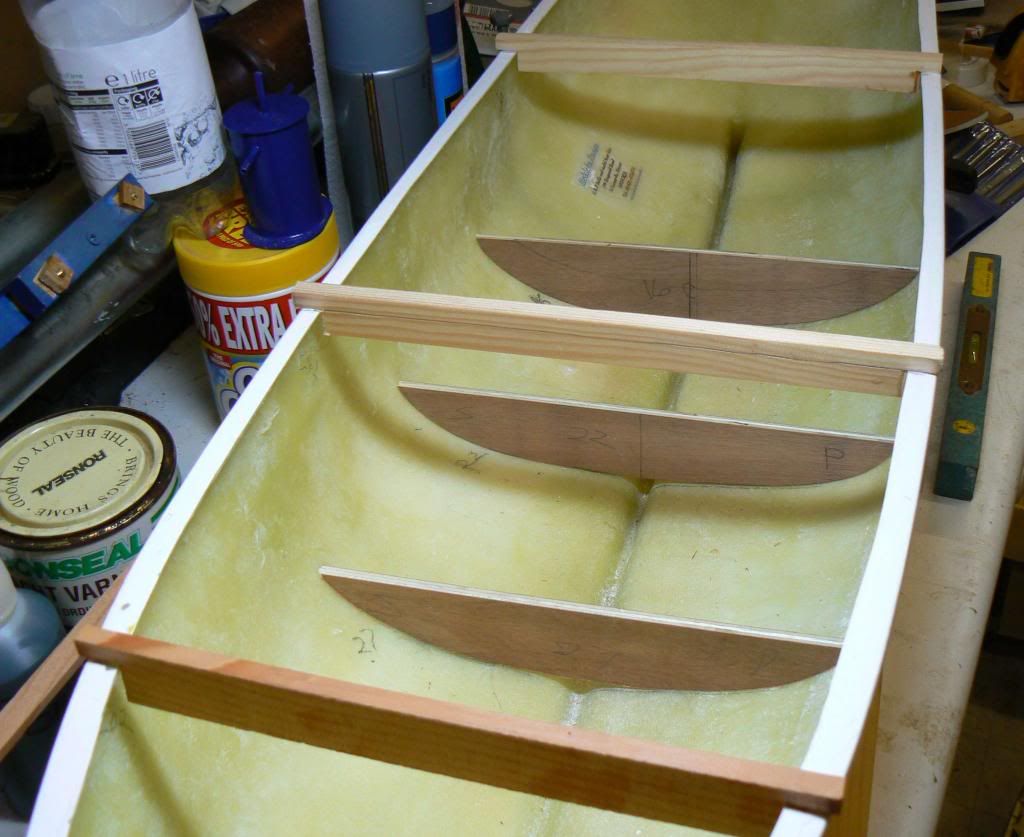
These are much higher than I need the finished floors to be, and that leads me to my first question.  The drawing supplied with the hull shows the steam plant mounted fairly high up in the hull.  The hull form does not demand this - it is quite beamy and fairly flat-bottomed so my steam plant can sit quite low in the hull.  Apart from stability issues, the illustrated installation means that the prop shaft has to be installed at quite a steep angle.  The only benefit I can see is that the inboard end of the prop shaft is above the waterline.  I know in full size this is not required, but do models normally require this because otherwise the tubes leak?  (Perhaps I should have mentioned that I've never built a working model boat before   :embarrassed: :o - oh, you'd guessed!)  So can I place my plant low in the hull, make the prop shaft more horizontal and keep away from stability issues, or will I just gradually sink?

And my second question (already posed on the other thread but without any response yet) - in all other steam launches I have seen, the water tank to top up the boiler is a separate moulding or metal construction - and given that most are in the bow, they are not an easy shape to create.  Is there any reason why I cannot simply create a tank within the hull by epoxying in two bulkheads and a floor?  It seems much easier than trying to make or buy a weirdly shaped tank, but nobody (as far as I can see) does it that way.  Any views?

Well that's it for now.  It might be a while before the next episode as I plan to plank the inside of the hull to hide the surface of the moulding so I'll be producing dust with the saw and thickness sander for a little while.  More douglas fir, and if I feel really keen some ash ribs as well.  We'll see how it goes!

Greg

pettyofficernick

  • Full Mayhemer
  • *****
  • Offline Offline
  • Posts: 1,255
  • Marineville will be destroyed, Muahahaha.....
  • Location: Leasowe, Wirral
Re: Solent steam launch build log
« Reply #1 on: January 03, 2013, 11:03:34 pm »

Hi Greg, Pack the shaft with lithium grease or similar, bur avoid the heavier greases as they will cause drag and waste power, I use lithium grease because I already had some. I cannot see any reason why you could not use the bow compartment as a tank, just make sure all is well waterproofed and you should be ok. There may be an effect on the boats trim as the water is used up, a pint of water weighs about 20 ounces, which is a fair bit of weight. You will also need to make provision for a vent and filling arrangements. However, you could route the flow from the by-pass valve back into the tank instead of loosing it overboard. Good luck with the build,
Regards,
Nick. :-)) :-)) :-))
Logged
What I do is best not discussed, for I have been many things in my time....

Jerry C

  • Full Mayhemer
  • *****
  • Offline Offline
  • Posts: 1,504
  • Location: Caernarfon, North Wales.
Re: Solent steam launch build log
« Reply #2 on: January 03, 2013, 11:22:48 pm »

I was writing a post but Nick beat me to it. I agree with Nick but I use ordinary gp grease with no probs. Ditto your idea for feedwater tank. It works on narrowboats for fresh water. Do you need a tank? Are you going to steam in salt water or very dirty water?  If not then is a tank necessary? I've run for a good long season drawing straight from the lake with no ill effects and BernhardBB has done it for yonks. Unless you are ok working out KG, KB and GM then keep every weight as low as possible. It doesn't matter if she's stiff cos you aren't aboard. Too tender and you risk swamping in a stiff squall. Looking good so far.
Jerry.

SailorGreg

  • Full Mayhemer
  • *****
  • Offline Offline
  • Posts: 1,326
  • Money talks - it says goodbye
  • Location: Hayling Island, Hants
Re: Solent steam launch build log
« Reply #3 on: January 04, 2013, 05:44:19 pm »

Thanks guys for the reassurance.  I have now ordered a Prop Shop prop and shaft so should be able to start drilling holes in the hull soon.  I must also do some early bath tank testing to make sure I am not going to end up with a badly unbalanced hull.  I don't expect to, given that others have been here before me but it's probably best to check before I glue too much in place.  Suddenly realised I am going to have to get a battery, receiver, servos and so on to get a proper loading in the boat.  Does the spending never end?  {:-{  I feel a visit to the model shop coming on.  :-)

Greg

SailorGreg

  • Full Mayhemer
  • *****
  • Offline Offline
  • Posts: 1,326
  • Money talks - it says goodbye
  • Location: Hayling Island, Hants
Re: Solent steam launch build log
« Reply #4 on: January 14, 2013, 12:20:19 pm »

Ooooh, snow this morning!  I'm a kid again  %)

Well things have been a bit slow recently, but I have added a little bit of structure to the hull.  Firstly, I glued inwhales around the top of the hull to give some rigidity and something to fit the deck structure to. 


If you look very carefully at the bottom left of the picture you can just make out that I actually made these from two thin strips laminated in place.  This is a lot easier than bending a 10mm square piece around the inside of the hull.  I didn't try and take these round the curved stern area, it seemed much simpler to make up a pattern and cut a piece to shape.  Fortunately I'd just finished a box of Shredded Wheat.


I made a blank to fit the required curve with a couple of lap joints (no, that's not places where you see dodgy dancing....   :o )


then cut it to shape and glued in place.


I have also added a couple of deck beams towards the bow.  These will support bulkheads that will form my water tank.  Here they are in place with the first bulkhead shaped and in position.  When these are glued in place I will seal the inside of the tank with a coat or two of epoxy (these are 6mm marine ply so that if any water does get through a tiny gap in the epoxy it shouldn't matter too much).


The deck beams have a small camber of about 3mm at maximum beam so the deck won't be completely flat.

As I said before, I plan to plank the inside of the hull and have milled the planks for this.  I am fortunate to have a fairly well equipped workshop, and making the planks is straightforward if a bit time consuming.  I prepared some lengths of douglas fir by ripping them to just over 10mm thick then planing them all round to get fair surfaces.  I then ripped a plank off each 10mm edge -


and then planed the sawn surface flat on the planer


before ripping a couple more planks.  You can actually work on quite small sections of timber with full size tools as long as you keep things sharp and use lots of push sticks  O0 O0 .  I ended up with a whole bunch of 10mm x 2mm planks each with one planed face and one sawn face.  I sanded the sawn face on my home-brewed thickness sander and had my finished planks ready to go. (If you are interested in the thickness sander, it is described here - http://www.modelshipworld.com/phpBB2/viewtopic.php?t=20982)

My next job is to fair the inside of the hull to give a good surface for the planks to stick to.  Any advice on gluing welcome - contact adhesive?  Super glue?  Something else?  Bearing in mind there will be a steam plant working close by, I don't want anything that might fail if warmed up a bit! 

Snow's all gone now  :((

Greg


KNO3

  • Full Mayhemer
  • *****
  • Offline Offline
  • Posts: 1,515
  • Location: Bucharest
Re: Solent steam launch build log
« Reply #5 on: January 19, 2013, 10:01:57 am »

That's a nice hull, with your wooden details it should make a very nice boat. What length is it?
Logged

SailorGreg

  • Full Mayhemer
  • *****
  • Offline Offline
  • Posts: 1,326
  • Money talks - it says goodbye
  • Location: Hayling Island, Hants
Re: Solent steam launch build log
« Reply #6 on: January 19, 2013, 01:05:41 pm »

It's 42" long, or 1067mm if you prefer.

Greg

SailorGreg

  • Full Mayhemer
  • *****
  • Offline Offline
  • Posts: 1,326
  • Money talks - it says goodbye
  • Location: Hayling Island, Hants
Re: Solent steam launch build log
« Reply #7 on: January 29, 2013, 06:50:58 pm »

Been a bit nippy recently hasn't it?  My proposal to move the build onto the dining room table didn't seem to go down too well.  Oh well, the bruises are nearly gone  :}

I have made a bit of progress though.  I have lined the inside of the hull (or at least as much as will be visible) with my douglas fir planks.  I used contact adhesive, and rather wish I hadn't.  It needed some encouragement to keep the planks in place as you can see.  Almost certainly user error, although the bits that are stuck are REALLY stuck!


It stayed in place when I took the clamps off, mostly.  A fair bit of superglue on the seams has stabilised the whole lot, but after I had done both sides I came across Bryan Young's espousal of double sided tape and wondered if that might have been better.  Not to worry, a coat of epoxy will soon seal everything in place.

I bought a Prop Shop prop and shaft, the 2.4" diameter, 4" pitch 4-bladed one.  Starting from scratch I would have had little idea of what to buy, but there's a sticky at the top of the Steam page called "TVR1A prop size" - gosh, that's handy!  That and other discussions here pointed me in the right direction.  This size of prop will project below the bottom of the hull as shown rather indistinctly here -


and I wanted to make sure it couldn't hit anything when sailing.  I also wanted to provide support for the bottom of the rudder, so I added this piece to the bottom of the hull to both protect the prop and give me a place to fix a rudder support.  This is epoxied in place with a screw through from inside the hull.


I also had a go at making a rudder.  Most launches like this seem to have a piece of brass sheet soldered or glued to the rudder shaft but I didn't have any brass sheet while I did have lots of wood.  I drilled a small hole in the rudder shaft to take a short piece of thick copper wire to discourage the shaft from rotating in the blade and then epoxied it all together resulting in this rather messy first attempt.  I'll see what it looks like when profiled and painted (and yes, I did start digging the little trough for the copper wire in the wrong place!)


After this I went back to my integral water tank.  I coated the inside with epoxy and ran an epoxy/microballoon fillet around the joins to make the whole thing watertight. 


Right at the bottom you can see the end of the tube that is the water outlet leading to the pump.  At the top is one of two breather tubes so I don't end up with a vacuum in here!  Once the epoxy was dry I filled the tank and left it for a couple of hours.  Perfectly watertight.  :-)) :-))   It holds well over a litre which is more than the boiler capacity, so should be enough for an extended cruise.

Last thing for this episode is the king plank for the foredeck, which is now in place.  The square hole is for the samson post which will go down to the bottom of the hull. 


I made this nice and wide so I can fit a filler for the water tank - on which subject, does anyone know where I can get a nice brass one that would suit?  I haven't looked very hard yet, but if you know of a good one, I'd be happy to hear.

That's all for now.  Hopefully we won't get another freezing spell too soon or I'll have to risk life and limb to get anything done!

Greg


pettyofficernick

  • Full Mayhemer
  • *****
  • Offline Offline
  • Posts: 1,255
  • Marineville will be destroyed, Muahahaha.....
  • Location: Leasowe, Wirral
Re: Solent steam launch build log
« Reply #8 on: February 03, 2013, 03:01:19 pm »

Hi Greg, try one of the model engineering suppliers who do traction engines, I am sure you will find a nice brass filler cap on one of their sites. Have you thought about a coupling yet. I recall you mentioning it on Muleers thread, here is a couple of shots of the one I have just made for my African queen, basically, a Meccano disk wheel, with 2 steel roll pins, (about 20p each from a motor factors) fitted in the flywheel to line up with the holes in the disk wheel. Simple, cheap and effective.
Regards,
Nick.


Logged
What I do is best not discussed, for I have been many things in my time....

SailorGreg

  • Full Mayhemer
  • *****
  • Offline Offline
  • Posts: 1,326
  • Money talks - it says goodbye
  • Location: Hayling Island, Hants
Re: Solent steam launch build log
« Reply #9 on: February 04, 2013, 07:18:52 pm »

Thanks for that Nick - yes, I do plan a prop shaft/engine connection something like that or the one that Muleears has used (now that he seems to have fixed his annoying rattle).  On the filler cap, I have had yet another offer of help from George (ooyah2) who seems to be putting nearly as much into this boat as I am!   :-) :-)

Looking back over the thread, I notice I appear to have completely ignored Jerry's query a while back about whether I need a water tank at all, or could I just take water from the pond?  Sorry Jerry - not intentionally ignoring you.  The answer is that my likely "home waters" is a rather murky pond - it's only a couple of feet deep but you have no chance of seeing the bottom.  It collects a lot of rainwater run-off (at least it has lately!) and the associated detritus and muck.  There is also a chance I will be sailing in salt water occasionally as I live a stone's throw from the sea.  So using pond water is an unknown and possibly dodgy route, hence my incorporation of the water tank. Obviously I will have to do some experimenting with trim to get the best balance of run duration and stability when fully loaded.  Don't want the prop pointing at the sky!  :}

I am progressing quite slowly at the moment, doing lots of little bits and pieces but not really anything worth showing.  I am also being dragged away kicking and screaming to lie on a sunny beach for the next couple of weeks, so the boatyard will fall silent for a bit.  And then it's spring time!  Yippee!   :-)) :-))

Greg

pettyofficernick

  • Full Mayhemer
  • *****
  • Offline Offline
  • Posts: 1,255
  • Marineville will be destroyed, Muahahaha.....
  • Location: Leasowe, Wirral
Re: Solent steam launch build log
« Reply #10 on: February 04, 2013, 07:30:36 pm »

Our lake at New Brighton contains fresh water from the water main, so is relatively clean. I plan on using a nitro car fuel filter on the suction side of the pump to make sure no bits get into my boiler. A tank would be best if you are sailing in sea water or a very muddy pond. Salt water would cause havoc in your nice copper boiler. Have fun 'abroad', only ever been once myself, did not like it at all, too hot, too noisy and too many drunks flying about for my liking....
Logged
What I do is best not discussed, for I have been many things in my time....

SailorGreg

  • Full Mayhemer
  • *****
  • Offline Offline
  • Posts: 1,326
  • Money talks - it says goodbye
  • Location: Hayling Island, Hants
Re: Solent steam launch build log
« Reply #11 on: February 21, 2013, 06:06:52 pm »

Back from far flung places.  Gosh, it's cold here isn't it!

One thing I have found on my return is that another forum I frequent has had a major crash (while in the process of upgrading the website) and lost all of its history - many years and many hundreds of posts of some brilliant and complex models, all gone.   <:( <:( This is the site I referred to here -
I sanded the sawn face on my home-brewed thickness sander and had my finished planks ready to go. (If you are interested in the thickness sander, it is described here - http://www.modelshipworld.com/phpBB2/viewtopic.php?t=20982)
- so if any of you have any interest in my thickness sander I suggest you PM me.

Came back with a stinking cold (there's always a price for having fun) so staying in the warm for a couple of days.  Normal service will be resumed as soon as possible.

Greg

frog32

  • Shipmate
  • *
  • Offline Offline
  • Posts: 23
Re: Solent steam launch build log
« Reply #12 on: March 29, 2013, 10:03:25 pm »

Hi Greg.  Hope your cold is better and you have now got used to the cold weather.
I am missing your blog on constructing the Solent hull.  I have just received my hull and started to lay out things.  I am using the same as you, a Maccsteam boiler with a TVR1A engine. 
I have put my hull in the bath and have reached the same conclusion as you that with the boiler and engine about midships the prop shaft angle is quite steep so I am at present trying to position the engine much closer to the rear of the boiler.  I have also realised that I will have to angle the engine to give the propshaft couplings better alignment.
Hope to see your blog up and running again real soon.  I am a 'first time' boat builder so any information is of great assistance.
I am not the world's most competent computer user but maybe can persuade my whizz kid son to assist me in putting up some pictures of my own!  Regards.  Roger.
Logged

SailorGreg

  • Full Mayhemer
  • *****
  • Offline Offline
  • Posts: 1,326
  • Money talks - it says goodbye
  • Location: Hayling Island, Hants
Re: Solent steam launch build log
« Reply #13 on: March 30, 2013, 10:34:49 am »

Hi Roger, thanks for the nudge.  I am fully recovered although the temperature in the workshop doesn't seem to have improved much!  It's been a bit of two steps forward one step back with the little work I have been able to do, so not much real progress to show.  I am not going to get to the boat this weekend, but will post something next week just to prove I haven't given up completely!

Great to hear that you are embarking on the same build.  Do start a log, and we can swap information and ideas.  One thing I did discover fairly early on is that the hull is not entirely symmetrical, so making anything to fit in the hull needs careful measurement.  I found this especially tricky when putting the rudder in.  Depending on how you measure its position, you can end up with slightly different "central" positions.  This was certainly one of my "one step back" points!  I'll expand a bit more next week.

Good luck with your build.

Greg

frog32

  • Shipmate
  • *
  • Offline Offline
  • Posts: 23
Re: Solent steam launch build log
« Reply #14 on: March 30, 2013, 02:41:31 pm »

Hi Greg.  Yes, there has been a lack of progress this end too as my workshop is not much warmer than the North Pole!
I was interested to hear that you too have a non-symmetrical hull - I did wonder if I had purchased a
Gondola  hull in error!  On my hull there appears to be a discrepancy of about 8mm.  If you take a centre line through the keel and follow it down through the boat it does not converge with the centre line of the curve of the stern.  I therefore intend to instal the rudder post on the centre of the keel from underneath but not bring the rudder post up through the rear deck.  I am doing away with the tiller arm for two reasons. 1. It will not come out centre of the stern and will make planking the rear deck difficult.  2. I am going to have a rear top hatch to enable access to the rudder servo and receiver rather than removing the rear bulkhead as per drawing.
How do I post images? I know how to reduce image size but people seem to use web sites to store their images and down load them from there.  When I use E-bay I just get them from the photo library on my computer; as I said earlier computers are not my best skill!
Looking forward to next week's episode.  Roger

Logged

muleears

  • Full Mayhemer
  • *****
  • Offline Offline
  • Posts: 262
  • Location: Washington, NC USA
Re: Solent steam launch build log
« Reply #15 on: April 02, 2013, 09:33:48 am »

Frog,

Posting images is much the same as for ebay, just select the "Attachments and other options" link below the text window, then select "Browse" and go to your picture location on your computer and select the one(s) you want.  It will place the pic below your text in the text window.

Hope this helps! O0
Logged
Cal
Washington, NC USA
Proud owner of:
75% complete Krick Victoria
75% complete Billing African Queen
Krick Alexandra
Lots of building, very little steaming!

SailorGreg

  • Full Mayhemer
  • *****
  • Offline Offline
  • Posts: 1,326
  • Money talks - it says goodbye
  • Location: Hayling Island, Hants
Re: Solent steam launch build log
« Reply #16 on: April 04, 2013, 06:10:11 pm »

As promised, an update on the painfully slow progress over the last few weeks  :(( .  Just come in from the workshop through flurries of snow.  I had hoped to get some gluing done but I don't want to try it if there's a poor chance of the glue curing properly.  It is going to get warmer, right?  O0 O0

OK, first my appeal for a filler cap for my water tank.  The one below actually came out of the scrap box of a friend, and fitted the bill perfectly - talk about good luck - and good friends!  I have set it into the king plank and will plank around it when I fit the foredeck.


I had a bit of trouble deriving the shape for the rear bulkhead and ended up gluing pieces of card to a piece of ply as shown below to produce a series of points that when joined up give a pretty good shape. 


Here is the finished article.  The cutouts are for wiring from the receiver to servos and from the battery to the receiver - I plan at the moment to put the battery under a seat in the stern area and the servos will be close to the engine with rigid control rods.  At least, that's the plan at the moment!


Part of the issue with getting the shape for this part is that the hull is not symmetrical, particularly aft of amidships.  This caused some grief with fitting the rudder tube.  Naively I measured the beam where I wanted the tube to be, divided this by 2 and marked this position on the inside of the hull.  I drilled a pilot hole and then looked underneath.  The hole was nowhere near the centre of the hull as defined by the keel.  After some fruitless attempts to find some compromise I gave up and did as Roger mentions in his message above - put the rudder in line with the keel and accept that the rudder post will not appear central in the stern deck.  I had intended to fit an external tiller, but like Roger I will now abandon that and keep all the workings hidden.  Also like Roger, I plan to have a hatch in the deck rather than a removable section of the bulkhead to get to the steering servo and receiver.  I also had a bit of a slip fitting the rudder as the wood block I fixed inside the hull slipped a little unnoticed by me and ended up too far forward.  Rather than trying to dig it out, I just put another piece behind it and fitted the tube in that.  The block(s) is fixed in place with Plastic Padding Marine Filler which I have used on full size boats and is handy stuff, both for filling scratches and dinks and low-stress gluing jobs.


The next task was to fit the engine bearers into the hull.  I am going to place the engine and boiler as low as possible in the hull, so these bearers are only deep enough to get the baseplate sitting level in the hull and to take the countersunk bolts that will be set into the bearers to hold the baseplate.  Here are the bearers cut roughly to size and shape.


(A small deviation here - I said in reply to PO Nick a while ago that I intended to connect the engine to the propshaft with a "pin and wheel" arrangement.  You might spot in the photo above a conventional universal joint on the end of the propshaft.  I have decided to give this a go.  I will leave the propshaft tube floating loose until the engine is fitted and then connect the engine and propshaft with this joint.  Only then will I glue the tube in place in the hull.  I hope this will mean that alignment is, if not perfect, at least good enough!  Time will tell.)

Back to the engine bearers.  The two bearers at each end of the baseplate were then fixed to the baseplate using wing nuts.  I had hoped to find some knurled nuts for this but nobody seems to have these any more - I still hope to get them, so if anybody knows of a source of M5 knurled nuts ....?  Anyway, the baseplate with the two bearers attached looks like this from underneath -


and like this from on top -


I balked at paying the earth for a brass base so I have an aluminium one (still with the protective sheet on one side, hence the odd stripe).  I plan to fit some angle down each side to add some rigidity but don't plan to use it as a sump, so the ends will remain open.  When I get in the gluing mood, I will fix the bearers in place while attached to the baseplate.  This will allow me to check the baseplate is level in both directions and then I'll let the glue dry with the baseplate in situ.

That's about it for the moment.  A good mix of epoxy comes next to fix all the bits that are currently loose.  That should leave me with a hull that has the engine and propshaft aligned and in place and the bulkheads and rudder fitted.  Next will be the fixings for the servos and battery and mounting the boiler on the baseplate (the gas tank and oil separator are going to be mounted separately).  At that point I might even be able to raise steam to turn the propeller!

So with a fair helping of good fortune, progress will pick up a bit now!   :-)) :-)) :-))

Greg

SailorGreg

  • Full Mayhemer
  • *****
  • Offline Offline
  • Posts: 1,326
  • Money talks - it says goodbye
  • Location: Hayling Island, Hants
Re: Solent steam launch build log
« Reply #17 on: April 04, 2013, 06:25:53 pm »

Roger,

Sorry, meant to reply to your query about photo posting.  Cal (muleears) has pointed you in the right direction for attaching pictures directly.  Others use Photobucket or similar image hosting sites to put pictures up here - that is what I do (I use Photobucket).  It removes any worry about picture size and avoids issues that sometimes arise with directly attached images.  I wasn't too keen on the hassle of setting up yet another account on yet another website, but once done it is perfectly straightforward to load images onto the site, copy the address and paste that into your posting here - and lo and behold the picture appears in your message.

(There are some long "pinned" threads in the Chit Chat section here discussing photo sizing, hosting, attaching and so on.  If you have some time to spare you could dip into these, but be aware that much of the information in the earlier posts is out of date in one way or another.)

Hope that helps. 

Greg

grendel

  • Full Mayhemer
  • *****
  • Offline Offline
  • Posts: 1,948
  • Location: Canterbury, Kent, UK
Logged

grendel

  • Full Mayhemer
  • *****
  • Offline Offline
  • Posts: 1,948
  • Location: Canterbury, Kent, UK
Logged

kiwimodeller

  • Full Mayhemer
  • *****
  • Offline Offline
  • Posts: 622
  • Location: Waihi, New Zealand
Re: Solent steam launch build log
« Reply #20 on: April 05, 2013, 10:20:04 am »

Greg, If using a universal type coupling I have found that it is well worthwile making up a dummy solid coupler the same length as the universal joint to help with lining engine up to shaft while gluing the shaft and bearers in place. Also, if there is room I like to use a double universal joint but it is possible to get away with a single joint if things are tight. Cheers, Ian.
Logged

Circlip

  • Full Mayhemer
  • *****
  • Offline Offline
  • Posts: 4,444
  • Location: North of Watford, South of Hadrians wall
Re: Solent steam launch build log
« Reply #21 on: April 05, 2013, 10:58:31 am »

Don't forget, you can also put angled bearers/packers between the baseplate AND the engine baseplate to allow alignment.
 
  Regards  Ian.
Logged
You might not like what I say, but that doesn't mean I'm wrong.
 
What I said is not what you  think you heard.

SailorGreg

  • Full Mayhemer
  • *****
  • Offline Offline
  • Posts: 1,326
  • Money talks - it says goodbye
  • Location: Hayling Island, Hants
Re: Solent steam launch build log
« Reply #22 on: April 05, 2013, 11:47:52 am »

Thanks everyone for the advice.

Yes grendel, those are exactly what I want!  Not sure why I didn't think of e-bay   :embarrassed:  Order now placed!

Ian and Ian - I guess I'll have a little play with alignment and positioning of engine and prop shaft before I finally glue things in place.  I might well end up packing the engine a little to tilt it into alignment with the shaft if that looks like a good way to solve the problem.

Greg

SailorGreg

  • Full Mayhemer
  • *****
  • Offline Offline
  • Posts: 1,326
  • Money talks - it says goodbye
  • Location: Hayling Island, Hants
Re: Solent steam launch build log
« Reply #23 on: April 16, 2013, 11:38:03 am »

I have now fitted the rudder (albeit temporarily) and the rudder servo mount, and begun the framing for the access hatch in the rear deck.  I've been struggling a bit with the rear deck because of the asymmetry of the hull.  Depending on how I assess the centre line I can end up with three different centres at the stern.  In the end I decided to go with making the deck and hatch look as visibly symmetrical as I could, and ignore the fact that it didn't necessarily line up with the centre line I had used to place engine, prop shaft and rudder.  This meant doing a bit of surgery to the framing I had already installed.


I've also made a start on the framing at the front of the cockpit -


Note the knurled nut on the steam plant base - thanks grendel!

Not too much to show for a lot of thinking, measuring and changing my mind.  And now apparently the garden needs some urgent work.   >:-o >:-o   Sounds like an unwanted distraction to me, but marital harmony is a prerequisite to boat building, so here we go!

Greg

pettyofficernick

  • Full Mayhemer
  • *****
  • Offline Offline
  • Posts: 1,255
  • Marineville will be destroyed, Muahahaha.....
  • Location: Leasowe, Wirral
Re: Solent steam launch build log
« Reply #24 on: April 16, 2013, 12:51:20 pm »

Looking good Greg, must be getting near time for sea trials....
Logged
What I do is best not discussed, for I have been many things in my time....
Pages: [1] 2 3 4 5   Go Up
 

Page created in 0.102 seconds with 21 queries.