


|
I'm gonna guess that a CASE II crit bounced inward somehow and killed something or started another ammo explosion and brained someone.
|
 #
?
May 20, 2020 23:09
#
?
May 20, 2020 23:09
|
|


|

|
| # ? Apr 26, 2024 08:06 |
|
|
The Grand Kong has 12 tons of ammo, it would be safer for it to have ablative side torsos than it is to let C.A.S.E. II chain 1 point critical chances together. Oh well, the Fire Mandrills designed it and it wouldn't be a totem 'Mech without a hilarious unforseen pilot-killing flaw.
|
|
#
?
May 20, 2020 23:14
|
|


|
PoptartsNinja posted:Just a comment on my usual post-mission "Oh, last mission was a bit much, I should tone down the number of units I have to move every turn this time!" Which I say after every mission and then completely forget while planning the next one. I just got done planning a DnD session that two months ago I told myself would be a quick encounter or two maguffin check. Somehow it blossomed into a multi-branch pathing mountain adventure that also includes an enormous castle siege set-piece, for some insane reason. And that's even BEFORE players started mucking things up! DMs make bad decisions all them time, is what I'm saying
|
|
#
?
May 20, 2020 23:19
|
|


|
Rule of Cool > most everything. If it's cool, I'm probably going to do it.
|
|
#
?
May 20, 2020 23:21
|
|
|
PoptartsNinja posted:The Grand Kong has 12 tons of ammo, it would be safer for it to have ablative side torsos than it is to let C.A.S.E. II chain 1 point critical chances together. Womp womp
|
|
#
?
May 20, 2020 23:42
|
|


|
PoptartsNinja posted:The Grand Kong has 12 tons of ammo, it would be safer for it to have ablative side torsos than it is to let C.A.S.E. II chain 1 point critical chances together. Wouldn't be the Fire Mandrills if they didn't beat themselves as much as the enemy.
|
|
#
?
May 20, 2020 23:57
|
|


|
Operation: Boomslang 10 Adam steadied his Axman, and raised its arm. Taking a moment to aim for a rent in the enemy assault �Mech�s torso armor, he squeezed off a single shot with his laser. He was rewarded by a chain of detonations, as he struck one of the ape-like �Mech�s ammo bins and ruptured the C.A.S.E. shielding surrounding it. He�d been counting on it having the same flaw as the older, lighter Mandrill: with only two launchers, the vast majority of the �Mech�s internal volume could only be ammo. The big �Mech wobbled, but still didn�t move or fall�its joints had locked in place. Adam would�ve been shocked to if they recovered that pilot alive. After having so many munitions detonate right under his feet, the enemy �Mechwarrior�s brain had probably been reduced to jelly. Not the way Adam would�ve wanted to go, but at least it was relatively quick. It beat slowly roasting to death in an inferno attack. As if to punish him for his satisfaction, the Fire Mandrill Warwolf pivoted slightly and nearly took his Axman�s leg clean off with a precise shot from both of its lasers. The Wolf-designed Warwolf was one of the oldest of the new Clan �Mechs, but it�d become a mainstay in many Toumans. It was versatile, powerful, and outweighed Adam�s Axman by ten tons. It was time to find somewhere else to be. �Alright, Strikers. They�re convinced we�re after a straight brawl. It�s about time we knock out their communications. The Fire Mandrills are supposed to be pretty bad at coordinating with one another, so they�re certain to have a ��Mech Commander� giving out tactical advice.�  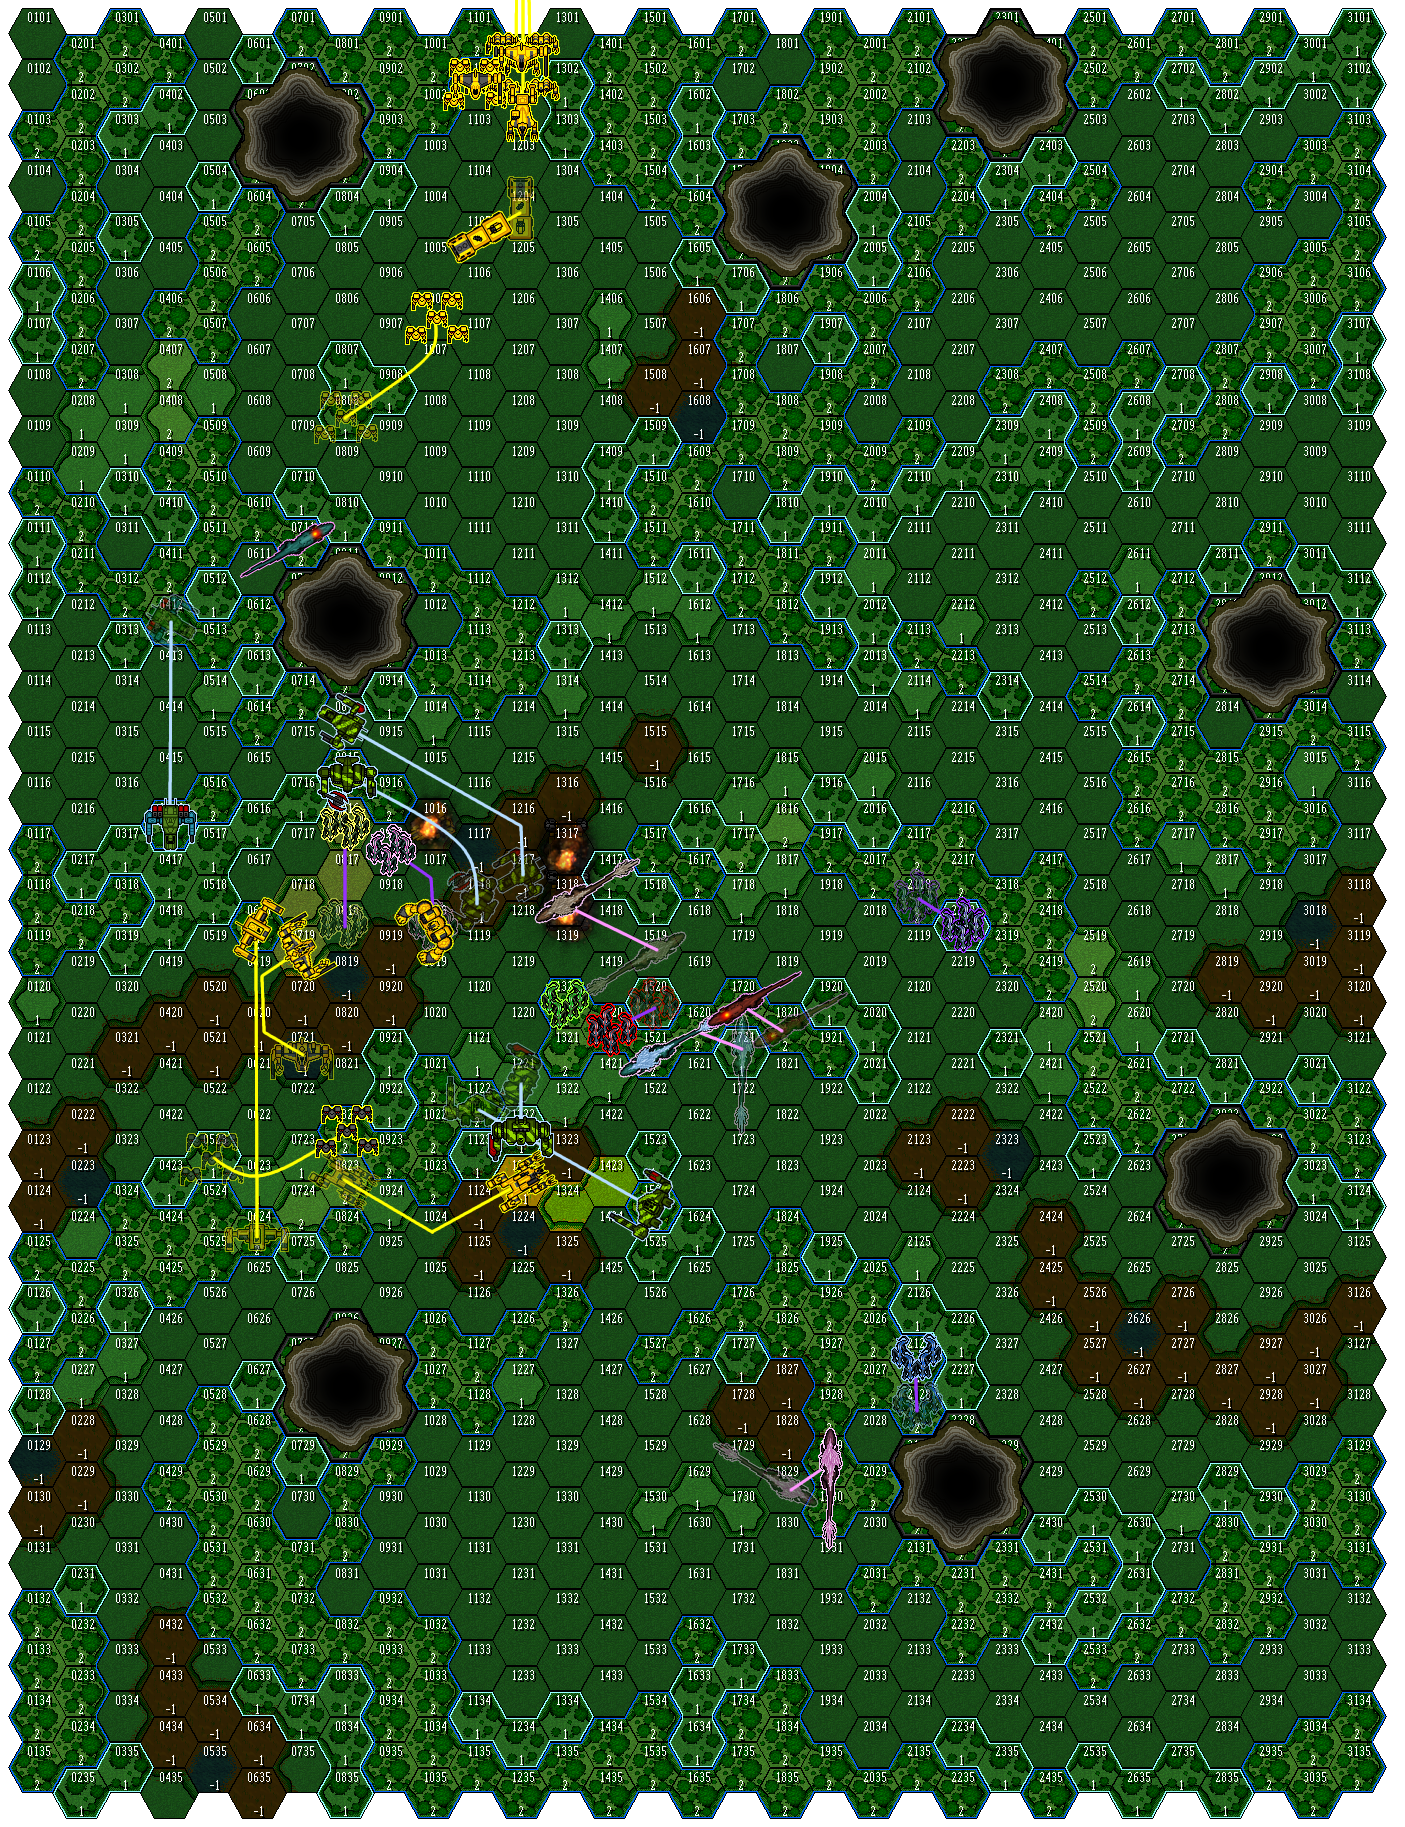  Movement Phase Scourge (Player) - Illuminates Sarath! Warwolf - Illuminates Axman! Shooting Phase Gauntlet A (Player) - Holds fire! - Gains 2 heat, sinks 12! Gauntlet B (Player) - Holds fire! - Gains 2 heat, sinks 19! Axman (Player) - Fires Small Laser at Grand Kong (3 base + 0 range + 3 movement - 4 enemy movement + 2 darkness = 4): rolled 7, hit Left Torso (0/26 armor, 12/17 structure remaining)! Crit! - Gains 9 heat, sinks 12! Scourge (Player) - Fires Heavy Gauss Rifle at Sarath (3 base + 0 range + 3 movement + 1 enemy movement + 0 illuminated target + 1 partial cover + 1 minimum range + 1 narrow profile - 1 A.E.S. = 9): rolled 6, miss! - Fires Medium Laser at Sarath (3 base + 0 range + 3 movement + 1 enemy movement + 0 illuminated target + 1 partial cover + 1 narrow profile - 1 A.E.S. - 1 laser = 7): rolled 11, hit Left Front Leg (damage blocked by terrain)! - Fires Pulse Laser at Sarath (3 base + 0 range + 3 movement + 1 enemy movement + 0 illuminated target + 1 partial cover + 1 narrow profile - 1 A.E.S. - 1 laser = 7): rolled 9, hit Right Front Leg (damage blocked by terrain)! - Fires Pulse Laser at Sarath (3 base + 0 range + 3 movement + 1 enemy movement + 0 illuminated target + 1 partial cover + 1 narrow profile - 1 A.E.S. - 1 laser = 7): rolled 9, hit Center Torso (20/23 armor remaining)! TAC! - Fires Pulse Laser at Sarath (3 base + 0 range + 3 movement + 1 enemy movement + 0 illuminated target + 1 partial cover + 1 narrow profile - 1 A.E.S. - 1 laser = 7): rolled 11, hit Left Front Leg (damage blocked by terrain)! - Fires Pulse Laser at Sarath (3 base + 0 range + 3 movement + 1 enemy movement + 0 illuminated target + 1 partial cover + 1 narrow profile - 1 A.E.S. - 1 laser = 7): rolled 5, miss! - Gains 24 heat, sinks 15! Overheating! G�tterd�mmerung (Player) - Fires Small Laser at Sarath (3 base + 0 range + 1 movement + 1 enemy movement + 0 illuminated target + 1 narrow profile - 1 laser = 5): rolled 10, hit Left Rear Leg (19/24 armor remaining)! - Fires Small Laser at Sarath (3 base + 0 range + 1 movement + 1 enemy movement + 0 illuminated target + 1 narrow profile - 1 laser = 5): rolled 7, hit Right Torso (13/18 armor remaining)! - Fires LRM-4 (Hotshot) at Sarath (3 base + 0 range + 1 movement + 1 enemy movement + 0 illuminated target + 1 narrow profile = 6): rolled 8 with a cluster roll of (8 + 2 = 10): 3 missiles hit Left Rear Leg (14/24 armor remaining), Right Rear Leg (19/24 armor remaining), Center Torso (15/23 armor remaining)! - Gains 16 heat, sinks 14! Overheating! Arctic Wolf Prime - Fires ATM-3 (MR) at Axman (3 base + 0 range + 3 movement + 2 enemy movement + 0 illuminated target + 2 woods = 10): rolled 4, miss! - Fires ATM-3 (MR) at Axman (3 base + 0 range + 3 movement + 2 enemy movement + 0 illuminated target + 2 woods = 10): rolled 2, miss! - Fires ATM-3 (MR) at Axman (3 base + 0 range + 3 movement + 2 enemy movement + 0 illuminated target + 2 woods = 10): rolled 4, miss! - Fires ATM-3 (MR) at Axman (3 base + 0 range + 3 movement + 2 enemy movement + 0 illuminated target + 2 woods = 10): rolled 4, miss! - Gains 14 heat, sinks 15! Sarath Prime - Fires Heavy PPC at Scourge (3 base + 0 range + 3 movement + 2 enemy movement + 0 illuminated target + 2 woods + 2 minimum range = 12): rolled 6, miss! - Fires Medium Heavy Laser at Scourge (3 base + 0 range + 3 movement + 2 enemy movement + 0 illuminated target + 2 woods - 1 laser = 9): rolled 7, miss! - Fires Medium Heavy Laser at Scourge (3 base + 0 range + 3 movement + 2 enemy movement + 0 illuminated target + 2 woods - 1 laser = 9): rolled 12, hit Left Torso (12/22 armor remaining)! - Gains 26 heat, sinks 22! Overheating! Warwolf C - Fires Large Heavy Laser at Axman (3 base + 0 range + 2 movement + 2 enemy movement + 0 illuminated target + 2 woods - 1 laser = 8): rolled 12, hit Left Leg (8/24 armor remaining)! - Fires Large Heavy Laser at Axman (3 base + 0 range + 2 movement + 2 enemy movement + 0 illuminated target + 2 woods - 1 laser = 8): rolled 11, hit Left Leg (0/24 armor, 7/15 structure remaining)! Crit! - Gains 22 heat, sinks 25! Grand Kong - Pilot unconscious - Gains 0 heat, sinks 18! Drummer Mobile HQ - Holds fire! Rabid Point #1 - Holds fire! Rabid Point #2 - Holds fire! Jaguar - Holds fire! - Gains 2 heat, sinks 10! Wulfen Prime - Holds fire! - Gains 2 heat, sinks 10! Wulfen D - Holds fire! - Gains 2 heat, sinks 10! Rabid Point #3 Warg Point - Holds fire End Phase: Grand Kong - Critical chance in Left Torso: rolled 12, 3 critical hits sustained! - - ATM-12 Ammo (HE) hit! Ammo explosion, 2x Pilot hits! Pilot killed! - - ATM-12 damaged! - - ATM-12 Ammo (MR) hit! Ammo explosion, 2x Pilot hits! - Grand Kong suffers 1 damage in an ammunition explosion to Left Torso (11/17 structure remaining)! Crit! - Grand Kong suffers 1 damage in an ammunition explosion to Left Torso (10/17 structure remaining)! Crit! - Critical chance in Left Torso: rolled 6, no critical hits sustained! - Critical chance in Left Torso: rolled 8, 1 critical hit sustained! - - ATM-12 Ammo (MR) hit! Ammo explosion, 2x Pilot hits! - Grand Kong suffers 1 damage in an ammunition explosion to Left Torso (9/17 structure remaining)! Crit! - Critical chance in Left Torso: rolled 9, critical hits sustained! - - ATM-12 Ammo (ER) hit! Ammo explosion, 2x Pilot hits! - Grand Kong suffers 1 damage in an ammunition explosion to Left Torso (8/17 structure remaining)! Crit! - - ATM-12 destroyed! Sarath - Through-armor critical chance in Center Torso: rolled 10, 2 critical hits sustained! - - XL engine hit! - - - - Gains 26 heat, sinks 19! Overheating! - - Gyro hit! - Must pass a piloting test or fall (4 base + 1 gyro damage - 2 quad = 3): rolled 6, succeeds! Axman (Player) - Critical chance in Left Leg: rolled 5, no critical hits sustained! - Must pass a guts test to avoid forced withdrawal (5 base + 0 armor breached + 0 critical damage = 5): rolled 7, succeeds!  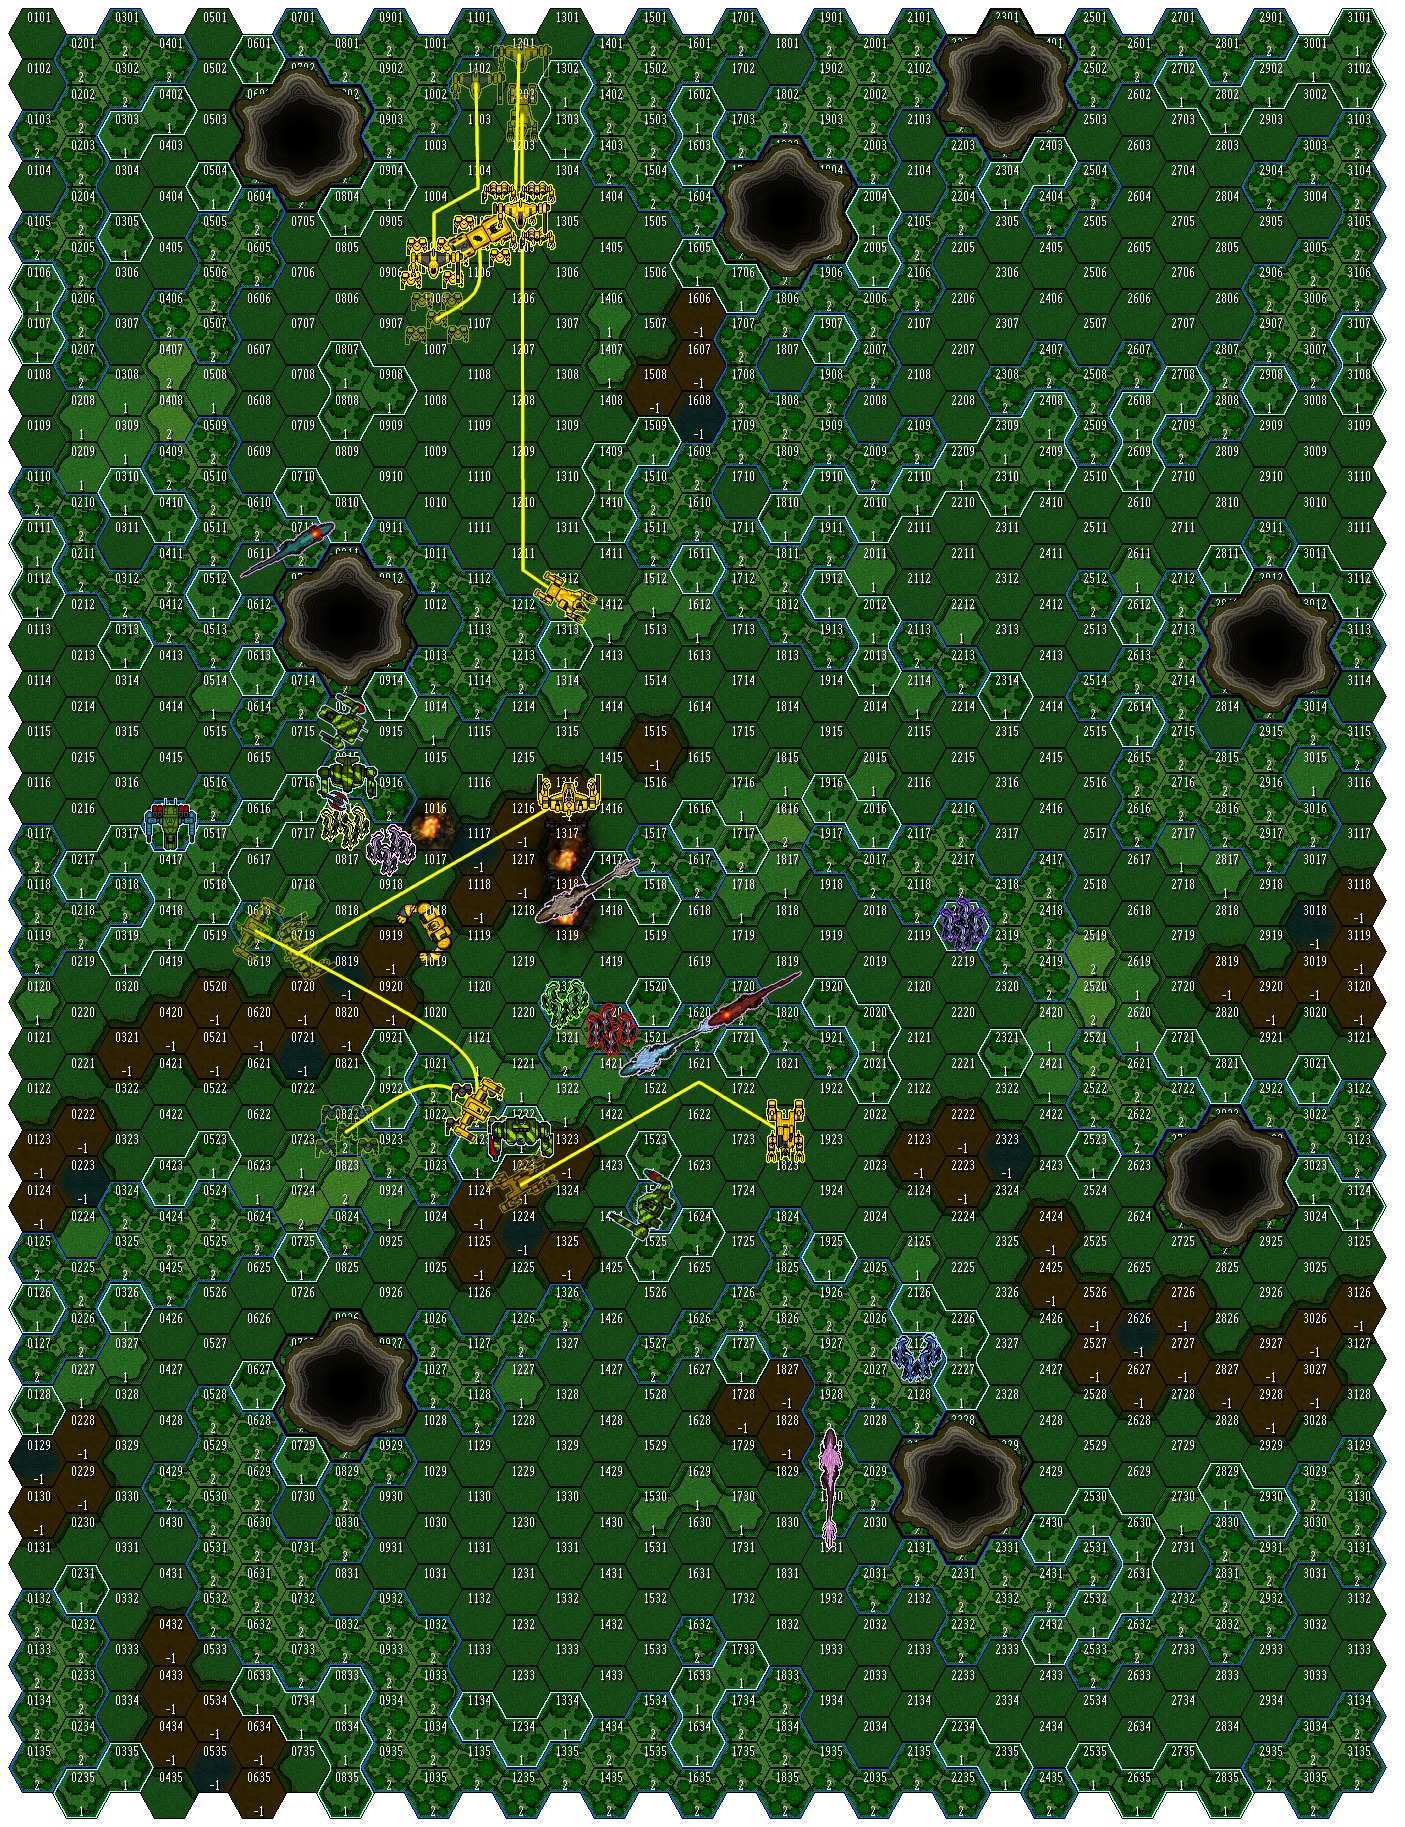 Map Link Player Status: 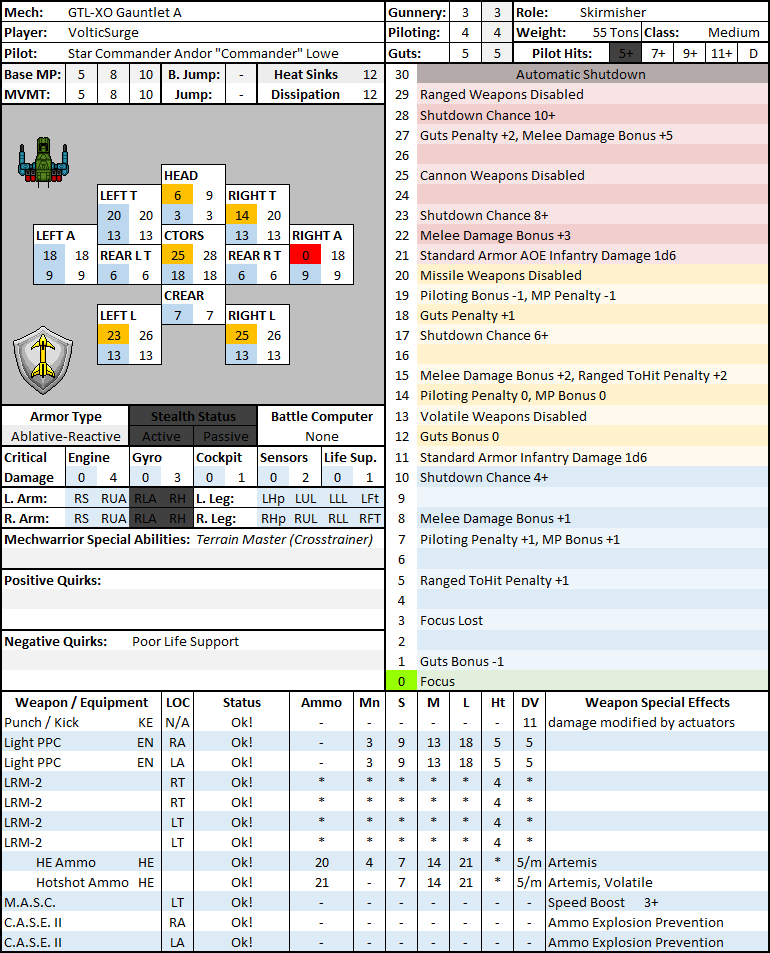 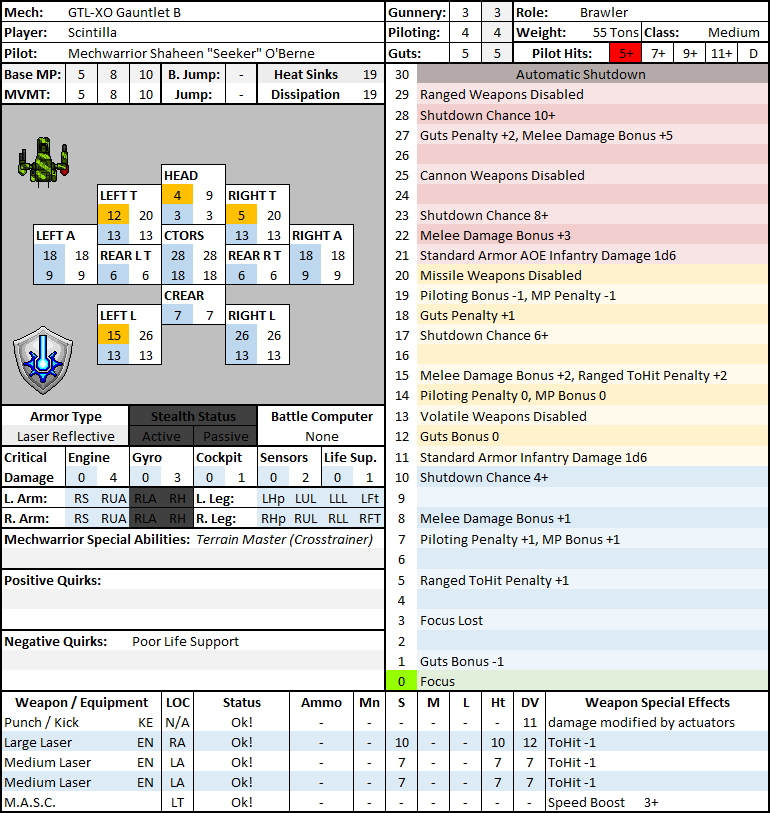 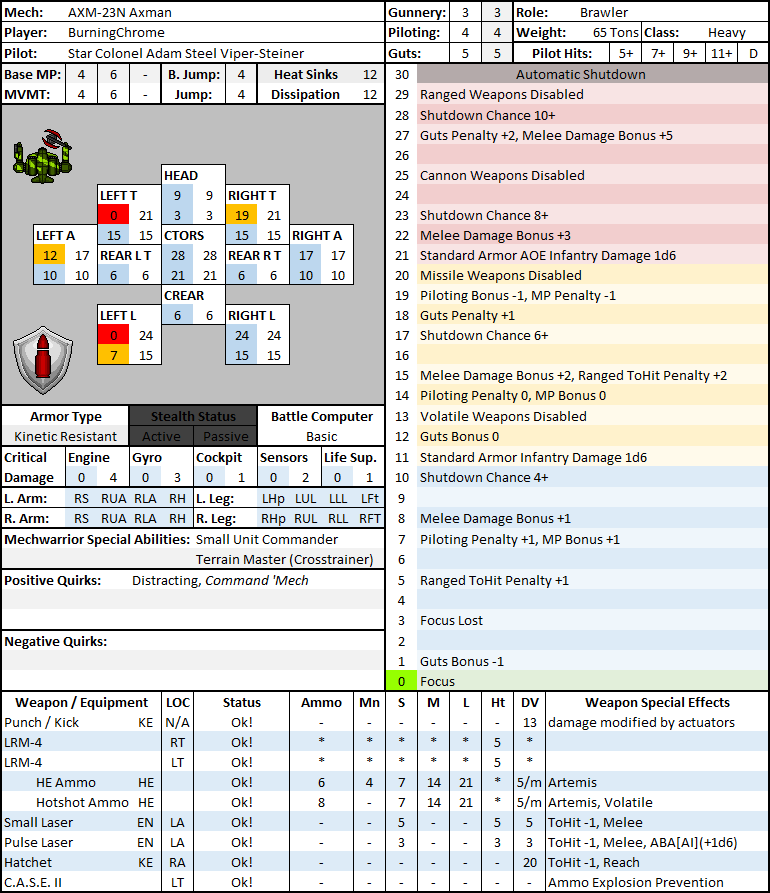 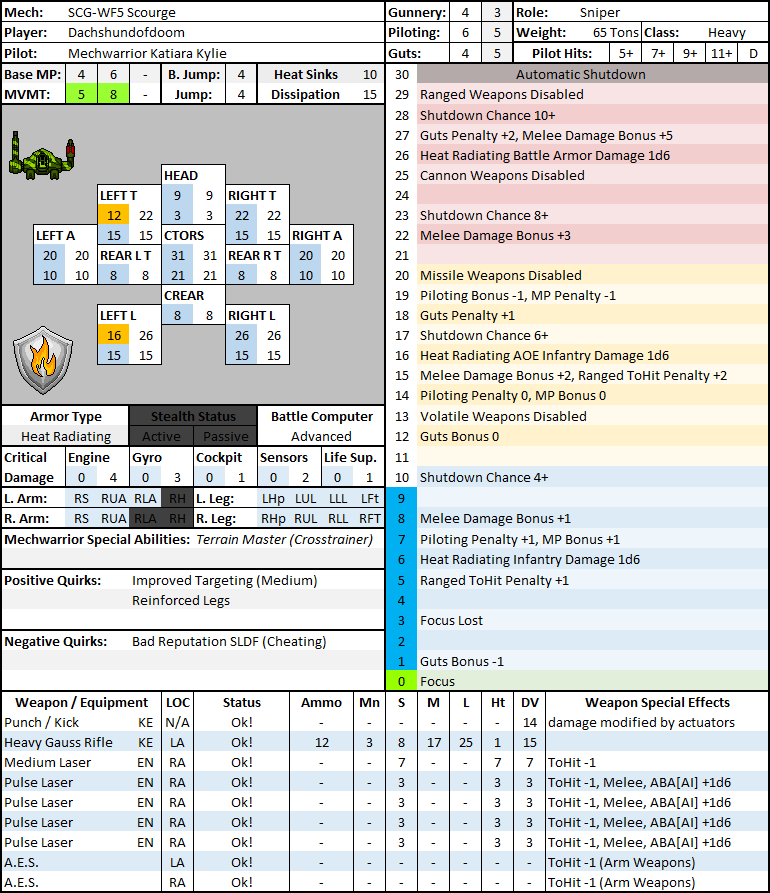 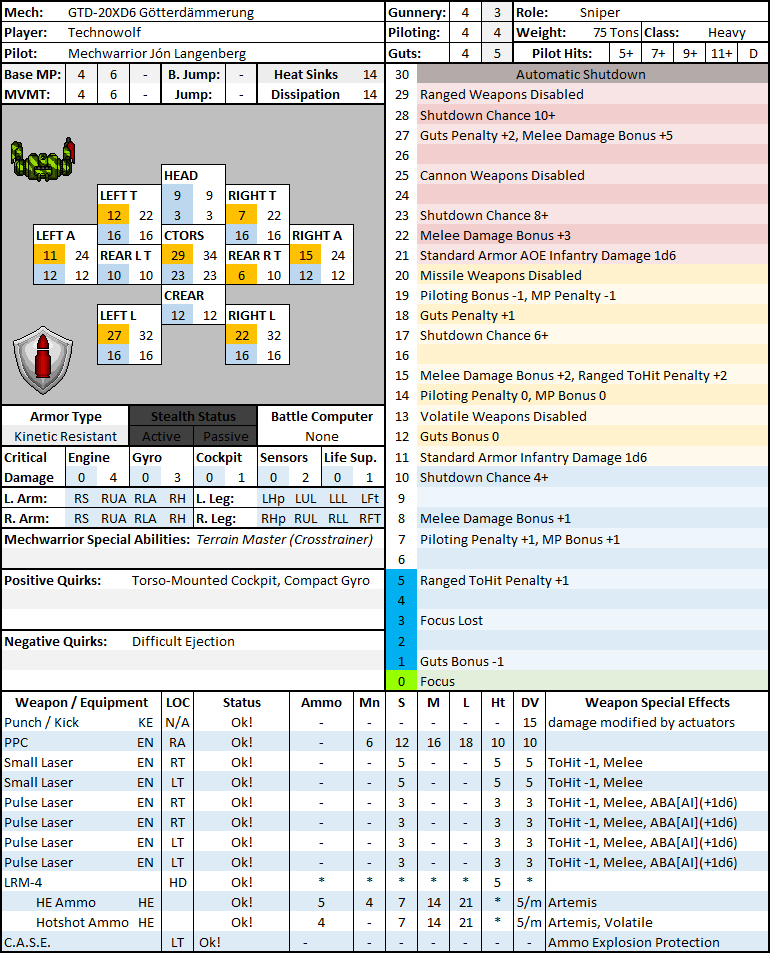 OpForce Status:  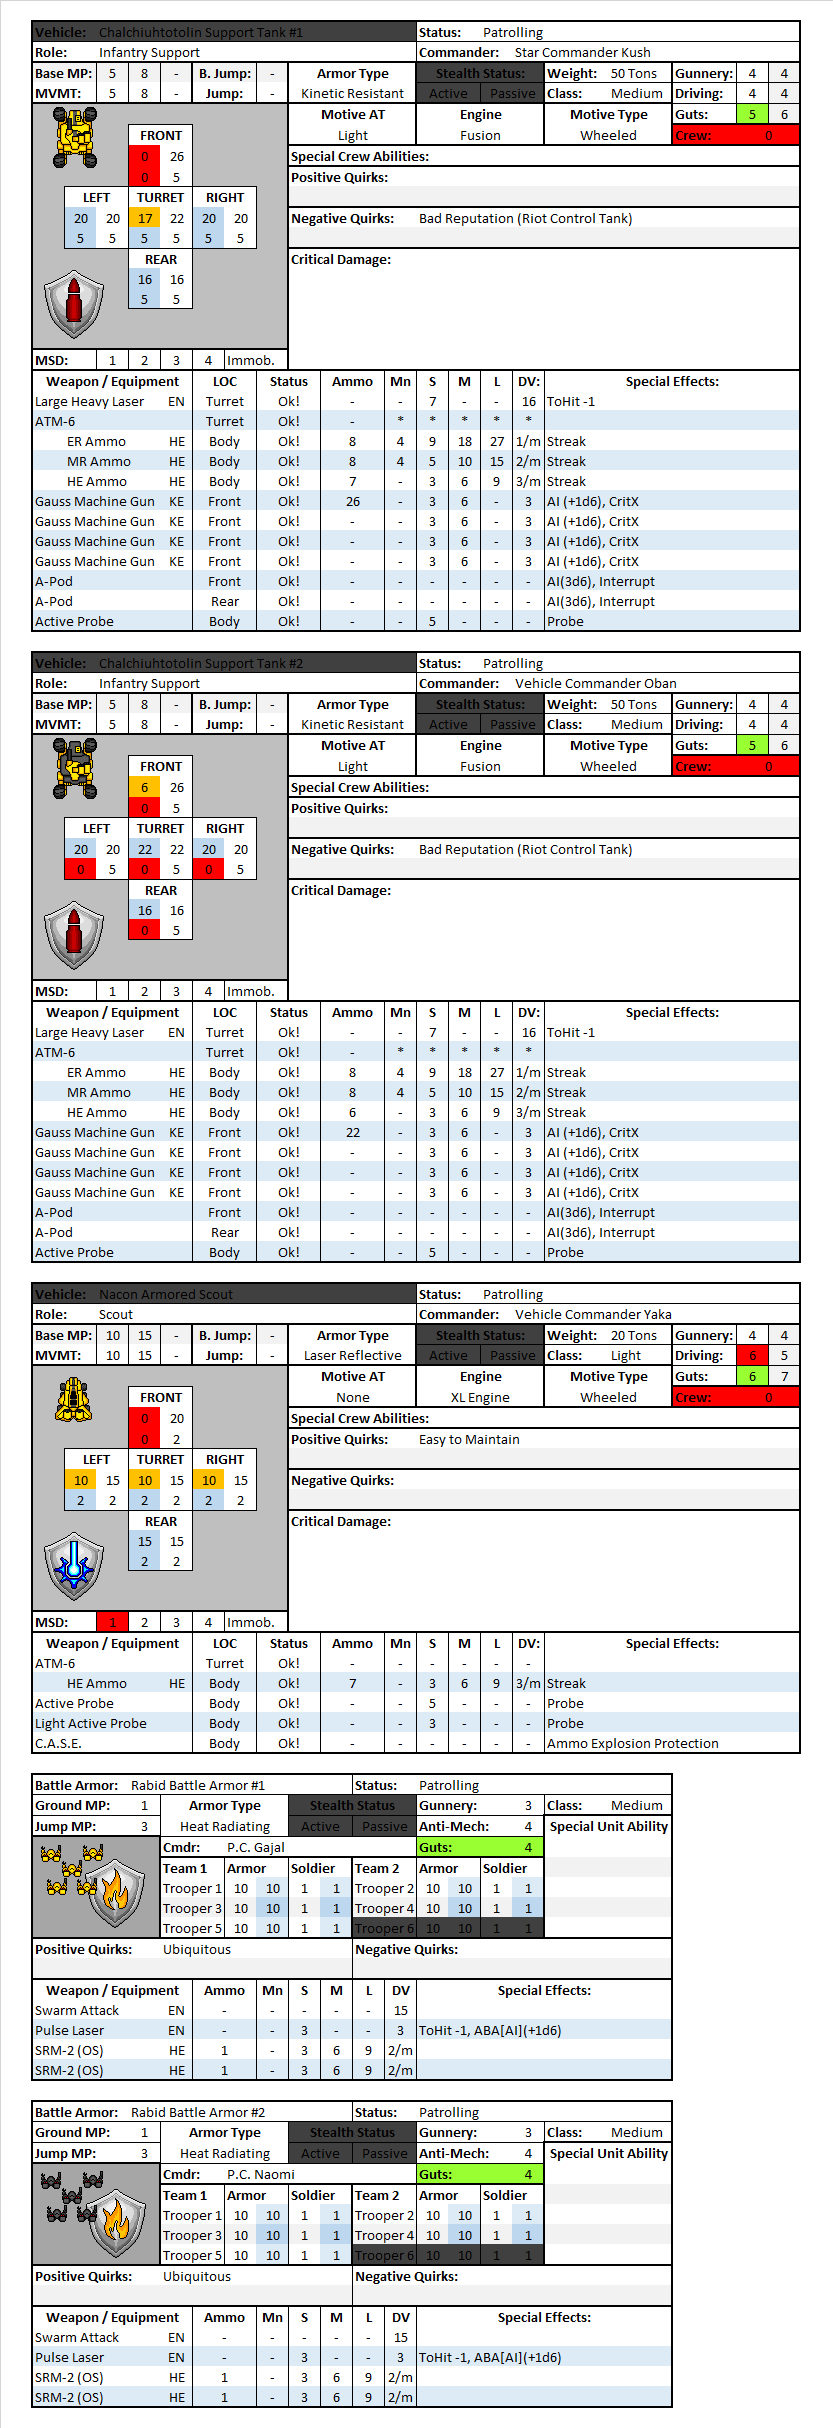 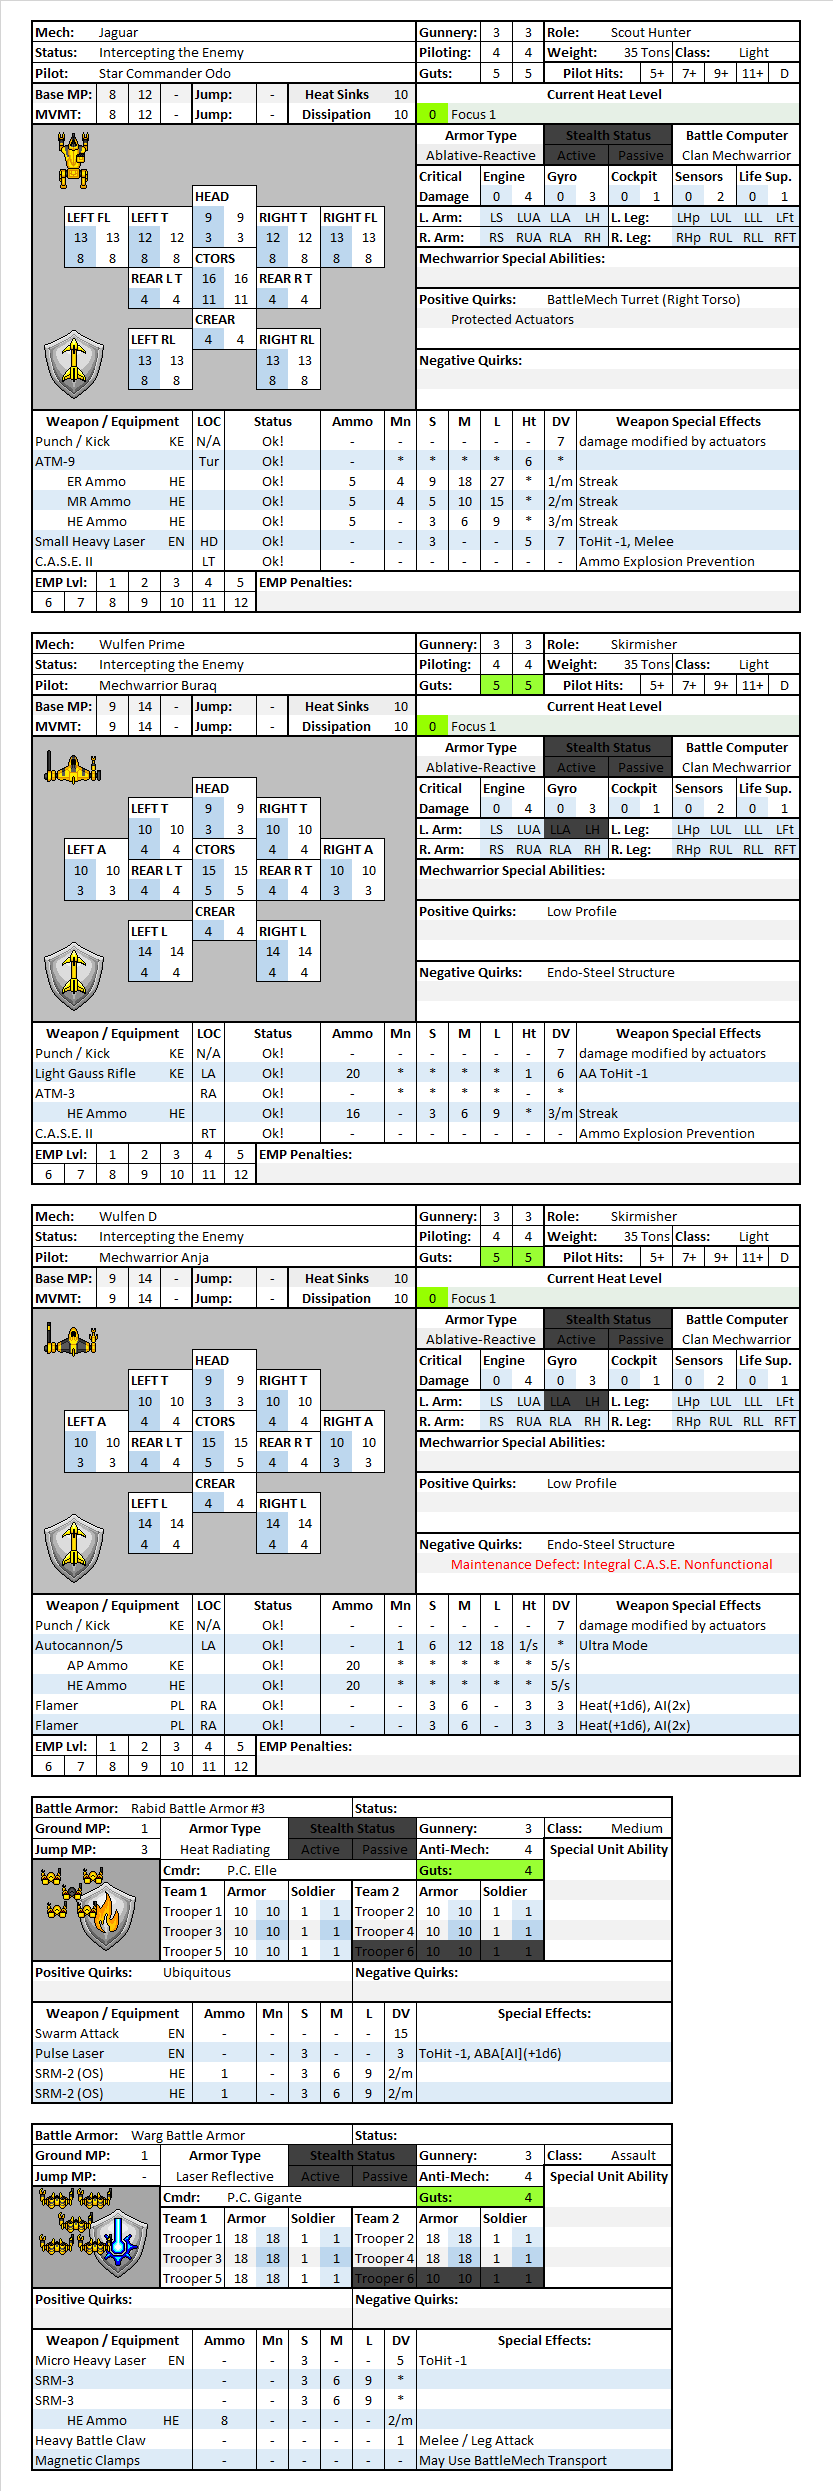 Critter Status:   Primary Objectives - Destroy or Capture Clan Mobile HQ Vehicle (0/1) Secondary Objectives - Destroy or Drive Off Clan HQ Star (1/4) - Destroy or Drive Off Clan Garrison Forces (3/5) - Destroy or Drive Off Clan Reinforcements (0/5) Special Rules Night Fighting � All units suffer a +2 penalty ToHit with ranged attacks. For every 10 points of heat the target suffers, reduce the attacker receives a -1 bonus ToHit (to a maximum of -2). Searchlights � All �Mech units and vehicles are equipped with searchlights, for BattleMech units the searchlight is front-mounted while tanks mount their searchlight in the turret. A unit may illuminate any single hex in line of sight (controller�s choice) within 30 hexes, revealing units in that hex and in all units (friendly or enemy) in intervening hexes. Attacks against illuminated units do not suffer the +2 penalty ToHit for Night Fighting. Attacks against a unit with an active searchlight do not suffer the +2 penalty ToHit for Night Fighting if the attack is in the same arc as the searchlight (for player units: this means attacks from the front). Units may turn their searchlight on or off at will during the movement phase. SPA: Small Unit Commander � A Small Unit Commander�s �Mech counts as a Command BattleMech regardless of the chassis other quirks, granting all units under their direct command any applicable SPA. TLDR: As long as Adam Steel Viper-Steiner is alive every player unit gets the next SPA. SPA: Terrain Master (Crosstrainer) � A unit with the Crosstrainer terrain mastery reduces the ground MP cost for entering any hex by 1 regardless of terrain type. All hexes still cost a minimum of 1 MP to enter, and costs incurred while within a hex (turning, standing up, etc.) remain unchanged. They�re chewing on the sensors! � A unit swarmed by Viper Lizards takes no damage, but suffers a +2 penalty ToHit as long as the Viper Lizards remain attached. Orders Due: Any Time On Saturday!
|
|
#
?
May 21, 2020 00:08
|
|
|

|
|
#
?
May 21, 2020 00:18
|
|


|
Axman might want to stick to sniping with the LRMs for now. Lose that leg and you're done, so I'd see if partial cover can be as helpful to you as it was the enemy.
|
|
#
?
May 21, 2020 00:29
|
|
|
Lesee... who do I try to target (if anybody's in range and I'm in movement range)? That Kong being dead means I have one less thing to shoot at.
|
|
#
?
May 21, 2020 00:45
|
|


|
 Was the Grand Kong designed by Jellicoe or something? There seems to be something wrong with their bloody 'Mechs today.
|
|
#
?
May 21, 2020 00:46
|
|

|
PoptartsNinja posted:�Alright, Strikers. They�re convinced we�re after a straight brawl. It�s about time we knock out their communications. The Fire Mandrills are supposed to be pretty bad at coordinating with one another, so they�re certain to have a ��Mech Commander� giving out tactical advice.� ")
|
|
#
?
May 21, 2020 00:56
|
|

|
Paingod556 posted:
please, let's blame Beatty when Beatty deserves the blame (it was his quote and also his mistakes that led to the reason for the quotes, imo)
|
|
#
?
May 21, 2020 01:09
|
|

|
Paingod556 posted:
In my tabletop group we went up against a very dragon heavy kurita company that had about 6 dragons go up to ammo explosions. That line was used a lot.
|
|
#
?
May 21, 2020 01:17
|
|
|
Leith Maclaine posted:In my tabletop group we went up against a very dragon heavy kurita company that had about 6 dragons go up to ammo explosions. That line was used a lot. Thankfully the Dragon II keeps this flaw. It has CASE II and a torso with nothing but Arrow ammo.
|
|
#
?
May 21, 2020 01:26
|
|

|
Look if the Dragon was GOOD it wouldn't really be a Dragon anymore.
|
|
#
?
May 21, 2020 01:56
|
|
|
The Ryujo is usable and the Hiryu's pretty solid for what it does (letting young idiot samurai believe they're actually contributing to a fight when the real goal is to keep them from being shot at). But you're right, they're not really 'Dragons' at that point.
|
|
#
?
May 21, 2020 02:05
|
|
|
PoptartsNinja posted:I think this is the first time I've ever seen a situation where old C.A.S.E. would be superior to C.A.S.E. II. oh my gosh. Also, my suggestion is - case that segregates the hit locations to the top or bottom of the chart would be neat. Because battletech, loosely, uses a d6 to determine if acrit is the top 6 slots or the bottom 6, right? A case version that puts up a barrier between the top and bottom halves and contains the blast within a portion of the hit location would be super neat. TheParadigm fucked around with this message at 02:14 on May 21, 2020 |
|
#
?
May 21, 2020 02:08
|
|


|
TheParadigm posted:oh my gosh. Case III vents explosion damage into all surrounding hexes
|
|
#
?
May 21, 2020 02:16
|
|


|
That would allow for reuseable good doggies once the dirty, broken, cobbled together remnants of NRWR pick themselves back up, 20 tons of machinegun ammo and all the love in the world.
|
|
#
?
May 21, 2020 02:22
|
|
|
CASE III turns out to be faulty, directing all ammo explosion damage directly to the head.
|
|
#
?
May 21, 2020 02:32
|
|


|
Critical hits are the popcorn moment for me, and this mission delivers. This is right up there with MASC ejecting your legs immediately. And it just was a tiny blip of a laser that started that whole thing, too!
|
|
#
?
May 21, 2020 03:57
|
|

")


|
CASE 3 replaces your ammo bins with infantry manually loading new rounds from the wagons attached to their bikes into the muzzles of your guns
|
|
#
?
May 21, 2020 04:03
|
|
|
Not sure where to go. I think I can get to 1022 and fire at the either the Arctic Wolf's open left side (on 11s) or the battle armor on 7s. 1522 gives me shots at the Sarath on 7s. Thoughts?
|
|
#
?
May 21, 2020 04:12
|
|
|
Defiance Industries posted:Axman might want to stick to sniping with the LRMs for now. Lose that leg and you're done, so I'd see if partial cover can be as helpful to you as it was the enemy. Seems like a good idea, is partial cover just standing behind something at a higher elevation? Not particularly sure what I should be targeting now. Would like to help deal with the arctic wolf and sarath hassling the long range mechs before the reinforcements can get into range but not sure I can get shots.
|
|
#
?
May 21, 2020 04:13
|
|

|
Yeah, partial cover is when you shoot from behind a 1-height hill.
|
|
#
?
May 21, 2020 04:26
|
|
|
This was a good turn for tiny lasers. Axman turned the GK pilot into jelly with an SL and I double-TAC'd the Sarath in the gyro and engine with a pulse laser. Feels good. As for movement, I see two possibilities. I can take advantage of my heat scale bumping me up to a 5/8 and run to 1121, where I have an opportunity to shoot the Warwolf in the back and go for a lucky crit. I'll get attacked by the Battle Armor if I do that, though. Alternatively, I can just jump to 1824 and continue pestering the Sarath from the safety of heavy woods, but I kinda feel like I would be dragging myself farther and farther out of position just to torture one bullet sponge quad.
|
|
#
?
May 21, 2020 05:44
|
|

|
Not really seeing any good places I can move to in order to potshot the Warwolf or Arctic Wolf, so I might just start moving up towards the HQ. Open to suggestions, though.
|
|
#
?
May 21, 2020 06:44
|
|
|
The Warwolf is a tempting target. It's in a position where a majority of us can shoot it in the back, and taking out those Heavy Lasers will significantly reduce the OpFor's firepower. On the other hand it'll be tricky to hit without giving the Arctic Wolf / Battle Armour / Megasaurs a chance to hit us back. If the rest of you guys are comfortable taking that gamble I'll head to 1317, light the fucker up with my searchlight and blast it with everything I have. My weapons won't do much damage but it'll run down that rear armour a little bit and hopefully help the Gauss / LRM shots penetrate.
|
|
#
?
May 21, 2020 11:36
|
|

|
As long as you can cause more damage to the enemy than you recieve in return, it is a good trade.
|
|
#
?
May 21, 2020 15:47
|
|
|
Radio Free Kobold posted:As long as you can cause more damage to the enemy than you recieve in return, it is a good trade. This isn't always true, especially if the enemy has more capacity to soak up damage.
|
|
#
?
May 21, 2020 16:31
|
|


|
Scintilla posted:The Warwolf is a tempting target. It's in a position where a majority of us can shoot it in the back, and taking out those Heavy Lasers will significantly reduce the OpFor's firepower. On the other hand it'll be tricky to hit without giving the Arctic Wolf / Battle Armour / Megasaurs a chance to hit us back. If the rest of you guys are comfortable taking that gamble I'll head to 1317, light the fucker up with my searchlight and blast it with everything I have. My weapons won't do much damage but it'll run down that rear armour a little bit and hopefully help the Gauss / LRM shots penetrate. I'd join you, but that would open me up to a lot of back shots, and my back armor isn't the best. Also, to reiterate: Technowolf posted:Not sure where to go.
|
|
#
?
May 21, 2020 19:55
|
|
|
Technowolf posted:I'd join you, but that would open me up to a lot of back shots, and my back armor isn't the best. Fair enough, it is a pretty risky move. In that case I'd suggest engaging the Battle Armour in melee. Your kick is guaranteed to kill a single trooper and your lasers gain an extra -1 hit bonus if you use them in the melee phase. VolticSurge posted:Not really seeing any good places I can move to in order to potshot the Warwolf or Arctic Wolf, so I might just start moving up towards the HQ. Open to suggestions, though. There are actually a few places you can go to get shots on the Warwolf. Walking down to  0420 will give you a decent shot at it with your LRMs without letting it or any other hostile unit return fire. I'd advise against targeting the HQ while it's still swarming with enemy Mechs and Battle Armour. 0420 will give you a decent shot at it with your LRMs without letting it or any other hostile unit return fire. I'd advise against targeting the HQ while it's still swarming with enemy Mechs and Battle Armour.
|
|
#
?
May 21, 2020 20:32
|
|
|
Just so I'm clear, is the brown stuff at -1 mud or water? I don't want to accidentally immobilize myself by moving into it with an open leg. If it isn't water, I think maybe jumping to 0919 would let me get backshots on the warwolf without taking any fire from the stuff down south?
|
|
#
?
May 21, 2020 20:35
|
|
|
Flooding just disables anything in a section, but that's clear terrain. I just wanted to make the -1 hexes more visually interesting.
|
|
#
?
May 21, 2020 21:24
|
|
|
Scintilla posted:There are actually a few places you can go to get shots on the Warwolf. Walking down to Sounds like a plan to me!
|
|
#
?
May 21, 2020 22:09
|
|
|
Grizzwold posted:Just so I'm clear, is the brown stuff at -1 mud or water? I don't want to accidentally immobilize myself by moving into it with an open leg. If it isn't water, I think maybe jumping to 0919 would let me get backshots on the warwolf without taking any fire from the stuff down south? It's possible that I'm misremembering my firing arcs, but I think the Warwolf and Arctic Fox can hit you with their left arm / torso weapons from 0919. You'll definitely have Partial Cover from the Warwolf, but I'm not so sure about the Arctic Fox. The Battle Armour can also shoot you with their SRMs. I'm also not sure you can hit the Warwolf in the back from there - I seem to recall that the rear hit zones for Battlemechs are pretty tight. A different plan could be to jump to 0417. That'll put you firmly out of range of everything hostile while still being able to snipe the Warwolf with LRMs. It definitely won't be backshots, but damage is damage. As for me, I'm now considering popping MASC and running to 0518 and shooting the Warwolf. Again, it won't be backshots, but it's much safer than 1317.
|
|
#
?
May 23, 2020 13:05
|
|
|
Scintilla posted:It's possible that I'm misremembering my firing arcs, but I think the Warwolf and Arctic Fox can hit you with their left arm / torso weapons from 0919. You'll definitely have Partial Cover from the Warwolf, but I'm not so sure about the Arctic Fox. The Battle Armour can also shoot you with their SRMs. I'm also not sure you can hit the Warwolf in the back from there - I seem to recall that the rear hit zones for Battlemechs are pretty tight. My math might be off by a bit but I think my LRMs would have to hit at 11+ from 0417, and I don't have a whole lot of ammo for those. e; forgot my jump range. nvm. Grizzwold fucked around with this message at 02:59 on May 24, 2020 |
|
#
?
May 24, 2020 02:56
|
|
|
Alright, sounds like we're at a consensus on dogpiling the Warwolf, so I'm headed to 1121. Hopefully the battle armor won't blow my leg off, but that's a risk I'm willing to take.
|
|
#
?
May 24, 2020 03:42
|
|
|

|
| # ? Apr 26, 2024 08:06 |
|
|
Orders in. I've decided to head to 1317 after all. I'm using my searchlight so no one else has to risk themselves.
Scintilla fucked around with this message at 12:23 on May 24, 2020 |
|
#
?
May 24, 2020 12:21
|
|