
LS1 and 200-4r to L92 / T56 in 71 Chevelle convertible...now Gen V LT1 6L80e swapping


 08-02-2016, 07:06 PM
#582
You mean to fix the overlap of the pedals? If I cut what I have down it'd be more narrow than I'd like, if I cut it and just move it over and weld it back on it'll be more or less like a pedal from a 4 speed. Shouldn't be too bad. Need to get the DBW pedal position figured out first I guess. If I can get out of Dayton early enough on Friday I should be able to get the motor back in and some of this figured out on Saturday (I hope).
08-07-2016, 08:46 PM
#583
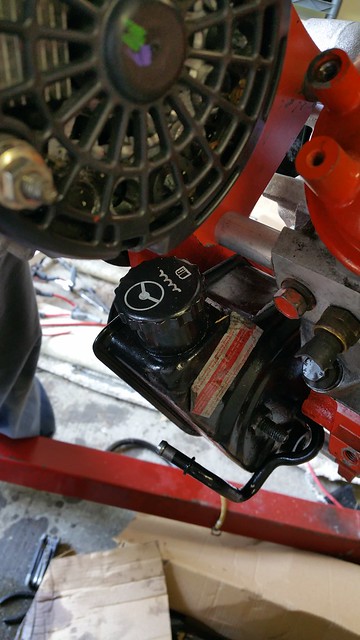
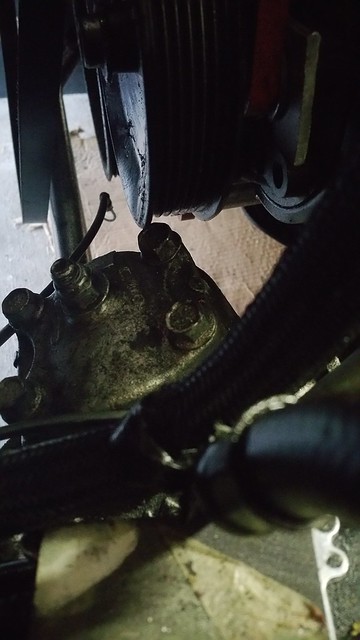
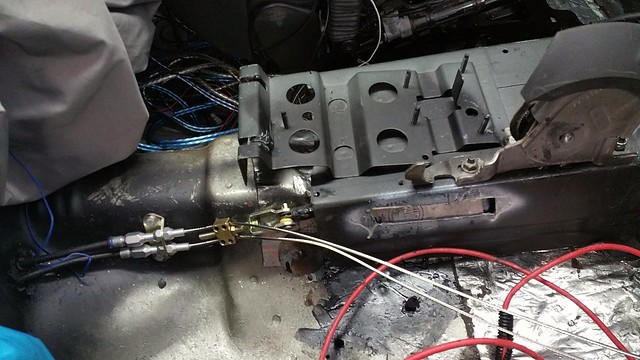
These pictures aren't going to be the best but if enlarged you can at least see the routing of some things and the pieces used w/ regards to hydroboost stuff.
For the high pressure booster to steering gear I used the line that was already in the car, I think it came with the first LQ9 I bought.
For the pump to the booster I used one of the lines mentioned before in an earlier post, I'll get the part number next time I'm in the garage.
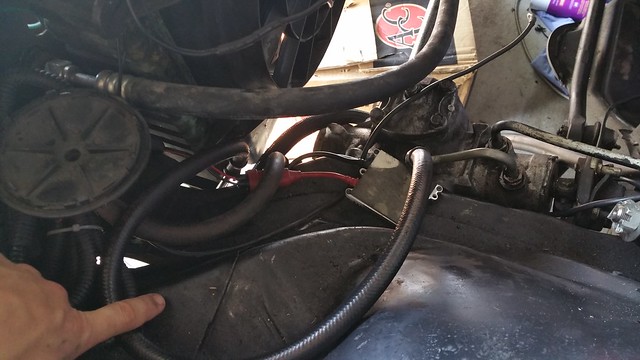
The low pressure from the gearbox goes to the cooler I got off an express van or similar, and the low pressure from the booster goes to the reservoir.
The res and post-cooler line are T'ed in together, then they feed back into the pump return. In other words it's what the picture in the link on the page 29 shows.
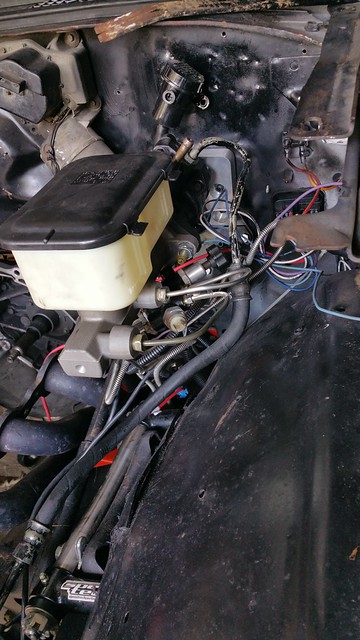
The res is under where my hand is and the cooler is where my finger is sort of pointing, more or less the same place as it was in the van.
The reservoir has a huge outlet side, just mentioning that since it will take an adapter or something to step it down to the size of the rest of the hoses.
I used a 1/2 inch version of this fitting from Lowe's, it was maybe two bucks or so.

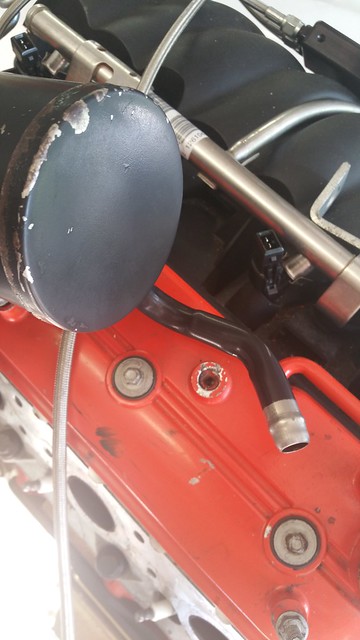
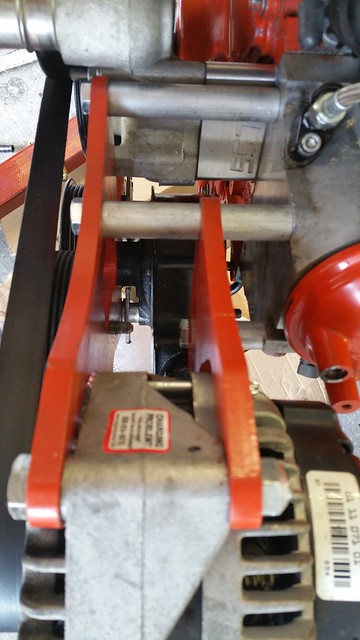
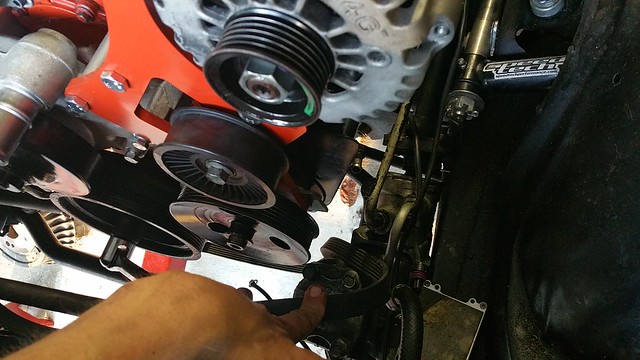
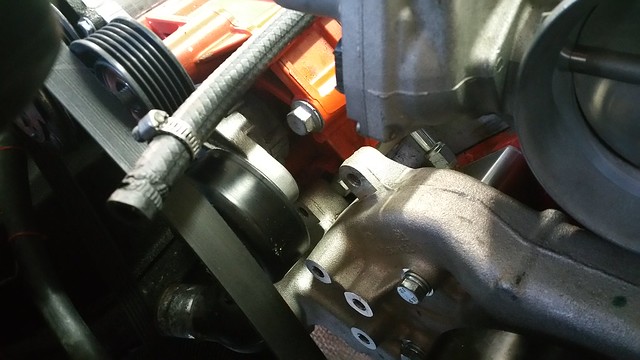
With that out of the way I turned to dressing the engine and assembling the Speed Engineering bracket. Now that it's together the bracket is okay, but if you have put a smaller pulley on your pump for clearance reasons I'd steer clear, as the bolts are super hard to get to. Also, since the jabronis at SE can't be bothered to make instructions to go with the bracket, I'll suggest starting with the bottom of the smaller piece and going from there. Or just try and get a different company's bracket and save yourself the headache (as long as they sell $140 fuel rail bolts and similar I hate to recommend Holley stuff too much, but their solid bracket is way better than any of these other bucket o' bolts brackets IMO).
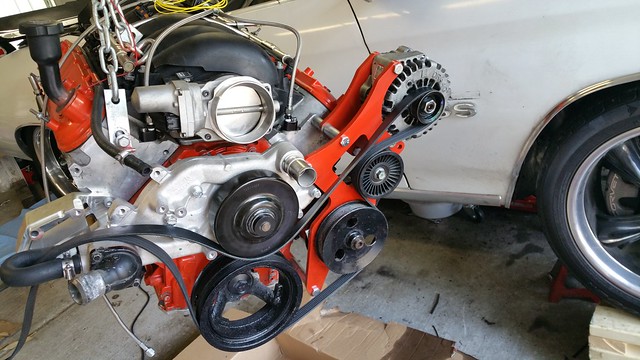
This is where the PS and alt end up.
In order to clear the steering gear with my old setup I had to push the pulley on a bit farther than normal, this means I needed to shim the pump back a bit (I lost my puller so couldn't pull it back out). Not a huge deal either way, though as mentioned before the bolts were not easy to reach.
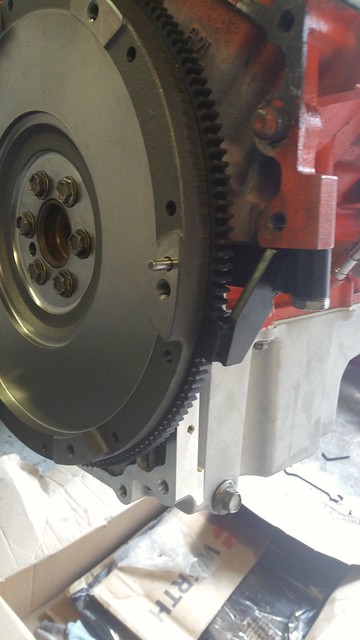
Messing with that bracket took way longer than I thought so I didn't get the motor in, which sucks, but I did go ahead and slap the flywheel on. Not sure what this tool is called but it's well worth the $20 it cost.
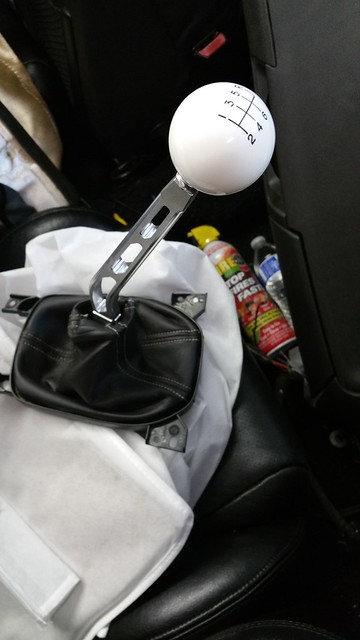
Lastly, I got the shifter and **** situation figured out. I'm going to use this Lokar handle and Hurst shift **** which I got for $30 from Amazon warehouse.
For the high pressure booster to steering gear I used the line that was already in the car, I think it came with the first LQ9 I bought.
For the pump to the booster I used one of the lines mentioned before in an earlier post, I'll get the part number next time I'm in the garage.
The low pressure from the gearbox goes to the cooler I got off an express van or similar, and the low pressure from the booster goes to the reservoir.
The res and post-cooler line are T'ed in together, then they feed back into the pump return. In other words it's what the picture in the link on the page 29 shows.
The res is under where my hand is and the cooler is where my finger is sort of pointing, more or less the same place as it was in the van.
The reservoir has a huge outlet side, just mentioning that since it will take an adapter or something to step it down to the size of the rest of the hoses.
I used a 1/2 inch version of this fitting from Lowe's, it was maybe two bucks or so.
With that out of the way I turned to dressing the engine and assembling the Speed Engineering bracket. Now that it's together the bracket is okay, but if you have put a smaller pulley on your pump for clearance reasons I'd steer clear, as the bolts are super hard to get to. Also, since the jabronis at SE can't be bothered to make instructions to go with the bracket, I'll suggest starting with the bottom of the smaller piece and going from there. Or just try and get a different company's bracket and save yourself the headache (as long as they sell $140 fuel rail bolts and similar I hate to recommend Holley stuff too much, but their solid bracket is way better than any of these other bucket o' bolts brackets IMO).
This is where the PS and alt end up.
In order to clear the steering gear with my old setup I had to push the pulley on a bit farther than normal, this means I needed to shim the pump back a bit (I lost my puller so couldn't pull it back out). Not a huge deal either way, though as mentioned before the bolts were not easy to reach.
Messing with that bracket took way longer than I thought so I didn't get the motor in, which sucks, but I did go ahead and slap the flywheel on. Not sure what this tool is called but it's well worth the $20 it cost.
Lastly, I got the shifter and **** situation figured out. I'm going to use this Lokar handle and Hurst shift **** which I got for $30 from Amazon warehouse.
Last edited by chuckd71; 08-05-2017 at 05:46 PM.
09-19-2016, 02:01 PM
#584
Had to come home for a conference in Nashville last week so I took this week off to get some things done.
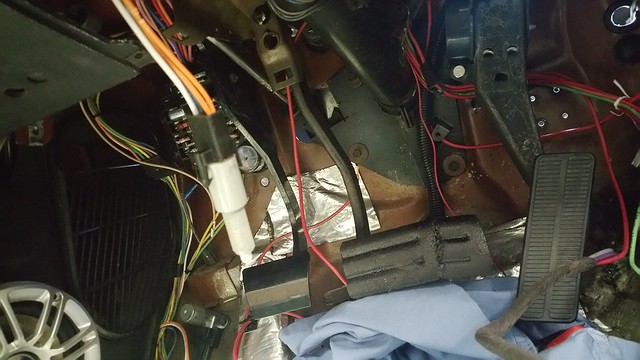
The tunnel is in place and welded up, the pedals are in and the harness is more or less in place. Eventually I'll get a grommet that will let me split the harness into halves at the firewall (sort of like the car's main harness does) but for now I just wrapped it in plastic and fed it through the passenger vent. Kind of a pain but seemed like the best option.
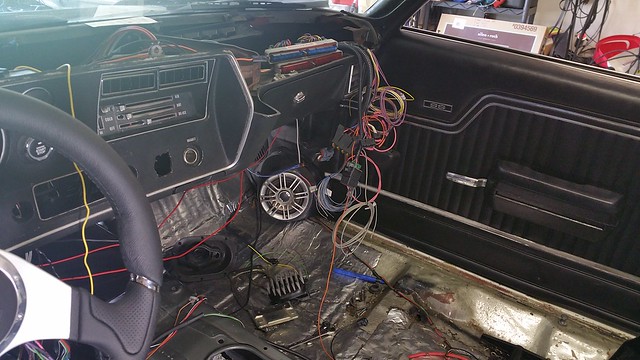
It's a pretty big mess but at least it's where I can roughly lay it out to make sure things will reach.
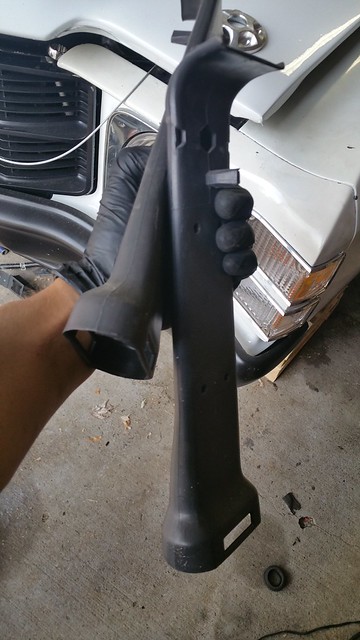
My welding skills are nonexistent but got I got the brake pedal cut and reshaped so as to fit around the clutch.
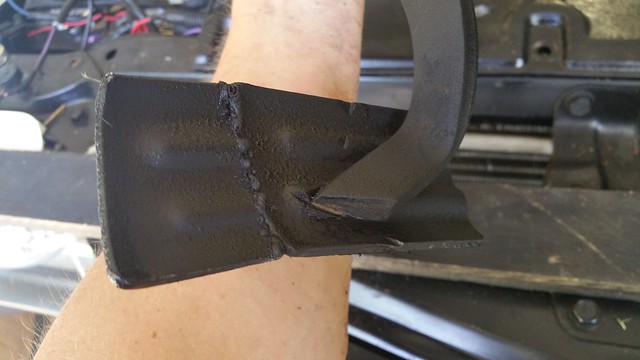
These wires have been rerouted, but I got what I guess is the Corvette pedal in. Looks sort of crooked but it lines up with the others in a way that should make one-footing the brake and gas fairly painless.
Going back out now to hopefully get the motor back in.
The tunnel is in place and welded up, the pedals are in and the harness is more or less in place. Eventually I'll get a grommet that will let me split the harness into halves at the firewall (sort of like the car's main harness does) but for now I just wrapped it in plastic and fed it through the passenger vent. Kind of a pain but seemed like the best option.
It's a pretty big mess but at least it's where I can roughly lay it out to make sure things will reach.
My welding skills are nonexistent but got I got the brake pedal cut and reshaped so as to fit around the clutch.
These wires have been rerouted, but I got what I guess is the Corvette pedal in. Looks sort of crooked but it lines up with the others in a way that should make one-footing the brake and gas fairly painless.
Going back out now to hopefully get the motor back in.
 09-19-2016, 03:39 PM
#586

Why don't you just buy the correct 4 speed brake pedal and clutch assy. They are readily available in the aftermarket new for around $100.00 and used even cheaper. It would look a lot better.
09-19-2016, 07:47 PM
#587
Because there is no good place to mount the throttle pedal closer to the brake, and I don't want a huge gap between the gas and brake. The original rubber cover still fits over the brake, so I'm assuming something fancier would as well, but pedal appearance is sort of at the bottom of the to do list for now. Anything short of Clayton Machine pedals is kind of half-assing it anyway, and that's overkill until legit paint/ body time.
Regarding the correct clutch pedal, it would also need to be modified to work so I wouldn't really be saving myself anything by using it, and welding a brake is much easier than measuring under the dash and welding a tab on a clutch. Besides, $100 will cover shipping for a new cyclocross bike I'm buying.
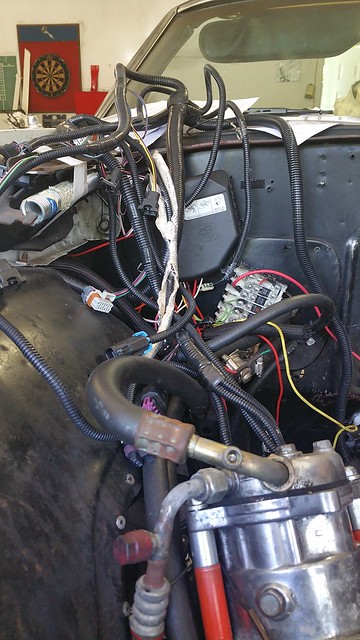
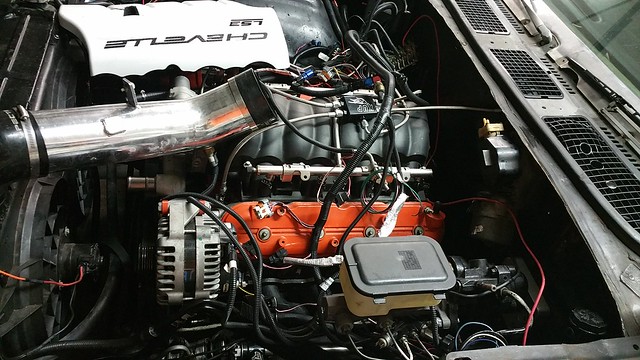
That aside, the motor is in and trans is in position to follow once I get the pilot bearing in. The power steering pulley clears the steering box roughly as well as the original and the alternator is in a much better place.
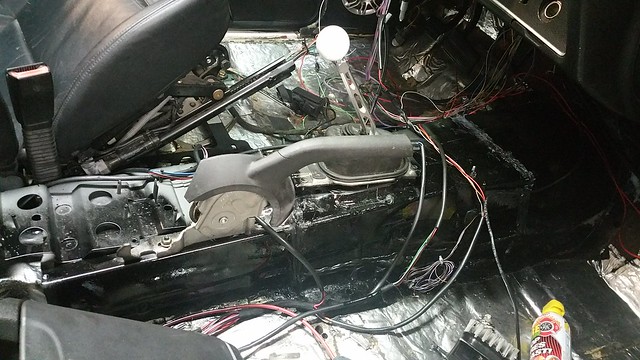
Hopefully tomorrow morning I can get the trans in well enough to make driveshaft measurements, and once that's done it'll mostly be tedious things like wiring and carpeting to finish. This is a beast of a harness and by the time I got the computer in place and the TAC taken care of I was ready to call it a day.
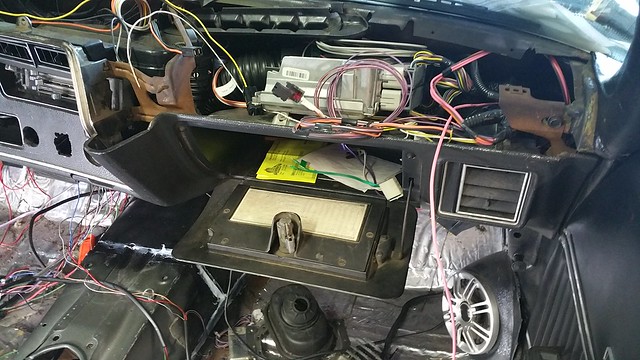
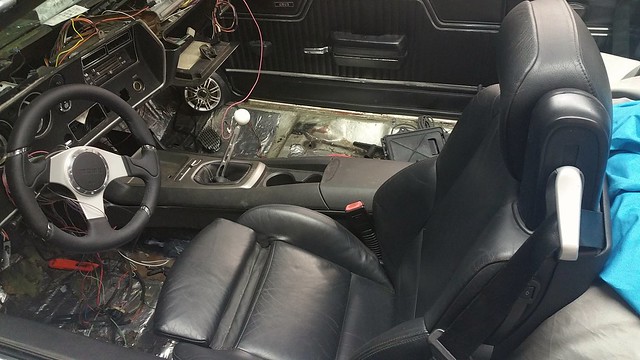
The console and shifter aren't secure but this is basically where things stand at this point.
Regarding the correct clutch pedal, it would also need to be modified to work so I wouldn't really be saving myself anything by using it, and welding a brake is much easier than measuring under the dash and welding a tab on a clutch. Besides, $100 will cover shipping for a new cyclocross bike I'm buying.
That aside, the motor is in and trans is in position to follow once I get the pilot bearing in. The power steering pulley clears the steering box roughly as well as the original and the alternator is in a much better place.
Hopefully tomorrow morning I can get the trans in well enough to make driveshaft measurements, and once that's done it'll mostly be tedious things like wiring and carpeting to finish. This is a beast of a harness and by the time I got the computer in place and the TAC taken care of I was ready to call it a day.
The console and shifter aren't secure but this is basically where things stand at this point.
Last edited by chuckd71; 07-01-2017 at 04:26 PM.
09-22-2016, 09:48 PM
#588
I got tired of messing with the transmission, so rather than continuing to roll around on the floor I had a truck come take it to the local transmission shop to mount it; way better use of my time and probably what I should've done from the start. When I move I'm getting a lift for sure.
All I wanted them to do was stab it in and get the crossmember in so I could see where things stand, and with that done there are some new clearance issues to address. The front to rear location is ideal, and while the crossmember in its current form leaves the back of the trans too high (and front of the motor too low to clear the steering pump) it will be an easy fix to lower the perch.
It's kind of hard to see, but with the original crossmember set up to fit the 200-4r and that low mount ebay PS/alt bracket, the pulley hits the power steering box. Lowering the rear of the trans fixes it, but I'm going to cut the edge off the bolt just to be safe.
Another clearance issue I ran into was on the water pump, the result of using the lower-profile of the LS3 pumps along with 1.5 inch spacers and the Holley truck A/C bracket. There are two now-unused bolt holes in the water pump that stick out and get in the way of the belt, not a huge deal since they can easily be cut off.
Harness looks like it's going to work, hiding it will be the hardest part.
Tunnel is sealed up and the e-brake is mounted, all that's left to do is cut some holes in the console for the power window switches and wire up the cigarette lighters, neutral safety and reverse lockout buttons.
That's probably it for a month or so at least but now that all the heavy-lifting things are done it's mostly just buttoning little things up. Hopefully I'll be able to knock it out over Christmas break and be driving by 2017 so I can take it when I head to Key Largo for a couple months.
Last edited by chuckd71; 09-25-2016 at 10:21 PM.
10-20-2016, 06:54 PM
#589
After spending the last month in Tulsa I finally get to head back home for a while after lunch tomorrow. Today however I got on Craigslist to see what the area might have for me and found a couple fairly decent parts places, one of which I was able to swing by before they closed. My original plan was to buy a beater set of front and rear 71 bumpers, then cut two of the tail light openings out of the rear and weld them into the front; the end result being a front bumper with holes in it where I can mount fog lights or turn signals. I figure using the molded holes from a rear would kind of tie things together, but all they had was nicer bumpers so that idea will have to wait.
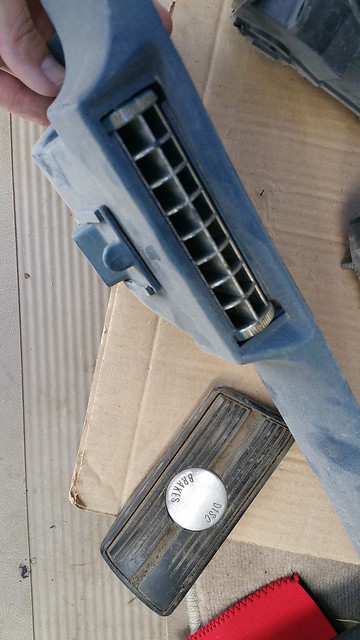
I did however find some dash vents and a brake pedal cover. Somehow I don't think I ever knew these lap vents even existed until now, but they will potentially solve or minimize a problem I've had with the AC and heat in the car, and that is neither really get to me or a passenger when turned on. The vents are tucked so far into the corners of the dash that it's hard to feel the air, especially if the top is down (I know, I shouldn't expect much when sitting in traffic without a breeze it sucks), but these will blow it straight where it needs to go. Still need to find one for the steering column.
For these to work I need to be able to prevent at least most of the air from going through the corners so I grabbed some vents from an AC car that have the open/ close mechanism. After digging through 20 or so dashes I finally found two with fins that weren't broken.

Not super exciting, but it's getting boring here and I needed something to do. Hopefully I'll be home by Sunday and can get the console finished that night and the driveshaft shortened the day after that.
I did however find some dash vents and a brake pedal cover. Somehow I don't think I ever knew these lap vents even existed until now, but they will potentially solve or minimize a problem I've had with the AC and heat in the car, and that is neither really get to me or a passenger when turned on. The vents are tucked so far into the corners of the dash that it's hard to feel the air, especially if the top is down (I know, I shouldn't expect much when sitting in traffic without a breeze it sucks), but these will blow it straight where it needs to go. Still need to find one for the steering column.
For these to work I need to be able to prevent at least most of the air from going through the corners so I grabbed some vents from an AC car that have the open/ close mechanism. After digging through 20 or so dashes I finally found two with fins that weren't broken.
Not super exciting, but it's getting boring here and I needed something to do. Hopefully I'll be home by Sunday and can get the console finished that night and the driveshaft shortened the day after that.
10-24-2016, 07:28 PM
#590
Over the last two day I've managed to get reacquainted with where things stand and have devised something at least slightly resembling a plan for finishing things up. The first order of business was to cut and reweld the trans crossmember to accommodate the T56. Getting it out was harder and more time consuming than the actual cutting and welding, and eventually I just said screw it and cut the exhaust pipes (they need to be changed anyway). No pictures of the final product because my welds look like trash; I was able to jump and stand on the new mount, so while ugly I'm fairly certain it's strong enough.
Next up was getting the drive shaft shortened. As anyone reading this might expect it wasn't quite the simple, but fortunately things worked out in the end. Long story short, my old shaft wasn't terribly straight or balanced so Dave (from Dave's Driveshaft in Nashville) made me new one while I waited. All US-made parts in it too.
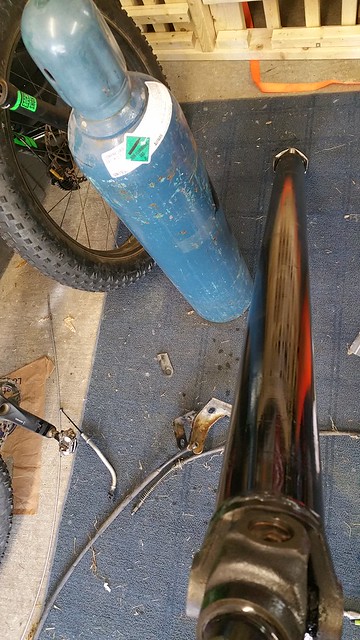
I also got a tank of Argon/CO2.
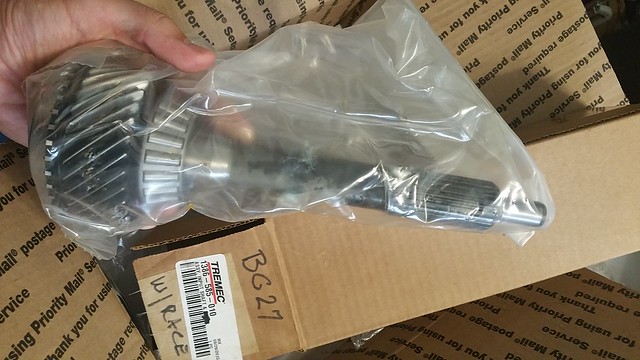
My input shaft is okay, but not perfect, so I went ahead and ordered a new one from Tick. It's hard to find a legit Tremec replacement, but I called them up and had them go ahead and press the race/bearing/whatever on for me. Swapping input shafts doesn't seem that hard but it can wait until after the car is moving.
Once I find a suitable donor I plan to make a new bumper with a spoiler and running lights built into it, and part of doing so might require relocating the hood release lever. To fully explain the plan and difficulties so far would be overkill at this point, so for now I'll just show the lokar lever I'm going to use. It's the same style billet as my shifter handle so if nothing else it'll look good.
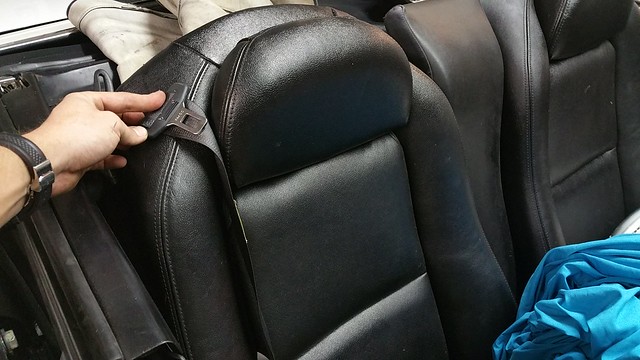
With the back seats basically finished I decided it might be a good idea to add some shoulder belts. For the sake of simplicity I ordered some GTO seats from Fparts on ebay and will be working on getting them in later in the week. Until it's finished I won't clutter this thread with details but it's being discussed in generalities over on chevelles.com http://www.chevelles.com/forums/42-c...have-them.html

Finally, I'll close this post with something perhaps more relevant to a broader audience. As you might or might not know, a while back I put Fbody rear backing plates on and paired them with C6 calipers. The good thing about these backing plates is that the e brake is built in, and after putting it off forever while I had an auto I finally decided it was time to hook them up.
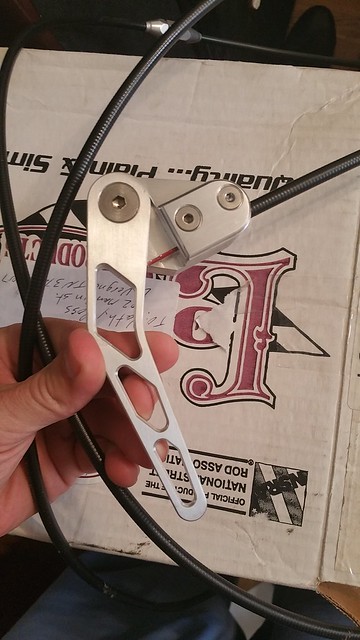
I bought the Lokar Ford Explorer ebrake cable set and, using it as a foundation, combined it with parts from old (as in 98-02) and new (10-15) Camaros to get it into my car. Starting up front, I used this oblong brass colored piece to connect the new Camaro brake handle to the Lokar intermediate piece.
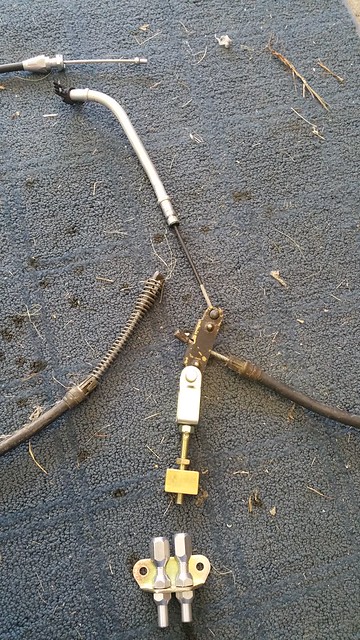
From there I cut down the old Fbody bracket so it would fit onto my rear end.
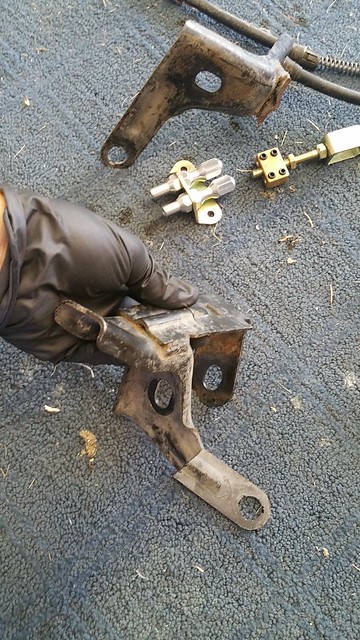
With the backing plates already on the car there was no way to fit the clevis for the lines onto the ebrake lever, so I cut a slit on the sides and bent them outward. This way I could slip it over the lever and then bend them back.
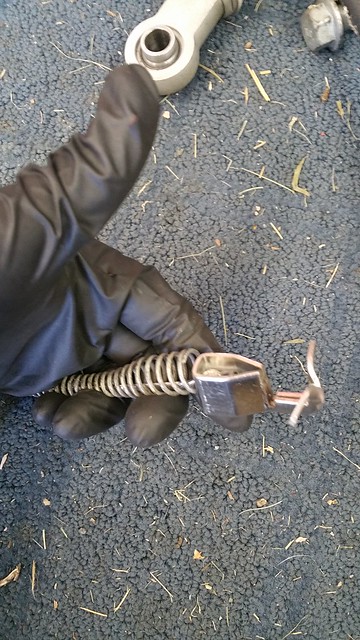
Then I took the spring off the old factory piece, cut it down a bit and ended up with this as the end product

And here it is in the car.
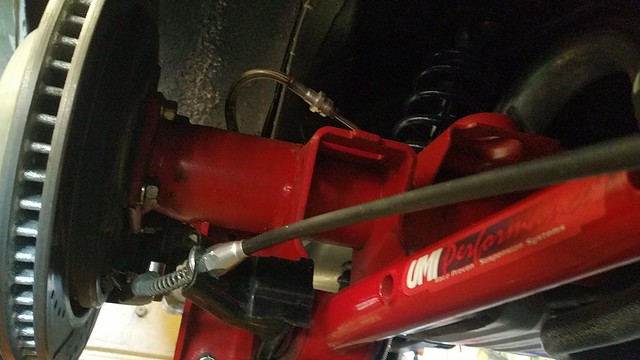
From here the cables go into the cabin by way of the lower rear footwells and meet up with the intermediate piece mentioned before.
Next up was getting the drive shaft shortened. As anyone reading this might expect it wasn't quite the simple, but fortunately things worked out in the end. Long story short, my old shaft wasn't terribly straight or balanced so Dave (from Dave's Driveshaft in Nashville) made me new one while I waited. All US-made parts in it too.
I also got a tank of Argon/CO2.
My input shaft is okay, but not perfect, so I went ahead and ordered a new one from Tick. It's hard to find a legit Tremec replacement, but I called them up and had them go ahead and press the race/bearing/whatever on for me. Swapping input shafts doesn't seem that hard but it can wait until after the car is moving.
Once I find a suitable donor I plan to make a new bumper with a spoiler and running lights built into it, and part of doing so might require relocating the hood release lever. To fully explain the plan and difficulties so far would be overkill at this point, so for now I'll just show the lokar lever I'm going to use. It's the same style billet as my shifter handle so if nothing else it'll look good.
With the back seats basically finished I decided it might be a good idea to add some shoulder belts. For the sake of simplicity I ordered some GTO seats from Fparts on ebay and will be working on getting them in later in the week. Until it's finished I won't clutter this thread with details but it's being discussed in generalities over on chevelles.com http://www.chevelles.com/forums/42-c...have-them.html
Finally, I'll close this post with something perhaps more relevant to a broader audience. As you might or might not know, a while back I put Fbody rear backing plates on and paired them with C6 calipers. The good thing about these backing plates is that the e brake is built in, and after putting it off forever while I had an auto I finally decided it was time to hook them up.
I bought the Lokar Ford Explorer ebrake cable set and, using it as a foundation, combined it with parts from old (as in 98-02) and new (10-15) Camaros to get it into my car. Starting up front, I used this oblong brass colored piece to connect the new Camaro brake handle to the Lokar intermediate piece.
From there I cut down the old Fbody bracket so it would fit onto my rear end.
With the backing plates already on the car there was no way to fit the clevis for the lines onto the ebrake lever, so I cut a slit on the sides and bent them outward. This way I could slip it over the lever and then bend them back.
Then I took the spring off the old factory piece, cut it down a bit and ended up with this as the end product
And here it is in the car.
From here the cables go into the cabin by way of the lower rear footwells and meet up with the intermediate piece mentioned before.
10-25-2016, 09:50 PM
#591
Finished the ebrake this afternoon; it was pretty straightforward, just a lot of trial and error and feeding lines and sheathes back and forth. Almost a Seldinger-esque process (if that reference makes sense to you and you're a residency director shoot me a message).
All that's left is to trim the cables.
To make mounting the belt retractor easier I marked the angles at which the belt can be extended. Turns out the seat back support falls in the proper range, gives me room to mount it and puts the belts in a position to be useful. In and of itself I don't think it'll be strong enough, but there is plenty of room to weld in a bracket that connects somewhere more sturdy.
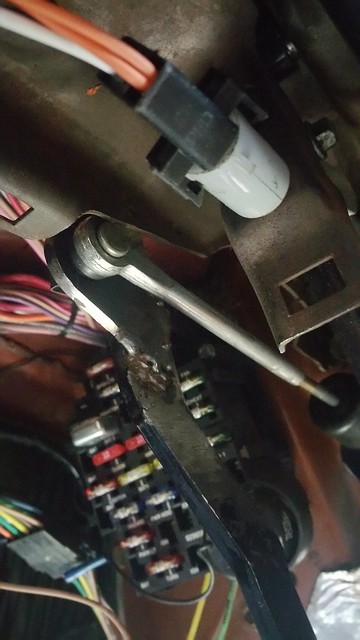
From here I moved on to wiring, and since the process of wiring is super boring I'll wait to update on it until it's in place and working. Long story short I mounted a pair of buttons in the console to serve as NSS and reverse lockout switches. Whether they will work or not is anyone's guess, but since the car was an auto with a console the wiring was already there.
All that's left is to trim the cables.
To make mounting the belt retractor easier I marked the angles at which the belt can be extended. Turns out the seat back support falls in the proper range, gives me room to mount it and puts the belts in a position to be useful. In and of itself I don't think it'll be strong enough, but there is plenty of room to weld in a bracket that connects somewhere more sturdy.
From here I moved on to wiring, and since the process of wiring is super boring I'll wait to update on it until it's in place and working. Long story short I mounted a pair of buttons in the console to serve as NSS and reverse lockout switches. Whether they will work or not is anyone's guess, but since the car was an auto with a console the wiring was already there.
11-01-2016, 09:54 PM
#592
Cage nuts suck ***, that's what I learned today. Fortunately the only spinning ones I had were up front, but they were still a pain what with having to drop the fenders and all. After lifting the body up and sitting it back down it didn't line up perfectly but the pointed bolts from AMK helped a lot with getting the nuts back on.
Now that it's done I think it's safe to say these originals needed to go.
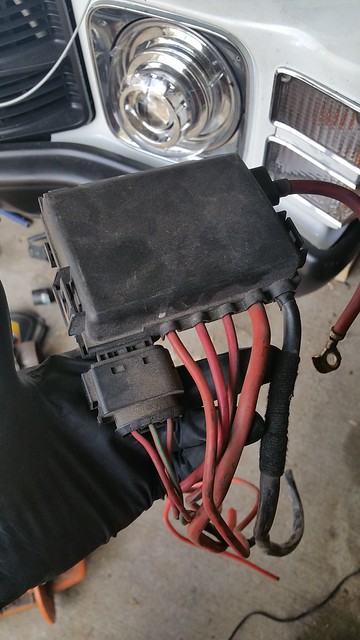
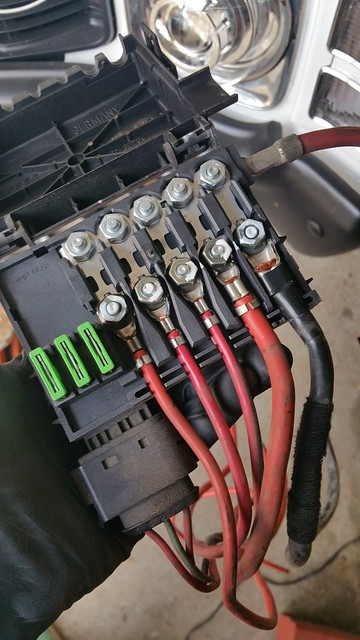
Also hit the salvage yard to get an electrical distribution box and something for routing the rear belts. This box is small, has lots of outputs (with a plug that can feed my hids and a fan) and is easy to get to in the 2001 Jetta donor car.
These belt guides came out of a 2001ish Mustang, they just pop out once the belts are cut (which most I've seen in the yards have been).
Other than that the rest of the day was spent on wiring, seats and random crap that nobody will ever notice. On the plus side, with most of it basically finished the car should be starting tomorrow, but if it doesn't at first then at least it's still apart enough to make troubleshooting fairly straightforward. All I'm missing now is a ton of fluids and a controller for my second fan. I have a pwm one coming sometime from Delta Current Control but from what I've read promptness isn't exactly their forte.
Now that it's done I think it's safe to say these originals needed to go.
Also hit the salvage yard to get an electrical distribution box and something for routing the rear belts. This box is small, has lots of outputs (with a plug that can feed my hids and a fan) and is easy to get to in the 2001 Jetta donor car.
These belt guides came out of a 2001ish Mustang, they just pop out once the belts are cut (which most I've seen in the yards have been).
Other than that the rest of the day was spent on wiring, seats and random crap that nobody will ever notice. On the plus side, with most of it basically finished the car should be starting tomorrow, but if it doesn't at first then at least it's still apart enough to make troubleshooting fairly straightforward. All I'm missing now is a ton of fluids and a controller for my second fan. I have a pwm one coming sometime from Delta Current Control but from what I've read promptness isn't exactly their forte.
11-11-2016, 04:30 PM
#593
Took some time off to keep other things in life on track but found an opportunity to get some car work done today. It isn't totally back together, but as far as I can tell it should at least be in a position to sit and idle. Just for the sake of trying to turn it over I tied both purple ignition wires together (will add a switch later of course) and made sure everything else was grounded or connected. When I try to start it it makes no effort to turn over then goes through this 30 second ritual of resetting itself. I have the interior lights turned on, and despite them not being tied to the computer in any way both they and the gauges go through this same cycle every time. Not sure what's going on but for now it's Friday night and there is drinking to be done. Will start from scratch with the electrics jazz once it warms up tomorrow.
11-13-2016, 05:35 PM
#594
After a bit of trial and error this morning I got things worked out and it fires every time now.
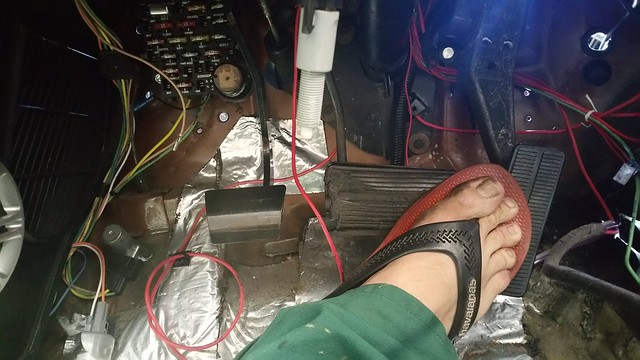
Despite having the McLeod pedal it turns out I still had to weld a different tab on it for the clutch master to get enough travel, not a huge deal but it's worth mentioning. I needed a clutch pedal regardless so I'm not out too much by having bought it. Haven't driven the car yet but it goes through the gears while running and starts in gear with clutch depressed so I'm assuming at least minimum functionality was achieved.
I got the NSS and reverse lockout buttons and reverse lights wired in and tested and weather permitting I should have the interior back in tomorrow. Maybe even with carpet. Fancy.
Some lingering things to check while they are still on my mind-
I forgot to bleed the brake master so I'll have to figure something out with that.
Fix dancing tach.
Replace rear passenger window motor
Get smaller air filter.
Prep wiring for DCC fan controller
This is just a video of it running, one of the first things I noticed is that the loud sucking hiss that once came out the intake is now gone. I don't know if it was due to an improper IAT setting or what but now it's super quiet, just like it should be. It's supposed to be in the 60s on Friday so I'm really hoping to get this thing moving.
 11-15-2016, 06:17 PM
#596
Thanks, yeah it sounds way better than it did with the Holley.
Good news/ bad news today. Good news is that I fixed the tach, nothing seems to be leaking, the seats are in for the last time before coming out for carpet (had to put them back in to drill some holes) and I was able to drive around the block today.
Now that I've bled the master and added enough power steering fluid to fill the cooler and extra lines the hydroboost works well, at least at low speeds.
Bad news is that as I was getting close to the driveway something went clunk and from then on the trans hasn't wanted to go through the gears. Sometimes it will only go into third, then other times it will go into everything but 4th. Then it won't want to move anywhere at all really. Never goes into 4th now at all. I've tried running it through while the car is off and then several times with the car running but clutch depressed. No consistency in terms of what motions will allow or preclude going into any given gear, the only constant is no 4th.
Surprisingly, the only other negative so far was that my NSS button quit working, but that's an easy fix and a fault of the button, not anything in the car.
There is a trans shop nearby that said they could clear some stuff out by Monday so they could take a look at it so I guess that is what I'm left with. Not ideal, but I don't really know anyone around here to ask to help me out with it. Looks like more downtime, but at least I can drive it in and out of the garage.
11-16-2016, 05:55 PM
#597
Beautiful day outside, did some mountain biking then drove the car down the street so I could back it into the driveway. Trans went into everything but 4th, though sometimes it would go into reverse but not actually engage the gear. Sucks.
Found a puddle of coolant under it and saw it dripping off the back of the oil pan. At first I thought the worst, but I ran a white rag along the back of the valley cover and it came back orange - a good sign. One of the steam vents tied into the Kurt Urban thing was loose. Remember your mods kids.
By then it was getting dark so I decided to finally redo the rear lights.
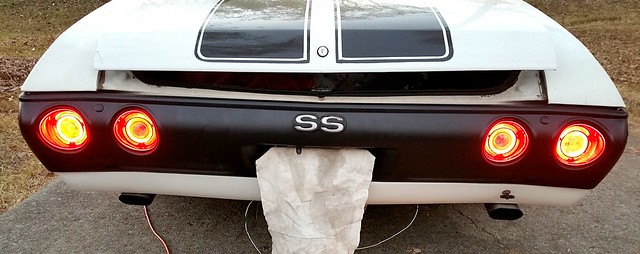
This is just a trial run to see what I want to do next, but for now it shows the concept is sound. There's something fishy going on with the left turn/ brake, but worked initially then quit. I'm thinking it's just a ground.
Found a puddle of coolant under it and saw it dripping off the back of the oil pan. At first I thought the worst, but I ran a white rag along the back of the valley cover and it came back orange - a good sign. One of the steam vents tied into the Kurt Urban thing was loose. Remember your mods kids.
By then it was getting dark so I decided to finally redo the rear lights.
This is just a trial run to see what I want to do next, but for now it shows the concept is sound. There's something fishy going on with the left turn/ brake, but worked initially then quit. I'm thinking it's just a ground.
 01-08-2017, 10:36 AM
#599
Haha yeah, it can be. I got the light issues fixed by putting in a new headlight switch. For $13 this one turned out to look alright -www.ebay.com/itm/162304475469?_trksid=p2057872.m2749.l2649&ssPageNa me=STRK%3AMEBIDX%3AIT
Right after my last post I ended up buying another T56, a Tick and some other stuff, but it's been so cold here I haven't done much with it other than sell the parts of it I didn't need. It's crazy what people will pay for a bellhousing these days.
Regardless, once it warms up I'll swap this new one in and hopefully get the car going. The main problem now is an electrical gremlin that is affecting a lot of different things in the car but most likely is the result of a single bad connection somewhere. I almost had it tracked down then I went to India for a bit and since I've been back the temperatures have fallen into the teens and 20s. Good for biking in the snow but not so good for working on wiring.
The fan controller came, it's pretty compact, about the size of a deck of cards. Turns out it might not be ideal for use with the Windstar fans, but until the wiring is figured out I can't say for sure.
[url=https://flic.kr/p/PKYVjd]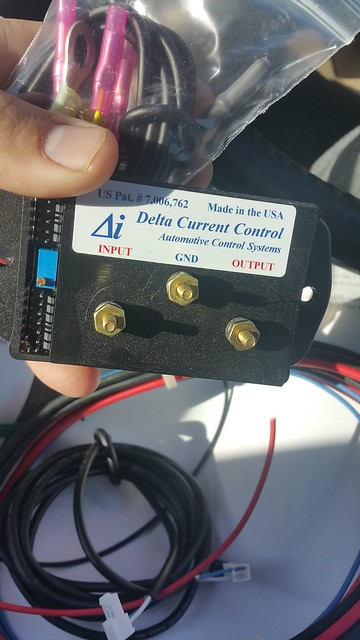
I went with the cabin control and load indicator as well.
[url=https://flic.kr/p/QPekwW]
Came with everything to install it (except the solder heat shrink)
[url=https://flic.kr/p/QPeoPh]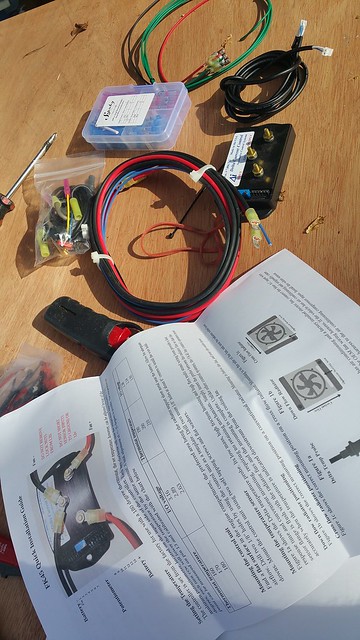
This is what I've done for the NSS and reverse lockout. They are wired to only light up when pushed, that way I'll know to turn them back off. Green for go and red for reverse.
[url=https://flic.kr/p/QPeoXy]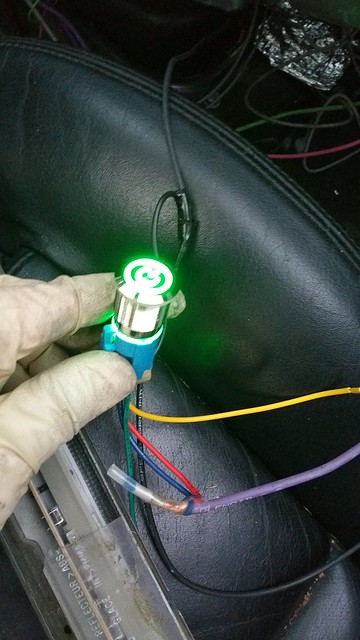
[url=https://flic.kr/p/QPekYY]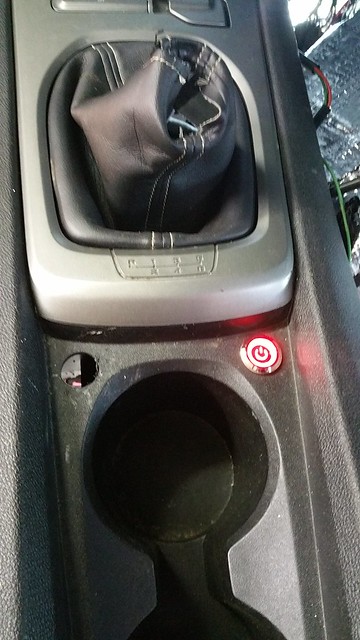
And that's where things are right now, waiting for me to either buy a propane heater for the garage or the temps to get somewhere more reasonable.
04-21-2017, 05:46 PM
#600
After a month in Colorado Springs I got to come home for a couple days so I'm going to try to address this electrical issue.
It's a really odd thing as it sort of seems like maybe the frame/ body are getting power somehow and/ or there is a cycling ground/power application somewhere. It sometimes does what is shown in post 593 and sometimes nothing happens. It'll turn over sometimes, sometimes not. I've removed everything electrical other than the fuel pump, computer and ignition and am trying to track things down with a multimeter but it's taking tons of time since no single action, connection or disconnection of pieces or parts creates consistently reproducible symptoms.
If anyone has any suggestions I'm open to them, but I'm sort of thinking that the best approach might be to remove everything electrical and just start from scratch. It would be a pain, but it might be the right thing to do at this point.
On the bright side I know it can't be a huge deal because the was running and driving right before this started happening.