Developing an Android App for Snapdragon Mobile Platforms
Using a hardware development kit and external camera for object detection and location
The Qualcomm® Neural Processing Engine (NPE) is a runtime for the execution of deep neural networks. The engine is accelerated through its tight integration with a Snapdragon® mobile platform.
The following project covers a sample AI/ML Android application designed to capture objects through an external camera and use a machine learning model to predict the location of the objects. The project applies to any device — smartphone, mobile hardware development kit, third-party development kit, etc. — powered by a Snapdragon processor that supports the Qualcomm NPE. As an example, the walk-through below is based on the Snapdragon 835 Mobile Hardware Development Kit.
Project prerequisites
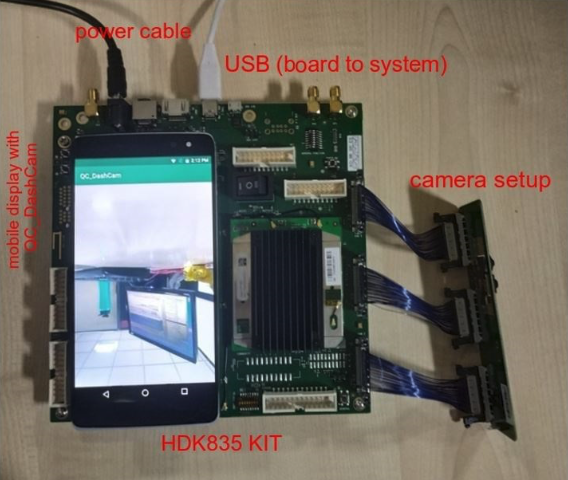
- Mobile display
- Snapdragon 835 Mobile HDK development board
- USB Type C cable
- External camera setup
- Power cable
Hardware setup
Set up the hardware as shown in the image:
Software setup
To install the Android application on the development board, switch on the power to the board. Next, connect the board to your development machine with the USB Type C cable. Then, enable USB debugging in the Developer options on the board as follows:
- Open the Settings app through the display.
- Select “About phone” in the list.
- Scroll down and tap “Build number” seven times.
- Press the back arrow and find “Developer options” in the list.
- Open Developer options, and then scroll down to find and enable USB debugging.
The board should now be connected to the development machine.
Running the application
The application opens a camera preview, collects all the frames and converts them to a bitmap. Neural Network Builder constructs the network by passing the model file in .dlc format as the input. The model receives the bitmap, and in the inference step the app predicts the location of the object.
The full project for this application is available in its GitHub repository.
Loading the model
Following is the code snippet for connecting to the neural network and loading the model:
final SNPE.NeuralNetworkBuilder netBuilder = new
SNPE.NeuralNetworkBuilder(mApplicationContext)
// Allows selecting a runtime order for the network.
// In the example below use DSP and fall back, in order, to GPU then CPU
// depending on whether any of the runtimes are available.
.setRuntimeOrder(DSP, GPU, CPU)
// Loads a model from DLC file
.setModel(new File(""))
// Build the network
network = builder.build();
Getting the bitmap from TextureView
A bitmap of fixed height and width can be obtained from TextureView in an onCaptureCompleted callback using TotalCaptureResult. That bitmap can be compressed and sent to the model as input, as shown in this code snippet:
@Override public void onCaptureCompleted(@NonNull CameraCaptureSession session, @NonNull CaptureRequest request, @NonNull TotalCaptureResult result) { super.onCaptureCompleted(session, request, result); if (mNetworkLoaded) { Bitmap mBitmap = mTextureView.getBitmap(BITMAP_WIDTH, BITMAP_HEIGHT);Performing inference in the object
In the code snippet below, the app converts the bitmap image to an RGBA byte array of size 300x300x3. Basic image processing depends on the kind of input shape required by the model.
Now the processed image must be converted into a tensor. The prediction API requires a tensor format of type Float, which returns object prediction and localization in the Map <String, FloatTensor> object.
private Map inferenceOnBitmap(Bitmap inputBitmap) { final Map outputs; try { if (mNeuralNetwork == null || mInputTensorReused == null || inputBitmap.getWidth() != getInputTensorWidth() || inputBitmap.getHeight() != getInputTensorHeight()) { return null; } // [0.3ms] Bitmap to RGBA byte array (size: 300*300*3 (RGBA..)) mBitmapToFloatHelper.bitmapToBuffer(inputBitmap); // [2ms] Pre-processing: Bitmap (300,300,4 ints) -> Float Input Tensor (300,300,3 floats) mTimeStat.startInterval(); final float[] inputFloatsHW3 = mBitmapToFloatHelper.bufferToNormalFloatsBGR(); if (mBitmapToFloatHelper.isFloatBufferBlack()) return null; mInputTensorReused.write(inputFloatsHW3, 0, inputFloatsHW3.length, 0, 0); mTimeStat.stopInterval("i_tensor", 20, false); // [31ms on GPU16, 50ms on GPU] execute the inference mTimeStat.startInterval(); outputs = mNeuralNetwork.execute(mInputTensorsMap); mTimeStat.stopInterval("nn_exec ", 20, false); } catch (Exception e) { e.printStackTrace(); return null; } return outputs;
}
Localizing the object
The model returns the respective Float tensors, from which the shape of the object and its name can be inferred. The app uses Canvas to draw a rectangle on the predicted object, as shown in this code snippet:
private void computeFinalGeometry(Box box, Canvas canvas) { final int viewWidth = getWidth(); final int viewHeight = getHeight(); float y = viewHeight * box.left; float x = viewWidth * box.top; float y1 = viewHeight * box.right; float x1 = viewWidth * box.bottom; // draw the text String textLabel = (box.type_name != null && !box.type_name.isEmpty()) ? box.type_name : String.valueOf(box.type_id + 2); canvas.drawText(textLabel, x + 10, y + 30, mTextPaint); // draw the box mOutlinePaint.setColor(colorForIndex(box.type_id)); canvas.drawRect(x, y, x1, y1, mOutlinePaint); }Snapdragon and Qualcomm Neural Processing Engine are products of Qualcomm Technologies, Inc. and/or its subsidiaries.