ProxMox Qemu create Ubuntu template
Запись создана 5 апреля, 2024
wget https://cloud-images.ubuntu.com/releases/jammy/release/ubuntu-22.04-server-cloudimg-amd64.img
mv ubuntu-22.04-server-cloudimg-amd64.img ubuntu-22.04-server-cloudimg-amd64.qcow2
qemu-img resize ubuntu-22.04-server-cloudimg-amd64.qcow2 10G

qm create  9000 \
--name ubuntu22 \
--bootdisk virtio0 \
--ostype l26 \
--sockets 1  \
--cores 2 \
--memory 1024 \
--scsihw virtio-scsi-single \
--onboot yes \
--serial0 socket \
--vga serial0 \
--net0 virtio,bridge=vmbr0 \
--agent 1 \
--ide2 local-zfs:cloudinit \
--virtio0 local-zfs:0,import-from=/root/ubuntu-22.04-server-cloudimg-amd64.qcow2

qm set 9000 --ipconfig0 ip=dhcp
Enable snippets store on ProxMox:
pvesm set local --content images,rootdir,vztmpl,backup,iso,snippets
cat > /var/lib/vz/snippets/9000.yaml << EOF
#cloud-config
preserve_hostname: true

users:
  - default
  - name: shakirov
    gecos: Artur Shakirov
    shell: /bin/bash
    groups: sudo
    sudo: ALL=(ALL) NOPASSWD:ALL
    passwd: $PASSWORD_HASH_TAKE_IT_FROM_YOUR_/etc/shadow_
    lock_passwd: false
    ssh_authorized_keys:
      - ssh-rsa AAAAB3NzaC1yc2EAAAADAQABAAABAQC5o74MtkmdOjSIvqvV+z0vtB65KE2EHLk8FGWqIqOxVg2nAvHNKS7Zy255c+mAWOS+sEJUsZMFlxaIsqS7f1nf/3TMftlnlRH3WNdoh2QP7lsEccpRrPymhD7+ZkouC0FosqciGEKGo0sGXnnyLnNajYp01UHmgsALH5vEsK9xXeiTtinvEDanI4QrI9U4bCoIEGboKeQPhvk7355x7hV05RBpq3fud/No+rbiD9PZxUQCI/l1H6GWtLbWE/LaGxS1CmBb1Rw3Ea5agJ5yX24F+Ey19CnKk8WsW649AI4HO4QdTKE7zwIEWW46ONIAEnpV0LkYmJbfBUCaKo/8g6I3
      - ssh-ed25519 AAAAC3NzaC1lZDI1NTE5AAAAIPQ187Jo6t/Wxxgs73NnEWc+OGebbruOY/DfmxemFX2C shakirov@shakirov

write_files:
  - path: /etc/sudoers.d/cloud-init
    content: |
      Defaults !requiretty

package_update: true
package_upgrade: true
packages:
  - qemu-guest-agent
  - pwgen
  - nmap
  - htop
  - iftop

runcmd:
  - sed -i -e 's/^GSSAPIAuthentication yes/GSSAPIAuthentication no/g' /etc/ssh/sshd_config
  - sed -i -e 's/^PasswordAuthentication no/PasswordAuthentication yes/g' /etc/ssh/sshd_config
  - [ systemctl, enable, qemu-guest-agent ]
  - [ systemctl, start, qemu-guest-agent ]
EOF
Apply Cloud-init to VM
qm set 9000 --cicustom "user=local:snippets/9000.yaml"
Now we have imported cloud image and can prepare it. At this stage you can customize somehow your image
qm start 9000 && qm terminal 9000
sudo -i
cat /dev/null > /etc/machine-id
cloud-init clean
history -c
shutdown -h now
Convert our VM to template
qm template 9000And now we can create a VM from template:
qm clone 9000 107 --full --name mgmt
» Запись из раздела Proxmox VE | Комментировать
Sentry: All events is empty
Запись создана 25 марта, 2024
If you have a nginx revers proxy on your self-hosted Sentry you can get an issue with empty «All events»
this can be fixed by adding to nginx config
    proxy_buffer_size          128k;
    proxy_buffers    16 256k;
if you need a complete config, here it is:
Читать дальше
» Запись из раздела Linux, Nginx | Комментировать
ProxMox migration fails: Host key verification failed.
Запись создана 22 марта, 2024
If you get an error, on migrating VM from one ProxMox to another, like this:
# /usr/bin/ssh -e none -o 'BatchMode=yes' -o 'HostKeyAlias=pve-n23' root@10.10.10.10 /bin/true
Host key verification failed.
ERROR: migration aborted (duration 00:00:01): Can't connect to destination address using public key
TASK ERROR: migration aborted
And you have FreeIPA installed on proxmoxes, you can fix it (temporary) by
ssh -o 'HostKeyAlias=pve-n23' root@10.10.10.10 /bin/true
or permanently, by commenting string
#GlobalKnownHostsFile /var/lib/sss/pubconf/known_hostsin /etc/ssh/ssh_config.d/04-ipa.conf
» Запись из раздела Linux, Proxmox VE | Комментировать
LVM resize HOWTO
Запись создана 15 марта, 2024
We have an virtual machine with 165Gb disk, and added extra 10Gb. Now we need to extend filesystem inside a VM
lets check trat extra 10Gb is available in VM
# fdisk -l /dev/sdb
Disk /dev/sdb: 175.2 GiB, 187924742144 bytes, 367040512 sectors
Checkout the physical volume size, it’s 165Gbyte
# pvdisplay
  --- Physical volume ---
  PV Name               /dev/sdb
  VG Name               data
  PV Size               <165.02 GiB / not usable 2.00 MiB
let’s resize it
# pvresize /dev/sdb
  Physical volume "/dev/sdb" changed
  1 physical volume(s) resized or updated / 0 physical volume(s) not resized
and check again. ok we see that it extended
# pvdisplay
  --- Physical volume ---
  PV Name               /dev/sdb
  VG Name               data
  PV Size               <175.02 GiB / not usable 2.00 MiB
logical volume is extended to, and have Free Size 10GiB
# vgdisplay
  --- Volume group ---
  VG Name               data
  VG Size               <175.02 GiB
  Alloc PE / Size       42244 / <165.02 GiB
  Free  PE / Size       2560 / 10.00 GiB
now we need to extend logical volume
# lvextend -l +100%FREE /dev/mapper/data-storage
  Size of logical volume data/storage changed from <165.02 GiB (42244 extents) to <175.02 GiB (44804 extents).
  Logical volume data/storage successfully resized.
and resize a file system (in my case it’s xfs)
# xfs_growfs /dev/mapper/data-storage
And now we see that filesystem is growed
# df -h /opt/docker/
Filesystem                Size  Used Avail Use% Mounted on
/dev/mapper/data-storage  175G  147G   29G  84% /opt/docker
» Запись из раздела Linux | Комментировать
Sangoma Linux after migration from VMWare ESXi to ProxmoxVE fails to boot
Запись создана 13 марта, 2024
After migration Sangoma Linux (FreePBX on CentOS7) from vmware to proxmox
qm importovf 7804 PBX002.ovf local-zfsOS fails to boot with error:
Could not boot
/dev/SangomaVG/root does not exist
/dev/SangomaVG/swaplv1 does not exist
/dev/mapper/SangomaVG-root does not exist
What do we need?
1. add network adapter, chose model «VMware vmxnet3» and set previously used MAC-address
2. detach hard disk and attach it as sata
3. boot the VM from CentOS-7-minimal.iso and
mount --bind /run /mnt/sysimage/run

systemctl start multipathd.service

chroot /mnt/sysimage

dracut --regenerate-all --force
» Запись из раздела CentOS Linux, KVM, Proxmox VE, virtualization, VoIP | Комментировать
FreeIPA WebUI login fails
Запись создана 18 января, 2024
runing ‘kinit’ in console gives an error like:
Received error from KDC: -1765328382/Server's entry in database has expired

kinit: Server's entry in database has expired while getting initial credentials
enter to console admin
kadmin.local
kadmin.local:  getprinc krbtgt/DOMAIN.COM
You may see that expiration date passed
Expiration date: Tue Dec 31 23:59:59 MSK 2023
Set a new one
kadmin.local: modprinc -expire "2024-12-31 23:59:59" krbtgt/DOMAIN.COM
» Запись из раздела Linux | Комментировать
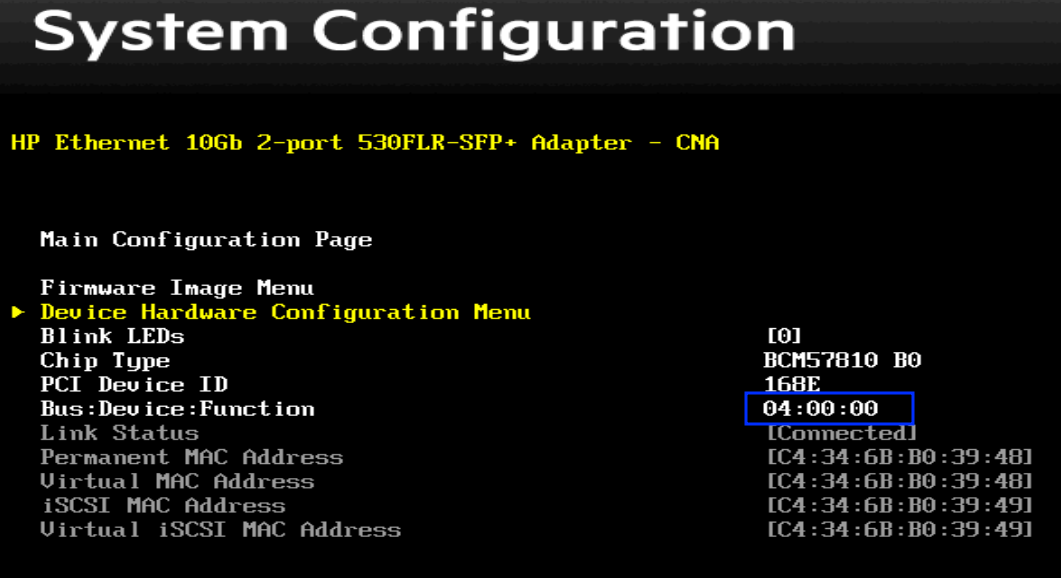
HP Proliant Gen9 G9 DMAR error
Запись создана 23 ноября, 2023
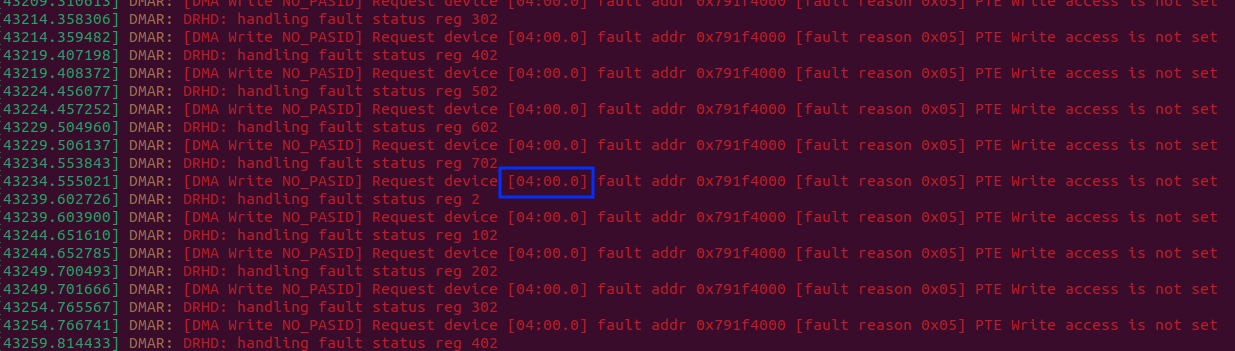
If you getting an error like this in dmesg on your linux and the physical server is a kind of HP Proliant G9 (Gen9)
DMAR: [DMA Write NO_PASID] Request device [04:00.0] fault addr 0x791f4000 [fault reason 0x05] PTE Write access is not set
DMAR: DRHD: handling fault status reg 402
You can just ignore it :)
OR if can reboot yourt server, there are several ways to «fix» it
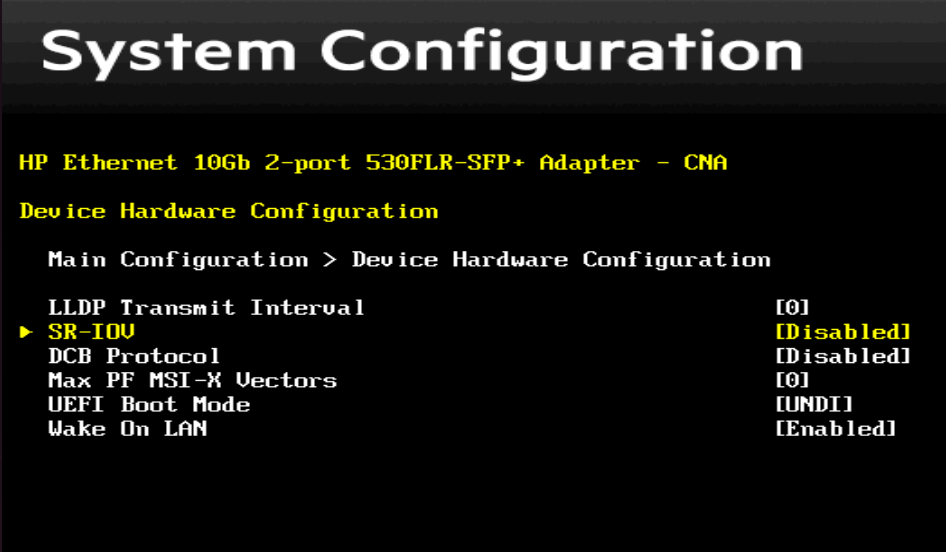
pass a «intel_iommu=on» option to kernel or enter RBSU (BIOS) pressing F9 on startup screen
System configuration >> chose embeded LOM >> Device configuration menu >> SRV-IOV >> set Disabled
Same thing on HPE Proliant Gen10 is called «HP Shared Memory Features»
» Запись из раздела Hardware, Linux | Комментировать
Mikrotik FAN speed on CCR2004-1G-12S+2XS
Запись создана 13 ноября, 2023
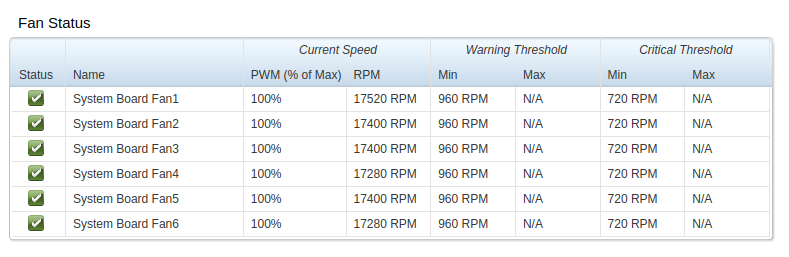
By default settings system health on mikrotik CCR2004 shows 0 RPM fan speed.
In my case the temperature of CPU was about to 60C but there is no direct settings to set FAN speed, so i set the temp to run fullspeed this way
/system health settings set fan-full-speed-temp=45C fan-target-temp=45C
» Запись из раздела Mikrotik | Комментировать
Dell iDrac FAN speed adjustment
Запись создана 23 октября, 2023
You can do it by setting fan speed offset in BIOS, but if you don’t want to reboot your system you can do it using ipmitool
enable manual Fan speed setting
ipmitool raw 0x30 0x30 0x01 0x00
Then set fan speed to 100%
ipmitool raw 0x30 0x30 0x02 0xff 0x64
» Запись из раздела Несортированное | Комментировать
FreeIPA allow queries from other networks
Запись создана 11 сентября, 2023
Add to /etc/named/ipa-ext.conf
acl "trusted_network" {
  localnets;
  localhost;
  10.222.0.0/23;
  195.222.111.0/24;
};
Where 10.222.0.0/23 and 195.222.111.0/24 not direct attached networks
Add to /etc/named/ipa-options-ext.conf
allow-recursion { trusted_network; };
and restart freeipa
ipactl restart
» Запись из раздела Linux | Комментировать