Basic Git Commands from Scratch
This blog tries to cover all the basic commands for a newbie in learning Git. Learn as you practice along.

Learning Git !!!!! Arduous … right ??? 😥
The initial fears that every developer has using the Git commands are much common. Its interface, commands, and above all, its conflicts are just the beginning of your journey. But, once you are used to it, it’s really fun.
Git is a version control system through which people from different parts of the world can openly collaborate on projects. Every developer can propose their ideas through code changes. Github is a place where we can keep our repositories(project folder) for future works.
Before starting, make sure you have Git downloaded and installed on your PC. You can download it from here. Proper installation can be confirmed by typing git --versionon cmd or git bash. If it shows you some version number, then you are ready to dive into git commands.
Setup your username and email on git bash using these commands —
git config --global user.name "<username>"
git config --global user.email <email-id>
Starting with the basic Git Commands -
HEAD in Git: It is a pointer that points to the current branch in which you are. Commonly the main branch is called the masterbranch. In the beginning, HEAD points to the master branch.
- Forking a Repo: This option is available on the Github platform where one can get a copy of the original repo, which that individual can manage.

- Clone :
git clone <URL of the remote repo>. Through this command, one can bring the remote repo into their local machine.

If your local computer has some existing projects, change it to a git repo by right-clicking on your project’s folder and opening Git bash. Typegit init command on git bash.
Now, after making the required changes in the cloned/existing repo:-
git status: This command shows the modified and untracked files in your repo.- Adding to staging area:
git add <file-name>for adding individul files, andgit add .to add all files. Using this command, Git now keeps track of the changes you have made. - Committing the changes:
git commit -m "message of the commit" -m "description of changes made (optional)". This creates a checkpoint in the git history through which one can move back to his previous changes.

- Git history :
git logorgit log --oneline.This command helps to see all your previous commits. Every commit has a unique hash called SHA through which one can identify his previous changes made. - Pushing the changes:
git push origin <name of branch which you want to push>. This command pushes the changes to the remote/forked repo.
However, this commands only works when the developer has cloned the repo. Initializing the folder through git initcommand doesn’t make originas an alias for remote repo.
- For making an alias, use :
git remote add origin <URL of remote repo> - To check all your remotes, use :
git remote -v
Now make a Pull Request (PR) from your remote repo on Github.
- Pull:
git pull— Through this you can update the changes made on the remote/forked repo to your local repo.
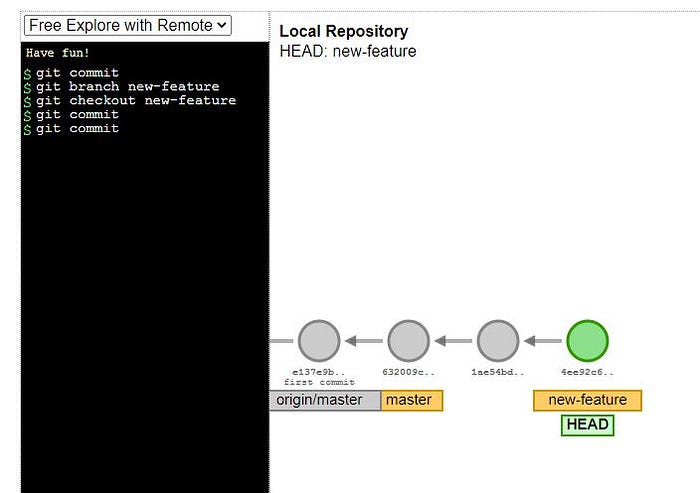
Creating Branches in git
It’s always a good practice to create a branch, to push your changes before making a PR. Branches are made so that one can make changes without disturbing the main branch.
Commands used :
- To check all the branches already present:
git branch - To create a branch :
git branch <branch-name> - To move from one branch to another:
git checkout <branch-name where one need to move> - To create and move to that branch at the same time:
git checkout -b <branch-name>
- To delete a branch after merging its changes :
git branch -d <branch-name> - To delete a branch without merging its changes :
git branch -D <branch-name>
Merge a branch
- Checkout to the branch where you want to merge your changes.
- Use :
git merge <branch-name which you want to merge>to merge both the branches. Merge is commonly made by fast-forward strategy or by recursive strategy. It depends on the commits made on the branch where you want to merge.
Merge conflicts -: It arises due to different changes appearing on the same line in a file. Git can’t resolve it automatically, so the user needs to edit and remove the changes according to his need before committing it.
To abort merge, use : git merge --abort
Vim Editor
Vim is a helpful editor for creating and editing different types of files more efficiently.
- To write in vim editor, press,
ifrom your keyboard, i.e., insert mode - To quit without saving: press
escand type:q! - To save your changes and quit from vim editor: press
esckey and type:wq

To wrap up
The best way to learn Git is to start from your local computer’s small projects or files. Make a repo using git initor from Github itself. Clone it, make changes, add files to staging area, commit it, push the changes, make a PR; all these will help you to become handier and confident in using Git commands.
After you become comfortable with all these commands, you can jump into advanced commands like git reset, rebase, cherry-pick, stash, etc.
One can use Git School to learn more through visualization.
All the best for your incredible Git journey !!!! 😊
Resources :