Thu, 05 May 2005, 01:50:15 UTC-08:00
Homemade Bicycle Repair Stand
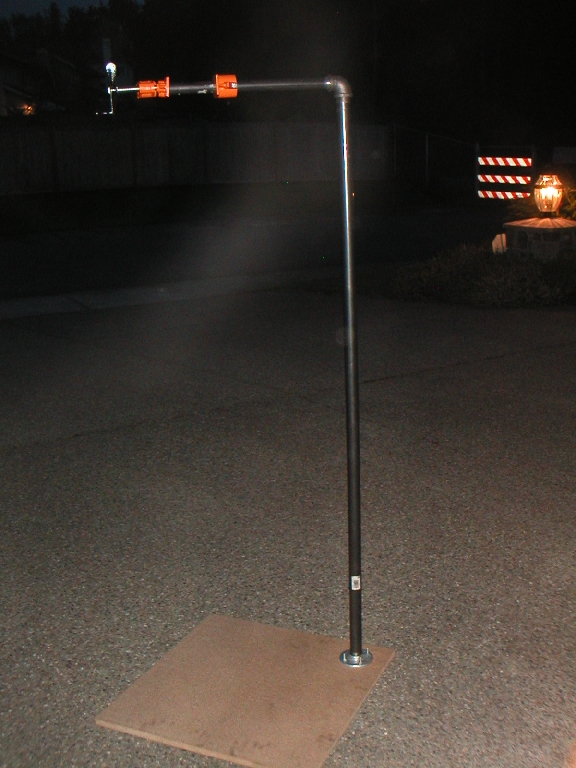
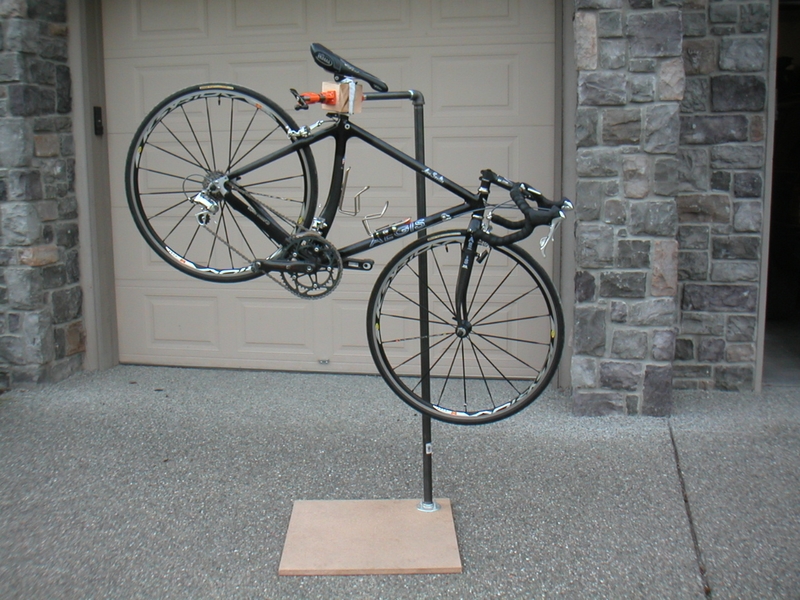
For a long time, I had wanted a repair stand in order to work on my bikes. These stands are meant to support the bike by one of their tubes in an elevated position so you can freely turn the wheels and easily access parts. However, many high quality stands are expensive. They range anywhere between $150 to $250. After reading a thread in BikeForums that was started by a guy who did the same thing, I also decided to build my own using parts from Home Depot. My goal was to keep it all under $50... preferably closer to $30. I knew I wasn't going to end up with something that has all the features of a quality Park Tool stand or anything but I at least hoped to build a solid and functional workstand.
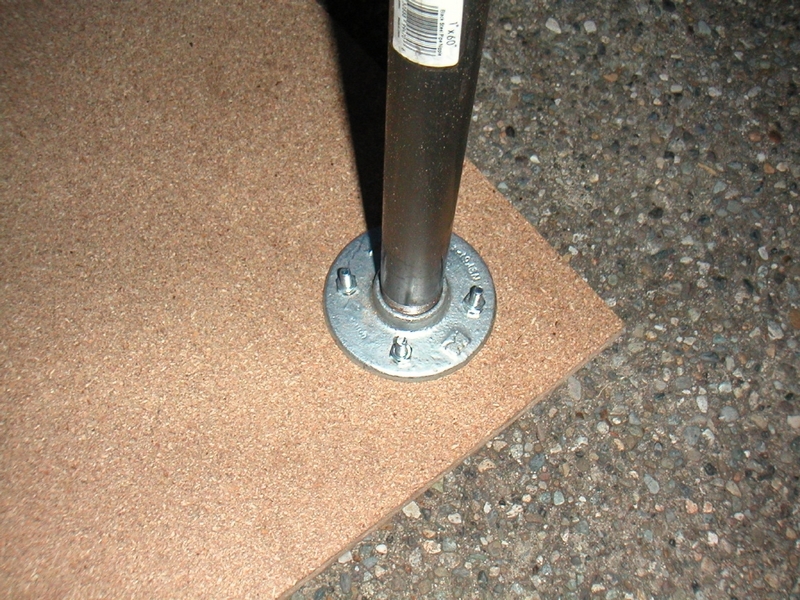
I used the same basic design as others in that thread: 18" long 3/4" diameter pipe for the Pony clamp to a 1"->3/4" reducer-elbow to a 1" diameter. I managed to pick up a 60" long 1" diameter pipe so it's all one segment as opposed to the other two folks who used shorter segments coupled together. However, I opted to go for a flange coupled to a particle board 2'x2' base instead of using a pipe base. I figured that a base extending out at least as far or further than the horizontal arm should be stable enough.
The vertical pipe is attached using four bolts to the base. Yes, I need to remove the ugly sticker.
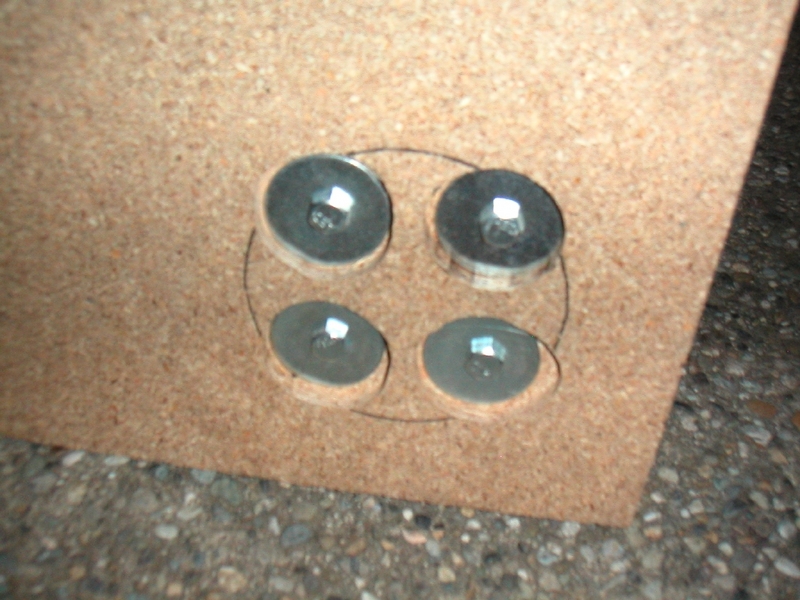
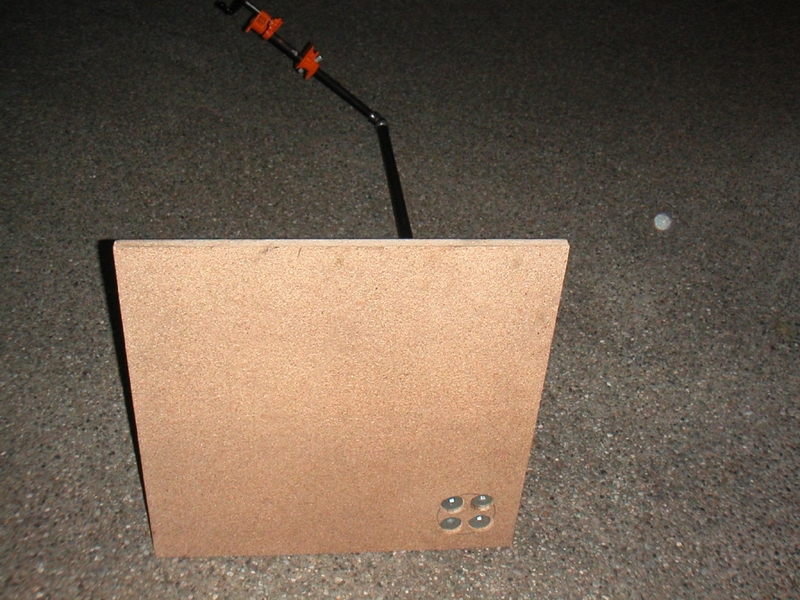
I decided to use some large washers to spread out the load on the bottom. In order to allow the base to sit flat, I had to countersink the bolt and washer. Unfortunately, I didn't have a spade bit large enough... strike that. I couldn't find any of my spade bits... grrrrrr. I need to clean my garage. So instead, I used my router which worked pretty well since it allowed me to compensate for some CEP (circular error probable) and provided me with a consistant countersink depth. As you can see, I traced the flange first, marked the holes, overlaid the washers onto the holes and then traced the washers to tell me where I needed to route.
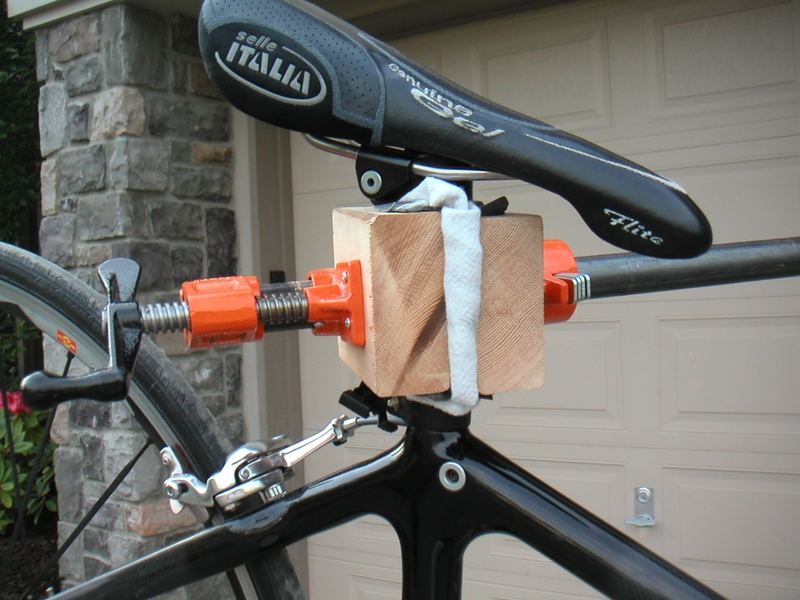
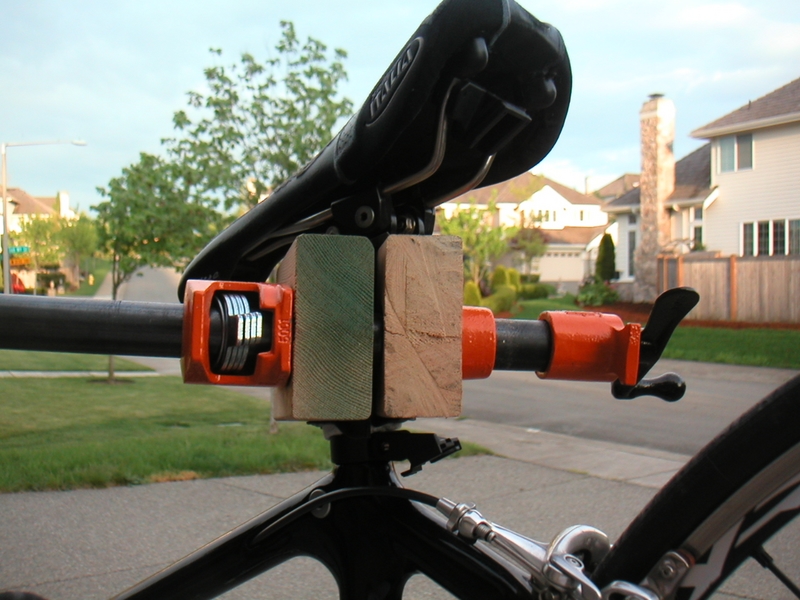
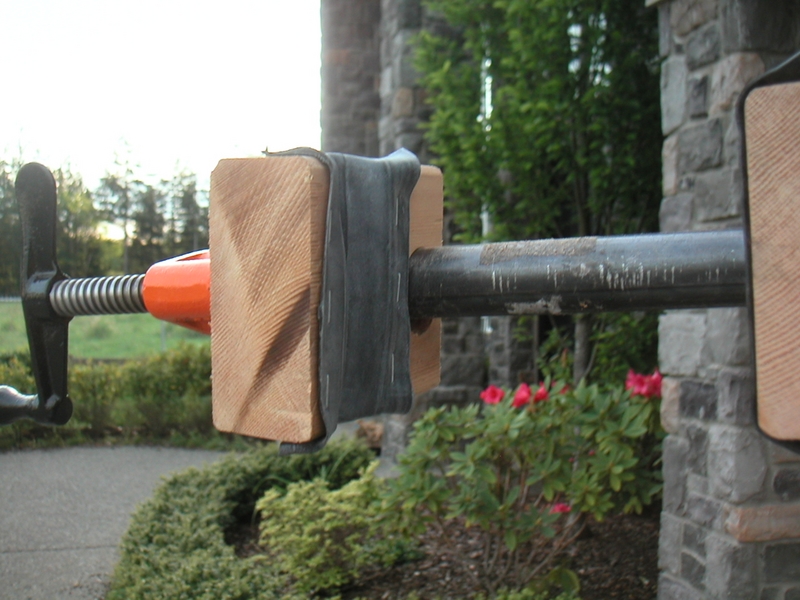
I then decided to create a drill-through clearance hole on the wood blocks to allow them to pass along the 3/4" pipe. I used a 1" bore for that. I then stuck the two 2"x4" sections together and bored through vertically to create the concave channels in each half of the wood block clamp pads. Then I stretched some old innertubes into the concave sections and stapled at the edges to act as rubber padding. Nevertheless, I still use a rag around the seatpost for extra measure.
All told the entire project took me about five hours of my time including gathering of materials and construction/assembly. Total cost of materials was just shy of $40. Home Depot isn't the cheapest place to get these parts but I did have a gift card that my in-laws gave me for Christmas and felt that was a good use of it. Some other people have claimed to have sourced the Pony clamp for about $3. Mine cost me $12. And pipes could have been found for about half the price. If I had hunted around, I probably could have built this for well under $20 in material. Additionally, cheap repair stands can be found via some online retailers for around $40 + S&H. However, I feel that sometimes there's a little added value in building something yourself. Besides, I know my stand is much more stout (if a bit heavy) than those cheap stands that are liable to last only a couple of years.
Posted by khuon on Thu, 05 May 2005, 01:50:15 UTC-08:00I read your link on bike forums
Just wanted to say thank you for showing us the way to build a bike stand.
I am 41 years old and want to start to work on my bikes but I dont like bending over the bike all the time.
Yes you can get a cheap one (made in china) for $3.99 @ Harbor Frieght. It is red.
Posted by: MR E on April 2, 2006 08:26 PMYes you can get a cheap one (made in china) for $3.99 @ Harbor Frieght. It is red. (pony clamp)
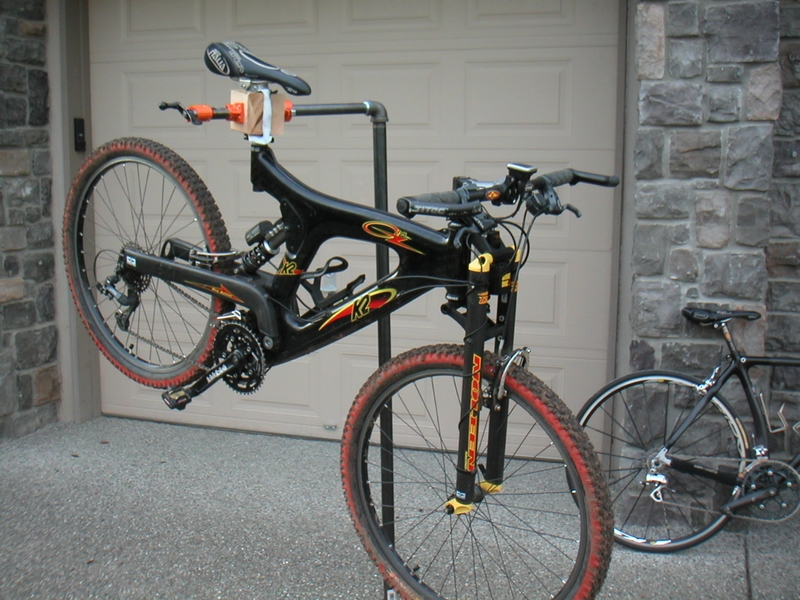
Posted by: MR E on April 2, 2006 08:29 PMA tricked out Aegis on a 2X4 / pipe stand. I like your style.
Posted by: Jon on May 12, 2006 03:32 PMthanks for info, i knew somebody had an idea out there. Now i know what to do with the left over gas pipe from installing my gas furnace. i am planning on building mine this weekend
Posted by: jon on July 21, 2006 06:00 PMHow sturdy is this baby? Looks great, thanks for the good idea.
Posted by: Matt on August 15, 2006 11:39 AMThe stand is plenty sturdy. It's not going to win any weight-weenie awards though. I used it recently to do some BB work and it kept the bike nice and stable.
Posted by: Jake Khuon on August 16, 2006 05:58 PMWhat is the throat size of the pony clamp you used in building your bike stand, 1 and 3/4 inches or 2 and 1/2 inches?
Posted by: John Sherman on October 29, 2006 09:11 AMThe Pony clamp fits a 3/4" pipe.
Posted by: Jake Khuon on October 29, 2006 10:30 AMThanks for the great idea. I built one.
http://photos.hi5.com/0000/146/495/HL5SAE146495-02.jpg
http://photos.hi5.com/0001/901/151/C5JUCQ901151-02.jpg
http://photos.hi5.com/0000/831/887/WQCO8Y831887-02.jpg
Made the bike stand. Great idea! Thanks for the info.
Posted by: Daniel Sanchez on April 13, 2007 10:53 AMThank you !
It's great.
I will send you a royalty check when I finish mine.
THANX
Very nicely done. I've repaired bikes all my like with every baloney kind of stand you can imagine, and this is the best homemade one I've seen. I like to work from a workbench and keep my tool sizes small and flexible, so I think I'll put a floor flange about 12" below your elbow and securely bolt that to a stretch of 2x6 that I can clamp (at the rear, trailing end of it) to the back of my bench and let the weight of the bike force the front of the 2x6 down onto the front of the bench.
Thanks so much for the idea. Well done.
John in Flint, MI
Posted by: John Hartranft on October 13, 2007 08:40 AMHi,
Just wanted to say thanks for an awesome design. Here's how I implemented mine (it is completely fixed in location).
http://www.speeddent.com/gear.php?bike_rack
Posted by: Mike V. on May 1, 2008 03:59 PMHi,
Just wanted to say thanks for an awesome design. Here's how I implemented mine (it is completely fixed in location).
http://www.speeddent.com/gear.php?bike_rack
Posted by: Mike V. on May 1, 2008 04:01 PMHi,
Just wanted to say thanks for an awesome design. Here's how I implemented mine (it is completely fixed in location).
http://www.speeddent.com/gear.php?bike_rack
Posted by: Mike V. on May 1, 2008 04:03 PMHi, Now that it is a couple years later, how has your bike stand held up over time? I'm planning to make one from leftover black pipe that I have, except mine is 3/4" diameter. I have an old Pony clamp which is like new. I will probably get a smaller square of plywood and put the flange in the center instead of on a corner.
Posted by: Bob on July 15, 2008 06:43 PMThe stand seems to have weathered the years pretty well. I have spilled a bit of oil on the base so it's a little stained but nothing has cracked or broken. I should probably reseal the wood base though. I have also thought about tacking a rubber mat to the bottom of the base. It's not like it slips or moves around a whole lot however.
Posted by: Jake Khuon on July 18, 2008 12:03 AMI have most of the parts needed for the stand now. A 3/4" flange will take 5/16" hex bolts, and I decided to try using a Fuller C14 countersink bit on the bottom side of the wooden base. This way I can countersink the hex bolt. With a little repeat drilling to adjust the countersink depth a bit the head of the bolt can be countersunk perfectly flush with the base. I'm not sure about using washers. I have both full washers and locking washers but I think they are 1/4". I've made one mistake so far, one of the four holes I drilled doesn't perfectly line up with its flange hole. The threads on the black pipe I'm using are pretty rusty. I sprayed WD40 on them and then squirted on light machine oil. We will see if they can screw into the flange and then the elbow.
To see the full Fuller countersink bits I'm mentioning go here --> http://www.wlfuller.com/html/no__8_set.html
Posted by: Bob on July 18, 2008 06:45 PMdo it yourselve thanks this gave me a great idea
especially ussing that sort of clap
Posted by: chalambalam on November 17, 2008 08:18 PMHow about this. Bolt a plate base to the ceiling of your garage, and basically turn the thing upside down hanging. You would obviously need a shorter pipe depending on the height of your ceiling, and the level that you are comfortable working at.
This way you can just unscrew it from the pre-mounted base plate when you are done with your maintenance, and put it away in the corner.
I've heard of some people who simply screw a couple of hooks into their garage ceiling and just loop a rope through in order hang their bikes to work on them. Someone else simply used a much shorter vertical pipe and simply bolted it to a workbench. I wanted something at least a little mobile so I could work on my bike in and out of the garage... such as my driveway. |8^)
Posted by: Jake Khuon on April 7, 2009 06:30 PMha ha - your half way to a park 9pc stand! (4/5 ratings) too bad home depot doesn't sell those! anyway good job, but i think ill just spend an extra $50, especially after factoring in my labor cost ;-)
Posted by: mr 'high' roller on April 17, 2009 08:45 PMThanks - I built one in about 1 hour (+ 30 min at home depot). Spent $45.00. I needed to special cut the 2x4 because my wife's tri bike is a cervelo p2-sl.
Posted by: miruddfan on May 17, 2009 01:02 PMI just built mine. Harbor Freight pipe clamp..$4. All piping from Home Depot $35. Took me about 5 minutes to build. Awesome stand!
Posted by: Fernzini on January 2, 2010 05:42 PMthanks, I've been trying to figure out how to make a clamp for a stand. genius!!
Posted by: roger on January 10, 2010 08:02 PMNice stand, I am making one based on your specs. Any improvements you would make since you have had the stand for a while now? How is the inner tube working as a pad against the bike?
Its a clean looking stand. Thanks
Posted by: Michael Souder on March 1, 2010 05:16 PMThanks for the great idea!
I only made one modification to the original specs listed for the stand. I used a 12" pipe for the clamp instead of an 18". my pedals still clear the vertical pipe with plenty of room to spare and the stand sways much less. Also used 3M no-slip floor tape instead of tire tubes. It is rubber on one side and extremely sticky tape on the other. Would highly recommend this design to anybody, original spec or with personal modifications.
Don't know if you're still monitoring this thread, but if you are: Well done, sir!
The approach is low-tech, low-dollar, and has a high benefit-to-expenditure ratio. Just the inspiration I needed, thanks!
Thank you. Be sure to check out some of the modifications and improvements others have made when they built theirs.
Posted by: Jake Khuon on May 31, 2010 09:42 PMJust the ticket great design and good looking
Posted by: Dean on June 28, 2010 04:42 PMwhere do you purchase the bases
i can get the pipes at home depot in danvers ma
My base is just particle wood pressboard. I also got it at Home Depot. I had to buy a 4'x2' sheet and actually just had them cut it in half at the store.
Posted by: Jake Khuon on November 29, 2010 06:36 AMJust put one of these together, following your instructions -- very nice. I didn't have any scrap lumber so I had to buy a 2'x2' base and it ended up costing around $38 for all of everything :) thanks!
Posted by: Tom on February 13, 2011 08:02 PMI like what you have made , For the Block of wood I would use 6x6x6 inch long drill a 3/4 " hole threw the block of wood , that would be your clamping area . then cut the block on a table saw ,in half of the hole you drilled .This will give you a tight clamp press when clamping the blocks together food for thought Great job .
Posted by: Bob on February 18, 2011 05:31 PMthis is pretty cool - good work!
Posted by: trevor on April 26, 2011 07:00 AMI am finally -after over a year- getting around to building this. Shopping for a pipe clamp tomorrow, will probably anchor mine to my (very sturdy) workbench. Thanks again for the inspiration!
Posted by: atoms on April 30, 2011 04:43 PM