SlideShare a Scribd company logo
1 of 49
Download to read offline
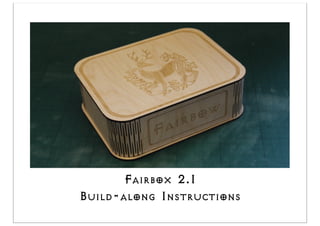
Fairbox 2.1
Build-along Instructions
Contents
Tools Required
Plus+ bench dogs, or a couple of small wooden
blocks would be useful, 2”x1”, 1” thick will do
nicely...
Some fine grain sandpaper....
... or a small sanding machine to
save time...
On a flat work surface, lightly sand all parts to
remove heat scorch marks. This will help the glue
to stick later.If using a sanding machine, go slowly
and gentle. Don't sand the edges- leave those
black. For the small pieces and edge trim, place
them flat inside their jigs, so you don't snap off
the small joints or break the thinner parts. If you
want to apply wood stain/dye/colour, now is the
time to do it. Use 0000 wire wool to lightly
remove tiny imperfections when dry.
Wipe dust off all parts and work surface with a
clean cloth. This stops your glue from clogging up.
Now take the lid, inside plate (rectangular)
and jig. Turn the lid upside down on bench
dogs/wooden blocks. Place the jig on the blank
side of the lid, line up the edges, and clamp it
in place. Put glue inside the jig, on the rear
face of the lid. Place the inside plate inside the
jig, then move the clamps onto the inside plate
to hold it firm. Make sure you don't glue and
clamp the jig in place! Allow a minute or 2 for
the glue to dry. Then remove the clamps and
jig. You should now have a lid, with an inside
plate fixed to the back of it.
Now take the base, the inside base support, and
the base support jig. Turn the base over, so the
logo is facing down. Using bench dogs/wooden
blocks under the base at this stage may help.
Place the jig in place on the inside face of the
base so the edges line up.
Put a small amount of glue on one side of the
base support. Place it inside the jig, then clamp
the base, the base support and the base support
jig all together. Make sure the base and the jig
edges all line up, and ensure you don't glue the
jig in place! After a couple of minutes, remove
the clamps and the jig. 
Now take the 4 internal wall upright pieces. 
Select the 4 wall faces with the best finish, so
when assembled, these face inside the box when on
view.
Run a bead of glue along the base and edge wall
pieces, one at a time, line them up inside the jig,
and slot together. A blob of glue on the 'nipple'
edge will help lock them together.
Use the inner top lip as a jig to help secure the
upright walls in position.
Assemble the upright piece by piece, one at a time,
wiping off excess glue spills whilst wet. Allow the
upright walls to dry in position with the inner top
lip in place.
When the walls are dry, remove the top lip and
lay off. Run a bead of glue around the top
edge of the 2 SHORT interior walls.
DO NOT put glue on the top edge of the 2
long walls. Place the top lip back into position,
and allow to dry.
Now take the long external wrap-around piece with the
living hinges. 
Turn the part-completed box upside down so the writing is at
the rear. Turn the long piece upside down also. Offer both
pieces together, so the wrap-around piece sits on top of the
bottom lip, all around the box. Bend the living hinge around
the corners, all around the box. At the rear of the box, the
male and female joints should slot together. You may need
to gently squeeze the 2 parts, causing the living hinges to
expand and slot inside each other. The male & female wrap
joints should be above the writing on the base, at the back of
the box.
Now  un-clip the joints and take it apart. You're going to
repeat that process again, but this time, fixing the parts
permanently in place using glue.
Run a bead of glue around all 4 top (black) edges
and all 4 rounded corners of the box. Apply glue
to the black edge only.
Then run a bead of glue along the BOTTOM edge
of the wrap, and inside the male & female joints.
DO NOT put glue on the top edge of the wrap. 
Repeat the wrap-around process as you practiced
earlier, and clip the male & female joints together
at the back of the box.
Secure with clamps and lay-off to dry. Wipe off
any excess glue whilst still wet if you can, but
excess you cannot reach, allow to dry and remove
with a light sanding.
When dry, remove all clamps, grab the lid, drop
it in place, and you're finished.
You should be left with 4 jigs- they can go in
the trash.
One Fairbox 2.1 to show off... enjoy.
fairbow.nl

More Related Content

What's hot

How to tile a floor
How to tile a floorHow to tile a floor
How to tile a floorHSS Hire
 
Use wall and floor tiling tools and equipment
Use  wall and floor tiling tools and equipmentUse  wall and floor tiling tools and equipment
Use wall and floor tiling tools and equipmentdeaftc232
 
Installing deck joists
Installing deck joistsInstalling deck joists
Installing deck joistsZulaiha Amaria
 
Hanging guide - Murals Wallpaper
Hanging guide - Murals WallpaperHanging guide - Murals Wallpaper
Hanging guide - Murals WallpaperecoWallvn
 
Foundation and plain paper power point
Foundation and plain paper power pointFoundation and plain paper power point
Foundation and plain paper power pointDjCurrie
 

What's hot (7)

How to tile a floor
How to tile a floorHow to tile a floor
How to tile a floor
 
Painting a ceiling
Painting a ceilingPainting a ceiling
Painting a ceiling
 
Use wall and floor tiling tools and equipment
Use  wall and floor tiling tools and equipmentUse  wall and floor tiling tools and equipment
Use wall and floor tiling tools and equipment
 
Installing deck joists
Installing deck joistsInstalling deck joists
Installing deck joists
 
Hanging guide - Murals Wallpaper
Hanging guide - Murals WallpaperHanging guide - Murals Wallpaper
Hanging guide - Murals Wallpaper
 
Foundation and plain paper power point
Foundation and plain paper power pointFoundation and plain paper power point
Foundation and plain paper power point
 
Go For The Grommets
Go For The GrommetsGo For The Grommets
Go For The Grommets
 

Similar to Fairbox 2.1 build instructions

Bible miniworld-princess-baby-model
Bible miniworld-princess-baby-modelBible miniworld-princess-baby-model
Bible miniworld-princess-baby-modelSandra Fuso
 
Miniature Theater Bilderbuch - Christmas Scene Only
Miniature Theater Bilderbuch - Christmas Scene OnlyMiniature Theater Bilderbuch - Christmas Scene Only
Miniature Theater Bilderbuch - Christmas Scene OnlyElizabeth Plain
 
Simple storage box
Simple storage boxSimple storage box
Simple storage boxjessica30251
 
Mini Album Binding tutorial
Mini Album Binding tutorialMini Album Binding tutorial
Mini Album Binding tutorialhappyyellow
 
Woodworking projects
Woodworking projectsWoodworking projects
Woodworking projectsjazza patrick
 
Wooden Bench With Storage.
Wooden Bench With Storage.Wooden Bench With Storage.
Wooden Bench With Storage.WonderfullDaily
 
Entrastamento de Forma Simples!!
Entrastamento de Forma Simples!!Entrastamento de Forma Simples!!
Entrastamento de Forma Simples!!Gabriel Vandresen
 
Diy chalkboard stocking hangers
Diy chalkboard stocking hangersDiy chalkboard stocking hangers
Diy chalkboard stocking hangersHaulTail
 
Edexcel Canvas stretching
Edexcel Canvas stretchingEdexcel Canvas stretching
Edexcel Canvas stretchingDaniel Freaker
 
Open House Miniatures - Miniature Folding Nativity for 2013
Open House Miniatures - Miniature Folding Nativity for 2013Open House Miniatures - Miniature Folding Nativity for 2013
Open House Miniatures - Miniature Folding Nativity for 2013Elizabeth Plain
 
Building a Cedar Strip Canoe
Building a Cedar Strip CanoeBuilding a Cedar Strip Canoe
Building a Cedar Strip Canoeserengeti321
 
Make a quick box using box joints
Make a quick box using box jointsMake a quick box using box joints
Make a quick box using box jointsjessica30251
 
Week 2 Tool Box Making FOR GRADE 12 AND 11
Week 2 Tool Box Making FOR GRADE 12 AND 11Week 2 Tool Box Making FOR GRADE 12 AND 11
Week 2 Tool Box Making FOR GRADE 12 AND 11LeoNinoDulce
 
Mola ram headdress tutorial cosjj.com
Mola ram   headdress tutorial cosjj.comMola ram   headdress tutorial cosjj.com
Mola ram headdress tutorial cosjj.comcosplaymall
 

Similar to Fairbox 2.1 build instructions (20)

Bible miniworld-princess-baby-model
Bible miniworld-princess-baby-modelBible miniworld-princess-baby-model
Bible miniworld-princess-baby-model
 
Miniature Theater Bilderbuch - Christmas Scene Only
Miniature Theater Bilderbuch - Christmas Scene OnlyMiniature Theater Bilderbuch - Christmas Scene Only
Miniature Theater Bilderbuch - Christmas Scene Only
 
Simple storage box
Simple storage boxSimple storage box
Simple storage box
 
Mini Album Binding tutorial
Mini Album Binding tutorialMini Album Binding tutorial
Mini Album Binding tutorial
 
How to hang wallpaper
How to hang wallpaperHow to hang wallpaper
How to hang wallpaper
 
Woodworking projects
Woodworking projectsWoodworking projects
Woodworking projects
 
Wooden Bench With Storage.
Wooden Bench With Storage.Wooden Bench With Storage.
Wooden Bench With Storage.
 
A Cross To Share
A Cross To ShareA Cross To Share
A Cross To Share
 
Entrastamento de Forma Simples!!
Entrastamento de Forma Simples!!Entrastamento de Forma Simples!!
Entrastamento de Forma Simples!!
 
Diy chalkboard stocking hangers
Diy chalkboard stocking hangersDiy chalkboard stocking hangers
Diy chalkboard stocking hangers
 
How to hang wallpaper
How to hang wallpaperHow to hang wallpaper
How to hang wallpaper
 
Tissue box cover
Tissue box coverTissue box cover
Tissue box cover
 
Edexcel Canvas stretching
Edexcel Canvas stretchingEdexcel Canvas stretching
Edexcel Canvas stretching
 
Open House Miniatures - Miniature Folding Nativity for 2013
Open House Miniatures - Miniature Folding Nativity for 2013Open House Miniatures - Miniature Folding Nativity for 2013
Open House Miniatures - Miniature Folding Nativity for 2013
 
Building a Cedar Strip Canoe
Building a Cedar Strip CanoeBuilding a Cedar Strip Canoe
Building a Cedar Strip Canoe
 
Interior painting
Interior paintingInterior painting
Interior painting
 
Make a quick box using box joints
Make a quick box using box jointsMake a quick box using box joints
Make a quick box using box joints
 
Week 2 Tool Box Making FOR GRADE 12 AND 11
Week 2 Tool Box Making FOR GRADE 12 AND 11Week 2 Tool Box Making FOR GRADE 12 AND 11
Week 2 Tool Box Making FOR GRADE 12 AND 11
 
Fur restoration
Fur restorationFur restoration
Fur restoration
 
Mola ram headdress tutorial cosjj.com
Mola ram   headdress tutorial cosjj.comMola ram   headdress tutorial cosjj.com
Mola ram headdress tutorial cosjj.com
 

Recently uploaded

France's UEFA Euro 2024 Ambitions Amid Coman's Injury.docx
France's UEFA Euro 2024 Ambitions Amid Coman's Injury.docxFrance's UEFA Euro 2024 Ambitions Amid Coman's Injury.docx
France's UEFA Euro 2024 Ambitions Amid Coman's Injury.docxEuro Cup 2024 Tickets
 
Austria vs France David Alaba Switches Position to Defender in Austria's Euro...
Austria vs France David Alaba Switches Position to Defender in Austria's Euro...Austria vs France David Alaba Switches Position to Defender in Austria's Euro...
Austria vs France David Alaba Switches Position to Defender in Austria's Euro...Eticketing.co
 
JORNADA 3 LIGA MURO 2024GHGHGHGHGHGH.pdf
JORNADA 3 LIGA MURO 2024GHGHGHGHGHGH.pdfJORNADA 3 LIGA MURO 2024GHGHGHGHGHGH.pdf
JORNADA 3 LIGA MURO 2024GHGHGHGHGHGH.pdfArturo Pacheco Alvarez
 
Austria VS France Injury Woes a Look at Euro 2024 Qualifiers.docx
Austria VS France Injury Woes a Look at Euro 2024 Qualifiers.docxAustria VS France Injury Woes a Look at Euro 2024 Qualifiers.docx
Austria VS France Injury Woes a Look at Euro 2024 Qualifiers.docxWorld Wide Tickets And Hospitality
 
Mysore Call Girls 7001305949 WhatsApp Number 24x7 Best Services
Mysore Call Girls 7001305949 WhatsApp Number 24x7 Best ServicesMysore Call Girls 7001305949 WhatsApp Number 24x7 Best Services
Mysore Call Girls 7001305949 WhatsApp Number 24x7 Best Servicesnajka9823
 
IPL Quiz ( weekly quiz) by SJU quizzers.
IPL Quiz ( weekly quiz) by SJU quizzers.IPL Quiz ( weekly quiz) by SJU quizzers.
IPL Quiz ( weekly quiz) by SJU quizzers.SJU Quizzers
 
Italy Vs Albania Euro Cup 2024 Italy's Strategy for Success.docx
Italy Vs Albania Euro Cup 2024 Italy's Strategy for Success.docxItaly Vs Albania Euro Cup 2024 Italy's Strategy for Success.docx
Italy Vs Albania Euro Cup 2024 Italy's Strategy for Success.docxWorld Wide Tickets And Hospitality
 
Instruction Manual | ThermTec Hunt Thermal Clip-On Series | Optics Trade
Instruction Manual | ThermTec Hunt Thermal Clip-On Series | Optics TradeInstruction Manual | ThermTec Hunt Thermal Clip-On Series | Optics Trade
Instruction Manual | ThermTec Hunt Thermal Clip-On Series | Optics TradeOptics-Trade
 
Technical Data | ThermTec Wild 335 | Optics Trade
Technical Data | ThermTec Wild 335 | Optics TradeTechnical Data | ThermTec Wild 335 | Optics Trade
Technical Data | ThermTec Wild 335 | Optics TradeOptics-Trade
 
Expert Pool Table Refelting in Lee & Collier County, FL
Expert Pool Table Refelting in Lee & Collier County, FLExpert Pool Table Refelting in Lee & Collier County, FL
Expert Pool Table Refelting in Lee & Collier County, FLAll American Billiards
 
Instruction Manual | ThermTec Wild Thermal Monoculars | Optics Trade
Instruction Manual | ThermTec Wild Thermal Monoculars | Optics TradeInstruction Manual | ThermTec Wild Thermal Monoculars | Optics Trade
Instruction Manual | ThermTec Wild Thermal Monoculars | Optics TradeOptics-Trade
 
8377087607 ☎, Cash On Delivery Call Girls Service In Hauz Khas Delhi Enjoy 24/7
8377087607 ☎, Cash On Delivery Call Girls Service In Hauz Khas Delhi Enjoy 24/78377087607 ☎, Cash On Delivery Call Girls Service In Hauz Khas Delhi Enjoy 24/7
8377087607 ☎, Cash On Delivery Call Girls Service In Hauz Khas Delhi Enjoy 24/7dollysharma2066
 
Turkiye Vs Georgia Turkey's UEFA Euro 2024 Journey with High Hopes.pdf
Turkiye Vs Georgia Turkey's UEFA Euro 2024 Journey with High Hopes.pdfTurkiye Vs Georgia Turkey's UEFA Euro 2024 Journey with High Hopes.pdf
Turkiye Vs Georgia Turkey's UEFA Euro 2024 Journey with High Hopes.pdfEticketing.co
 
Technical Data | ThermTec Wild 650L | Optics Trade
Technical Data | ThermTec Wild 650L | Optics TradeTechnical Data | ThermTec Wild 650L | Optics Trade
Technical Data | ThermTec Wild 650L | Optics TradeOptics-Trade
 
Real Moto 2 MOD APK v1.1.721 All Bikes, Unlimited Money
Real Moto 2 MOD APK v1.1.721 All Bikes, Unlimited MoneyReal Moto 2 MOD APK v1.1.721 All Bikes, Unlimited Money
Real Moto 2 MOD APK v1.1.721 All Bikes, Unlimited MoneyApk Toly
 

Recently uploaded (16)

France's UEFA Euro 2024 Ambitions Amid Coman's Injury.docx
France's UEFA Euro 2024 Ambitions Amid Coman's Injury.docxFrance's UEFA Euro 2024 Ambitions Amid Coman's Injury.docx
France's UEFA Euro 2024 Ambitions Amid Coman's Injury.docx
 
Austria vs France David Alaba Switches Position to Defender in Austria's Euro...
Austria vs France David Alaba Switches Position to Defender in Austria's Euro...Austria vs France David Alaba Switches Position to Defender in Austria's Euro...
Austria vs France David Alaba Switches Position to Defender in Austria's Euro...
 
JORNADA 3 LIGA MURO 2024GHGHGHGHGHGH.pdf
JORNADA 3 LIGA MURO 2024GHGHGHGHGHGH.pdfJORNADA 3 LIGA MURO 2024GHGHGHGHGHGH.pdf
JORNADA 3 LIGA MURO 2024GHGHGHGHGHGH.pdf
 
Austria VS France Injury Woes a Look at Euro 2024 Qualifiers.docx
Austria VS France Injury Woes a Look at Euro 2024 Qualifiers.docxAustria VS France Injury Woes a Look at Euro 2024 Qualifiers.docx
Austria VS France Injury Woes a Look at Euro 2024 Qualifiers.docx
 
Mysore Call Girls 7001305949 WhatsApp Number 24x7 Best Services
Mysore Call Girls 7001305949 WhatsApp Number 24x7 Best ServicesMysore Call Girls 7001305949 WhatsApp Number 24x7 Best Services
Mysore Call Girls 7001305949 WhatsApp Number 24x7 Best Services
 
IPL Quiz ( weekly quiz) by SJU quizzers.
IPL Quiz ( weekly quiz) by SJU quizzers.IPL Quiz ( weekly quiz) by SJU quizzers.
IPL Quiz ( weekly quiz) by SJU quizzers.
 
Italy Vs Albania Euro Cup 2024 Italy's Strategy for Success.docx
Italy Vs Albania Euro Cup 2024 Italy's Strategy for Success.docxItaly Vs Albania Euro Cup 2024 Italy's Strategy for Success.docx
Italy Vs Albania Euro Cup 2024 Italy's Strategy for Success.docx
 
Instruction Manual | ThermTec Hunt Thermal Clip-On Series | Optics Trade
Instruction Manual | ThermTec Hunt Thermal Clip-On Series | Optics TradeInstruction Manual | ThermTec Hunt Thermal Clip-On Series | Optics Trade
Instruction Manual | ThermTec Hunt Thermal Clip-On Series | Optics Trade
 
Technical Data | ThermTec Wild 335 | Optics Trade
Technical Data | ThermTec Wild 335 | Optics TradeTechnical Data | ThermTec Wild 335 | Optics Trade
Technical Data | ThermTec Wild 335 | Optics Trade
 
Expert Pool Table Refelting in Lee & Collier County, FL
Expert Pool Table Refelting in Lee & Collier County, FLExpert Pool Table Refelting in Lee & Collier County, FL
Expert Pool Table Refelting in Lee & Collier County, FL
 
Instruction Manual | ThermTec Wild Thermal Monoculars | Optics Trade
Instruction Manual | ThermTec Wild Thermal Monoculars | Optics TradeInstruction Manual | ThermTec Wild Thermal Monoculars | Optics Trade
Instruction Manual | ThermTec Wild Thermal Monoculars | Optics Trade
 
Denmark Vs Serbia Haaland Euro Cup CPR Drive Incident.docx
Denmark Vs Serbia Haaland Euro Cup CPR Drive Incident.docxDenmark Vs Serbia Haaland Euro Cup CPR Drive Incident.docx
Denmark Vs Serbia Haaland Euro Cup CPR Drive Incident.docx
 
8377087607 ☎, Cash On Delivery Call Girls Service In Hauz Khas Delhi Enjoy 24/7
8377087607 ☎, Cash On Delivery Call Girls Service In Hauz Khas Delhi Enjoy 24/78377087607 ☎, Cash On Delivery Call Girls Service In Hauz Khas Delhi Enjoy 24/7
8377087607 ☎, Cash On Delivery Call Girls Service In Hauz Khas Delhi Enjoy 24/7
 
Turkiye Vs Georgia Turkey's UEFA Euro 2024 Journey with High Hopes.pdf
Turkiye Vs Georgia Turkey's UEFA Euro 2024 Journey with High Hopes.pdfTurkiye Vs Georgia Turkey's UEFA Euro 2024 Journey with High Hopes.pdf
Turkiye Vs Georgia Turkey's UEFA Euro 2024 Journey with High Hopes.pdf
 
Technical Data | ThermTec Wild 650L | Optics Trade
Technical Data | ThermTec Wild 650L | Optics TradeTechnical Data | ThermTec Wild 650L | Optics Trade
Technical Data | ThermTec Wild 650L | Optics Trade
 
Real Moto 2 MOD APK v1.1.721 All Bikes, Unlimited Money
Real Moto 2 MOD APK v1.1.721 All Bikes, Unlimited MoneyReal Moto 2 MOD APK v1.1.721 All Bikes, Unlimited Money
Real Moto 2 MOD APK v1.1.721 All Bikes, Unlimited Money
 

Fairbox 2.1 build instructions

  • 4. Plus+ bench dogs, or a couple of small wooden blocks would be useful, 2”x1”, 1” thick will do nicely...
  • 5. Some fine grain sandpaper....
  • 6. ... or a small sanding machine to save time...
  • 7. On a flat work surface, lightly sand all parts to remove heat scorch marks. This will help the glue to stick later.If using a sanding machine, go slowly and gentle. Don't sand the edges- leave those black. For the small pieces and edge trim, place them flat inside their jigs, so you don't snap off the small joints or break the thinner parts. If you want to apply wood stain/dye/colour, now is the time to do it. Use 0000 wire wool to lightly remove tiny imperfections when dry. Wipe dust off all parts and work surface with a clean cloth. This stops your glue from clogging up.
  • 8.
  • 9. Now take the lid, inside plate (rectangular) and jig. Turn the lid upside down on bench dogs/wooden blocks. Place the jig on the blank side of the lid, line up the edges, and clamp it in place. Put glue inside the jig, on the rear face of the lid. Place the inside plate inside the jig, then move the clamps onto the inside plate to hold it firm. Make sure you don't glue and clamp the jig in place! Allow a minute or 2 for the glue to dry. Then remove the clamps and jig. You should now have a lid, with an inside plate fixed to the back of it.
  • 10.
  • 11.
  • 12.
  • 13.
  • 14. Now take the base, the inside base support, and the base support jig. Turn the base over, so the logo is facing down. Using bench dogs/wooden blocks under the base at this stage may help. Place the jig in place on the inside face of the base so the edges line up. Put a small amount of glue on one side of the base support. Place it inside the jig, then clamp the base, the base support and the base support jig all together. Make sure the base and the jig edges all line up, and ensure you don't glue the jig in place! After a couple of minutes, remove the clamps and the jig. 
  • 15.
  • 16.
  • 17.
  • 18.
  • 19.
  • 20.
  • 21. Now take the 4 internal wall upright pieces.  Select the 4 wall faces with the best finish, so when assembled, these face inside the box when on view. Run a bead of glue along the base and edge wall pieces, one at a time, line them up inside the jig, and slot together. A blob of glue on the 'nipple' edge will help lock them together. Use the inner top lip as a jig to help secure the upright walls in position. Assemble the upright piece by piece, one at a time, wiping off excess glue spills whilst wet. Allow the upright walls to dry in position with the inner top lip in place.
  • 22.
  • 23.
  • 24.
  • 25.
  • 26.
  • 27.
  • 28.
  • 29. When the walls are dry, remove the top lip and lay off. Run a bead of glue around the top edge of the 2 SHORT interior walls. DO NOT put glue on the top edge of the 2 long walls. Place the top lip back into position, and allow to dry.
  • 30.
  • 31.
  • 32.
  • 33. Now take the long external wrap-around piece with the living hinges.  Turn the part-completed box upside down so the writing is at the rear. Turn the long piece upside down also. Offer both pieces together, so the wrap-around piece sits on top of the bottom lip, all around the box. Bend the living hinge around the corners, all around the box. At the rear of the box, the male and female joints should slot together. You may need to gently squeeze the 2 parts, causing the living hinges to expand and slot inside each other. The male & female wrap joints should be above the writing on the base, at the back of the box. Now  un-clip the joints and take it apart. You're going to repeat that process again, but this time, fixing the parts permanently in place using glue.
  • 34.
  • 35.
  • 36. Run a bead of glue around all 4 top (black) edges and all 4 rounded corners of the box. Apply glue to the black edge only. Then run a bead of glue along the BOTTOM edge of the wrap, and inside the male & female joints. DO NOT put glue on the top edge of the wrap.  Repeat the wrap-around process as you practiced earlier, and clip the male & female joints together at the back of the box. Secure with clamps and lay-off to dry. Wipe off any excess glue whilst still wet if you can, but excess you cannot reach, allow to dry and remove with a light sanding.
  • 37.
  • 38.
  • 39.
  • 40.
  • 41.
  • 42.
  • 43. When dry, remove all clamps, grab the lid, drop it in place, and you're finished. You should be left with 4 jigs- they can go in the trash. One Fairbox 2.1 to show off... enjoy.
  • 44.
  • 45.
  • 46.
  • 47.
  • 48.