CAMTASIA STUDIO 8
Camtasia can be used in several different ways:
- Screencasting tool (tutorials on how to use a video software for example)
- For tutorial creation. This is what we’re doing today
Today, we’re going to create a simple lesson in Powerpoint, and then we’re going to use the Camtasia plugin to record a voice over narration over our slides. This is going to the base of our tutorial. When this is done, we’re going to open this project in Camtasia to further edit it (music, add callouts, transitions, and a quiz.)
Note: an alternative to using the method above would be to 1) create the PPT, 2) Save the slides as pictures, 3) import each slide in Camtasia, 4) record your narration over each slide, 5) adjust the length of each slide to match the duration of its narration, 6) group each slide with its narration so that they don’t get accidentally separated when you move thing around.
STEP ONE: CREATE YOUR SLIDES IN PPT
1. Open PowerPoint:
Start > All Programs> Microsoft Office>Microsoft PowerPoint 2010

or click the Windows button.
You can choose a blank presentation (first option) but you may also choose a theme that has a built font/color scheme. To select a theme, go to Design and select the template you wish to use.
Save your PPT to your desktop:
File > Save As
Choose a name and click Save.
Start building a couple slides. To insert a new slide, got to Home> New Slide.
Everything you type in the notes section of ppt can be imported as captions for your tutorial:

STEP TWO: RECORD YOUR NARRATION
At the very end of the PPT menu, click the Add-ins link. If you select the microphone, you will record the sound only, but if you also select the camera, you will also video record yourself.

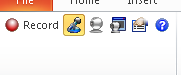
Click the Record button:
Before recording, make sure the volume is high enough. When you speak, you should see the green bar appear on the recording window at the bottom right of your screen. Adjust the slider as needed.
Record a sample narration over your slides.
When you’re done with your recording, save it to your Desktop and choose the option to Edit it in Camtasia:

Note that the file in red is the .camrec file. This is the PPT with the recorded narration that you will edit in Camtasia. Do keep a copy of the original PPT in case you want to make some changes.
Here are some tips:
- As you create your slides, use the notes below to enter your script. Later on, as you export your tutorial to Camtasia, you will have the option to export your script as captions. Captions are useful for students with hearing impairments. Check out these tips to create ADA compliant captions: http://www.techsmith.com/tutorial-camtasia-mac-compliant-captions.html
- Use a large enough and legible font!
- Use a simple and legible color scheme.
- Do not overcrowd your slide with too much text. Use bullets and short sentences.
- Use the slide to illustrate your point. Your slide and the voice over narration should work together, not duplicate each other.
- Keep your slides clutter free. All the information and graphics on the slides must be directly relevant to your message. No “decorative pictures for examples”.
STEP THREE: EDIT YOUR PROJECT IN CAMTASIA
Your project will open in Camtasia. You will be asked whether you wish to import your notes as captions and you will be asked to pick a screen size ( 854 by 480 is fine).
Let’s take a look at the interface:
The screen is split in 3 parts:
- Top left: this is where you call on the tools you wish to use. if you click Transition, the transition menu opens up.
- Top right: preview window
- Bottom: your timeline with the various tracks.
Use the spacebar to start and stop your recording.
You should have 2 or 3 tracks (depending on whether you imported captions).
- The bottom track is your system audio track. Right-click the track title and select Remove track. We won’t need it.
- The second one are your slides with synchronized recording (you can separate the audio from the video by right clicking on the track and choosing Separate video and audio.
- The one on top contains your captions (if you imported any)

You can name each track by double clicking on its name. This is a good idea if you’re planning on adding other tracks such as music or callouts.
Use the slider right below the Clip bin/Library menu to make your timeline smaller or bigger:

Splitting the slide/audio track
Place your playhead where you wish to split your track and click the split button:

You can now insert transitions between each clip (click Transition and drag and drop the transition of your choice between 2 clips.)
Moving various parts of the timeline
Use the mouse and the shift key to select and move various parts of the timeline together. You can also group item (it does not merge them, you can still move individual components but they move together)
Removing portions of the recording:
Editing is very time consuming so try to get the best possible recording from the get go!
You can remove portions of the recording by using the green and red tabs on the playhead to isolate the part you wish to delete. Press the spacebar to listen to your selection and make some adjustments. To delete your selection, right-click the selection > Delete.

Callouts
Callouts allow you to highlight parts of your screen. Click the Callout tab to reveal the Callout options:
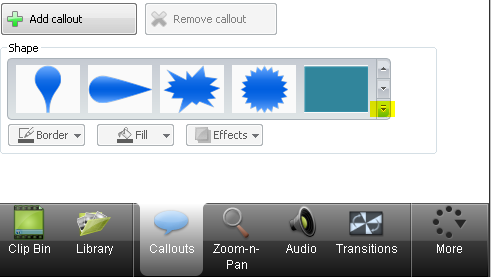
Click the highlighted arrow (in yellow), to expand the menu.
To add a call out, just click on it and then use the Spacebar to synchronize it with your recording.
You can resize a callout by clicking on it on the slide and dragging the circles highlighted in yellow:

You can move the callout and dragging it in the timeline:

And you can adjust the length of the callout by dragging its edges.
Add music
You can also add music. The library tab contains pre-recorded music you can add at the beginning or the end of your recording.
Adding a video, or an image
To import additional material (picture, a video), click the import media button and browse to your file. It will be added to your timeline and you can place it where you want it to be.

Add a voiceover or a webcam recording
You can add a little video introduction or conclusion at the beginning if you wish. Go to More> Record Camera. Your recording will be added to a new track and a copy of it will be placed on your desktop.
Similarly, you can record a voiceover narration from within Camtasia.
STEP FOUR: CREATE A QUIZ
Go to Tools > Quizzing
The quiz toolbox appears in the upper left corner of your screen:

Select add a quiz, name it and then from the timeline, move the quiz at the end of the tutorial. To edit the quiz, double click it in the timeline (Note that you can make the quiz window bigger).

Create the questions and the answers.
STEP FIVE: EXPORT YOUR PROJECT
Click the produce and share button:

The MP4 format is fine. Click next and save the project to your desktop. The rendering process takes a few minutes.