Friday, February 22, 2013

Most Frequently Asked Question

Carving block stash
I thought today I'd tackle the answer to the question I'm asked the most:
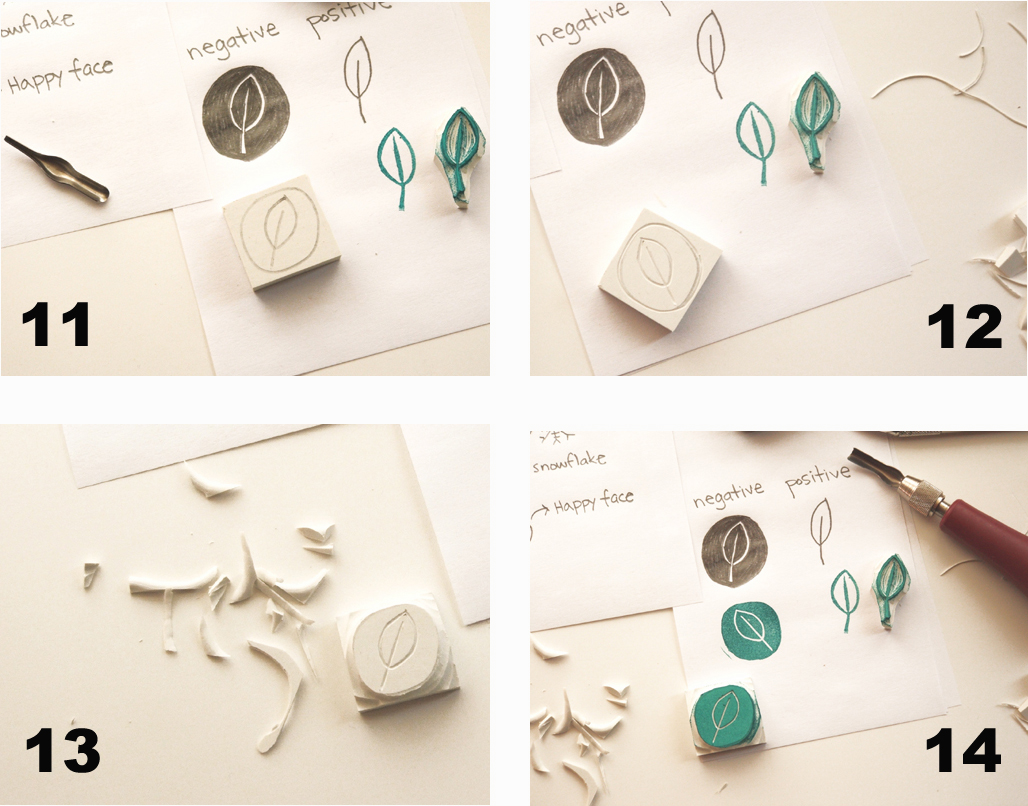
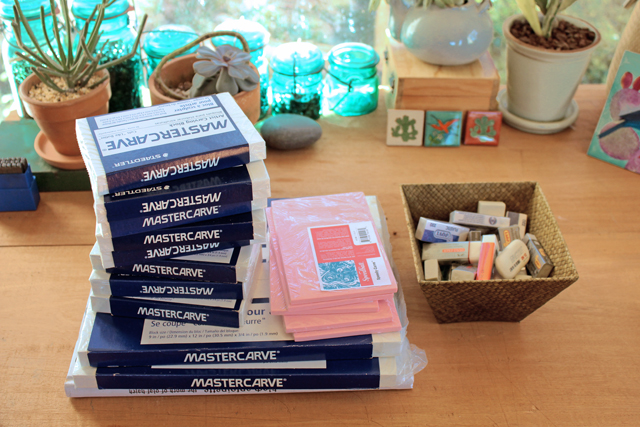
"What material do you use to make your stamps?"
This is my humongous stash of Staedtler's MasterCarve rubber carving blocks. Unfortunately this wonderful material has been discontinued for a few years
and it doesn't look like it's making a comeback any time soon.
I have enough to last me a decade I guess :-)
There is a brand that is very similar and we used it during the stamp carving workshop I taught in Toronto last year, it's called MooCarve. The nice thing about it is that it has the same thickness as the MasterCarve blocks and is very easy to hold when stamping. I doesn't need to be mounted onto wood or acrylic if you don't want to.
I've also used Speedy-Carve rubber blocks by Speedball and it works really well but it only has a quarter of an inch in thickness and does need
some kind of backing with larger size stamps.
I also collect different brands of rubber erasers for smaller stamps. Lookout for the very dense erasers that won't crumble when you carve into them.
You can purchase the MooCarve blocks from Amazon, Blick Art Materials and other art & craft supply shops.

Labels: , ,

Monday, June 29, 2009

Little blooms

The wild flowers don't come out here until the fall.
But I carved myself a little stamp garden today.

Labels:

Thursday, May 07, 2009

F.A.Q #2

This is probably the question I'm asked the most.
This is my favorite carving block to make stamps.
It really does cut like butter:
This tool is called a linoleum cutter.
I use one made by Speedball.
I mostly use the liner tip, and the large gouge:
I have experimented with many brands of ink pads
and this is my favorite brand:


I hope this is helpful & encourages you to try it out,
it is so much fun!

*Someone wanted to know
what font I used to type the F.A.Q.:
It is American Typewriter regular :)

Labels: ,

Wednesday, April 29, 2009

Me....in action!


Stamp Carving from Geninne Zlatkis on Vimeo.
I made this 10 minute video today
to show the whole process
of making a hand carved stamp.
It might take a while to load so be patient.
The music I used is called
"Bigger Situation" by Leo Kottke,
a favorite of mine :)
Enjoy!

Labels:

Wednesday, February 25, 2009

Wrap

A great use for hand carved rubber stamps
is printing your own gift wrapping paper.
I love how the white ink looks
on Kraft paper.

Labels:

Monday, April 07, 2008

Eraser stamps


So many fun things you can make
with a simple eraser stamp
...like personalizing your sticky notes or notepads,
making your own stickers, etc...

Labels:

Friday, November 30, 2007

Hand Carved Stamps Tutorial Part 2


Whew!
The weather has been unseasonably rainy this week
and I thought I wouldn't have time to do Part 2 of the tutorial,
but the sun came out this morning :)
I'll be adding the explanatory text over the weekend
...I didn't want to leave you hangin'
I bet you can even start carving by just looking at the pictures.
This tutorial was done with plain white erasers. you don't need to have
a special carving block to make simple & fun stamps.
Click on the images to see them LARGER
and look at all the details.
Part 3 next week!

Have a lovely weekend friends.

Labels:

Friday, November 23, 2007

Hand Carved Stamps Tutorial Part 1

This is a list of the tools that I use to make my stamps.
You can certainly use other alternatives.
I am linking each item to Blick Art Supplies
simply because they have good photos
and it's where I usually buy my supplies,
but any of these things can be bought at any other
art/office supply store in your area.
1- A Speedball linoleum cutter is the tool you will use to carve your stamps. I use the No.1 and No.5 cutters. The No.1 is for carving out fine lines and the No. 5 for carving out large areas of the stamp.

2- You can use any kind of dense/soft eraser to make your stamps (I recommend Staedtler erasers, they work like a charm) or carving blocks made specifically for this purpose like MasterCarve, E-Z Cut, Soft-Kut and many more. For the purpose of this tutorial I will make stamps with erasers which are easily available to everyone.

3- A trusty (and highly dangerous) X-Acto knife for cutting the eraser or block material to the desired size or shape. Be careful with this tool! and always put the protective cap back on after each use.

4- Any type of archival ink pad. There are so many kinds of ink pads available out there! I use StazOn, or VersaColor, you can also use black ink pads from office supply shops.

5- A No.2 pencil.

6- Some plain white paper to do some stamping tests and to draw the image you want to transfer on to your carving block.

7- And last but not least: an idea ;) You have to decide what it is that you want to make...I would start with a basic simple shape. I use my teardrop shapes all the time or just a basic triangle like the happy Christmas trees I recently posted. Practice, practice, practice and in no time you will be making more intricate shapes.

Part 2 of the tutorial will be posted next friday so stay tuned!

Labels: