Learn the best ways to troubleshoot QuickBooks error code 6123
With each passing day, more and more entrepreneurs are getting inclined towards incorporating QuickBooks software in order to carry out their day to day activities in a smooth manner. It is an undeniable fact that the QuickBooks has the ability to transform the way entrepreneurs carry out the accounting and bookkeeping activities manually, but at the same time it is an undeniable fact that the QuickBooks software at times get prone to certain errors. One such common error that can be seen often is the QuickBooks error code 6123. This kind of error occurs when users tries to open the company file. There are various other facts associated with this error code, which will be discussed later in this article.
We recommended you to go through this segment thoroughly in order to rectify this issue manually. However, a better way to solve the issue is to contact a QuickBooks error support team that has a reputation for expertise. Our proficient & certified team of QuickBooks experts can be contacted via the helpline i.e., 1-800-761-1787. We’ll guide you through the entire walkthrough and will make sure that this error on your system remains an event of the past. On that supportive note, let’s proceed!
You may also like: How to Disable QuickBooks Update Service Pop Up?
What is QuickBooks Error Code 6123, 0?
As stated before, QuickBooks error code 6123 is usually seen when users make an attempt to restore the backup of the company file. This error code pops up without any prior indication or warning and hinders the company file activities. You might also encounter the same error while opening a company file from the multi-user network. The error may also appear while opening the file directly from the network or while restoring the backup. The error message that appears along with this error code states that there is a “Problem connecting to Server”. When you are opening a company file over a network or multi-user mode you may see the error -6123, 0 message on your computer screen:
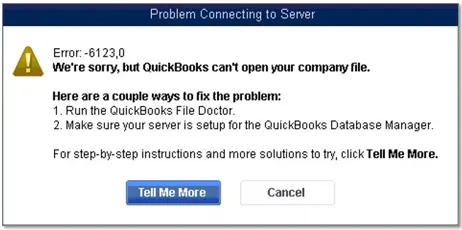
| Error | Description |
|---|---|
| Problem | Error: -6123, 0: We’re sorry, but QuickBooks can’t open your company file. |
| Problem Connection to Server | Error 6123, 0: “Connection to the QuickBooks company file has been lost” |
This error can be complicated to resolve for users, so we highly recommend you to disable your antivirus and other security programs before proceeding to the below given troubleshooting methods.
Important: It should be noted that, in case you are using McAfee security software, then this might be a reason behind to causing the issue in QuickBooks desktop. However, if you are already aware that McAfee security software does not belong to Intuit, and Intuit can’t help you if the McAfee causing the problem then it is recommended to consult with McAfee support first or continue reading this article.
Factors that causes QuickBooks Error 6123
There can be multiple factors that might lead to such error in your QuickBooks, a few of which are mentioned below:
- Damaged Windows OS can be one of the reasons for error code 6123, 0
- There might be a damaged company file.
- If you have restored the company file from an external storage device.
- A disrupted network connection from the host server can be another valid reason.
- Firewall settings may be interrupting the QuickBooks software while opening the company file.
- This troublesome QB error may also appear If some antivirus program installed on your system hinders the smooth communication process between QuickBooks and the server.
- QuickBooks data files or program files are corrupted or damaged.
- Damaged Windows User and QBW files can also be a reason.
Read Also: What is QuickBooks Error H303, and How to Resolve It?
Procedure to Rectify the Error Code 6123, 0 in QuickBooks
After uncovering the various causes that could cause this error, you should know the different methods that can assist you to eliminate QuickBooks error message 6123, 0. Below we have jotted down a number of the most efficient techniques to rectify the ongoing problem. Therefore, without wasting much time, let’s check out the methods of rectification techniques one by one and get this error rooted out from the system once and for all.
Condition 1: Error 6123, 0 appears while opening or upgrading your company file
This technical issue in QuickBooks could be triggered in different situations. More often, this error shows up during the process of opening the company files in QuickBooks. Follow the below-given methods if this is the scenario in your case.
Method 1: Renaming the company file or removing any special characters from the name

Many times the issue is seen if the company file name has any special character in its name or if the file name of the file exceeds the prescribed limit. Thus, you need to ensure that:
- The company file name shouldn’t exceed the allowed 30 characters.
- Also, it should not contain any special type of character or space in the file name.
Method 2: Use QuickBooks tool hub program to fix this error
Step 1: Download and Run QuickBooks Tools Hub
The steps to download and run the tool are as under:
- At first, close the QuickBooks accounting software.
- Download the QuickBooks tools hub file. Once done with that, save the file somewhere you can easily find it out.
- Now open the file that was downloaded in the above step.
- Next, carry out the on-screen prompts, in order to Install and agree to the terms and conditions.
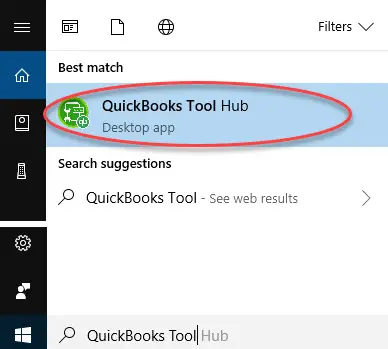
- Double-click the Icon on the Windows desktop to open the tool hub.
The point to be noted here is that, if you are unable to spot the icon, it is recommended to search in Windows for Tool hub and then select the program.
Step 2: Use QuickBooks File Doctor Tool
QuickBooks file doctor tool can help you in automatic scanning, diagnosis, and rectification of the issues, especially when it comes to common QuickBooks desktop data issues. After installing the tool, implement the below-given steps to run the tool.
- Select the Company file issues option in the QuickBooks Tools Hub.
- After that, hit a click on Run QuickBooks File Doctor tool.
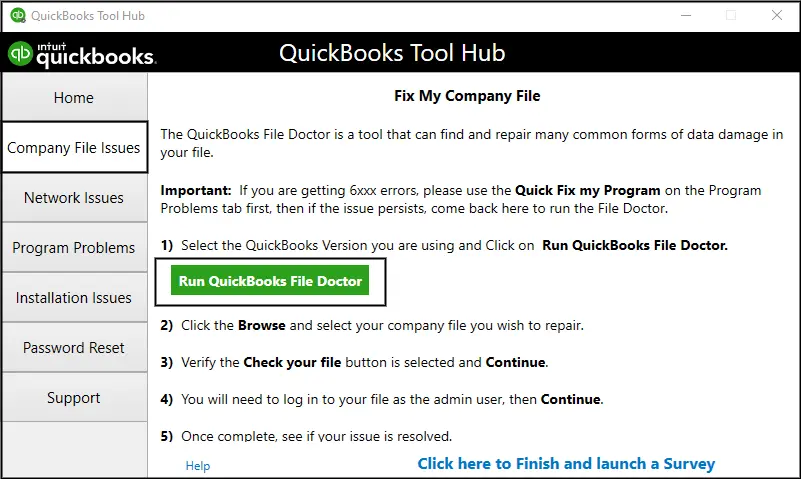
- When the File doctor tool opens up, you are recommended to select the Company file from the drop down list. In case you are unable to find it, then click on Browse option to search the system for the file i.e. [your company name].qbw.
- Select Check your file only and then hit Continue to diagnose the file.

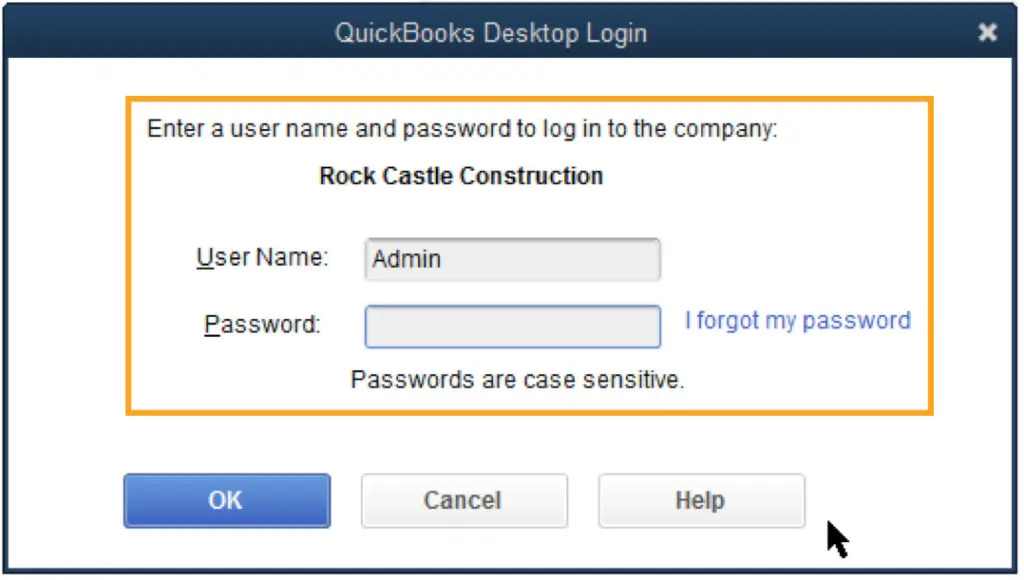
- Enter the QuickBooks admin password, followed by hitting Continue. Once done with this, the QuickBooks file doctor tool will begin with the repairing process on its own, which might take some time.
- To end the process, go for the company file from the list and then hit a click on the Open QuickBooks option.
It should be noted that if the file can be opened up without any issue, then the error is resolved. But make sure to backup the company file, after you have opened it up.
Step 3: Running Quick Fix my program from Tool hub program
To use Quick Fix My Program feature in tools hub program, you are supposed to carry out the steps below:
- Hit a click on the Programs Problems option in the Tool Hub.
- After that select the Quick Fix my Program tab.
- This process might take a minute to run. In case you have multiple versions of QuickBooks installed on the system, then it might take more than a minute to open up.
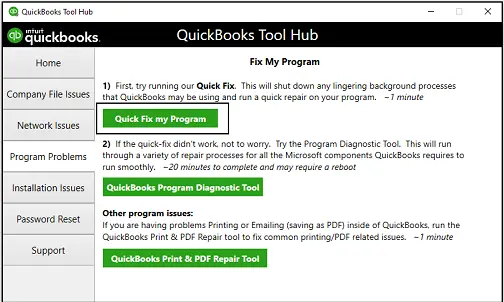
- When Quick Fix my Program is finished, you need to open QuickBooks and then verify the issue is fixed.
Read Also: How to Export Reports as Excel Workbooks in QuickBooks Desktop?
Method 3: Renaming the .ND and .TLG file
- To begin with, you need to first open up the folder that contains the company file.
- After that, choose the Corresponding .ND file.
- Next, hit a right-click on the company file and then hit the Rename option.
- Also, rename .ND file to .ND.OL
- Select the .TLG file and rename it in the same way as you renamed the Network (.ND) file.
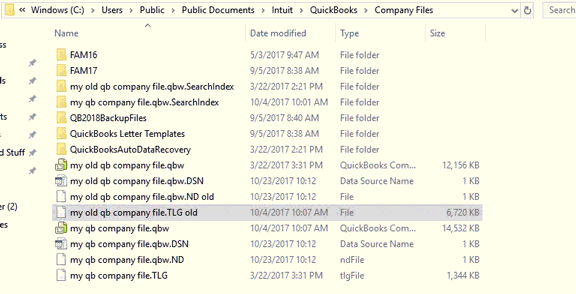
- Now rename it to .TLG.OLD.
- At last, ensure to open the QuickBooks company file.
Setting proper folder permissions.
At times, the folder settings require to be set to full access. It depends on the Windows settings and Windows user login.
Method 4: Creating a new Window User
The probability of Windows user login being corrupted might be higher. Thus, in that case, you can carry out the steps below:
- Open Control Panel and hit click on the Create new user option in the User icon.
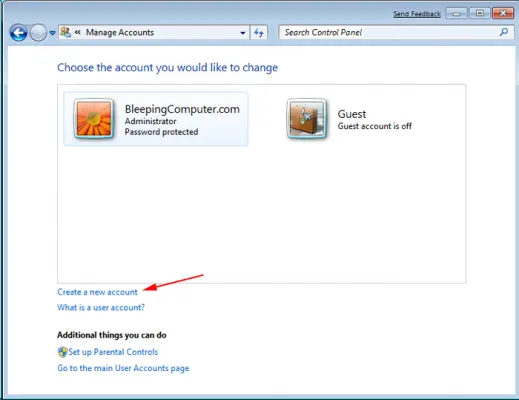
- Select the Administrator for user type.
- After that, log out of the existing.
- Followed by rebooting the system, and then login using the New user credentials.
- Now move the company file to the desktop.
- Lastly, open QuickBooks and access the company file.
Related article: How to Fix QuickBooks Error: Could Not Connect to the Email Server?
Method 5: Restart your system in Safe Mode

- By restarting and using your system in Safe mode will stop all the 3rd party applications to restrict QuickBooks desktop from running and operating without any disruption.
- You can also try to temporarily disable 3rd party security programs in safe mode.
Once both these steps are ensured, open QuickBooks and try opening your company files in Safe Mode itself.
Method 6: Disabling the system security programs
Just in case you have an antivirus installed on your system, then it might cause the issue. Majority of the times, the antivirus program interferes the company file and consider them as malware. This might hinder you from opening the company file. In such a situation, you are required to disable the QuickBooks application and then open the company file.
Method 7: Re-installation of QuickBooks application

- Start the process by clicking on Windows start button and from there, visit the Control panel.
- Uninstall the current QuickBooks from the Control panel tab.
- Download QuickBooks variant that you wish to utilize on the system or use the QuickBooks installation CD.
- And then Install the QuickBooks in Normal mode.
- Enter the product ID and license number at there.
- After entering the credentials, QuickBooks will be registered and activated to use.
- Lastly, try opening the company file.
Read Also: How to Fix QuickBooks Crashing Error When Sending Emails?
Method 8: Moving company file to a different location

- In order to check if there is any issue with the file path, you will have to move the file to a different location and open it from there, in order to check if it works in a proper manner.
- Move to the folder where the company files are located.
- Also, right-click on the Company file and select Copy the file.
- Verify that you copy the right company file with the extension .QBW.
- Copy the file to the desktop, and then hit a right click on Blank space, and then choose New and folder options respectively.
- Open that New folder and then click on Paste the file there.
- Toward the end, you need to open the QuickBooks program and access the company file from the new location.
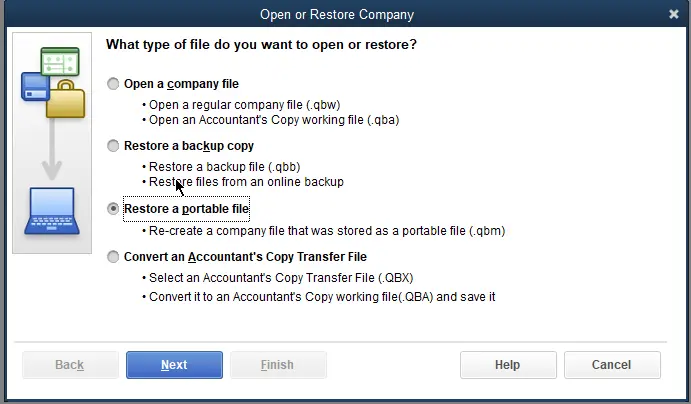
Method 9: Restoring the company file

- It is supposed to move the Backup file to the local hard drive. And also, avoid opening them from an online storage folder or remove the drive.
- Carry out the required steps to Restore the company file from the backup.
You may also read: How to Fix QuickBooks Error Code C=343?
Condition 2: In case Error 6123 is encountered while restoring a backup (.qbb) on a new system
Another condition in which this QB error code 6123, 0 may show up is when restoring a previously backed-up company file. If you are facing this error while restoring the backup, then the following steps will resolve the issue on your computer.
Method 1: Create a portable company file (.qbm) to restore your company file
In this situation, you are recommended to create a portable company file. Then, you are required to use it to restore the company file. The steps to be followed in this method are as follows:
- First, you need to open the QuickBooks desktop on the same system which was used to create the backup of the company file.
- After that, open the Original company file.
- The next step is to Create a portable file of the company file.
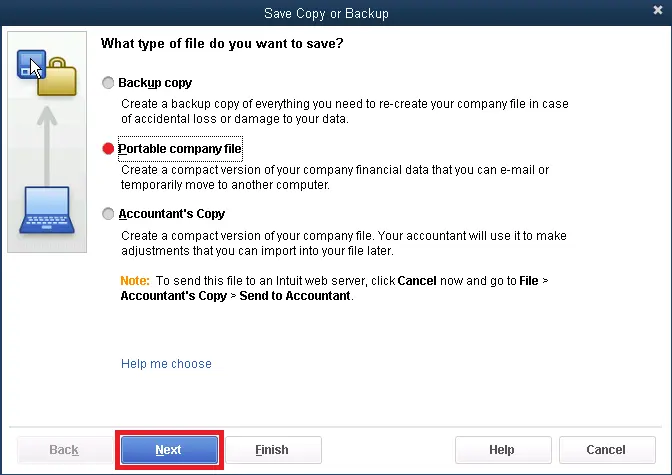
- Also, open the QuickBooks desktop on the new system.
- Restore the company file using the Portable copy, rather than using the backup file.
Method 2: Use the QuickBooks auto data recovery(ADR)
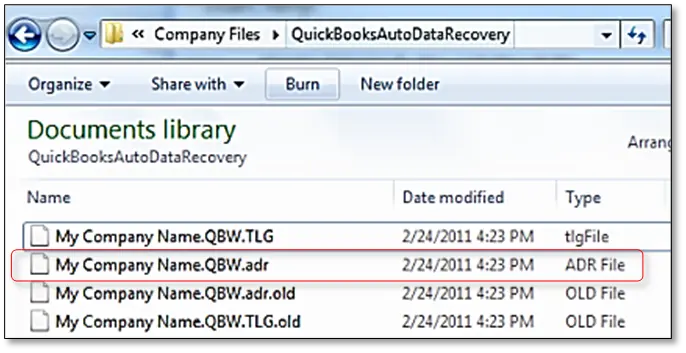
You can restore your company file using the auto data recovery function. Restore your .adr copy of this file and check whether it works or not. Most probably, there is a huge possibility that this error shall be resolved by using this method. Click here to get the procedure of using QuickBooks auto data recovery.
Related Post: Steps to Fix Company file is missing or cannot be found in QuickBooks
Condition 3: Manually configuring multi-user setup
If you are making use of multi-user in QuickBooks, then you can configure its settings using the steps listed below:
Step 1: Renaming the .ND and .TLG files
Getting the Network and transaction log files renamed can fix QuickBooks Error 6123. The instructions are as follows:
- At first, open the folder to the company file.
- Within that folder, select the .ND file of the company file.
- You then need to right-click on .ND file and then click on Rename option.
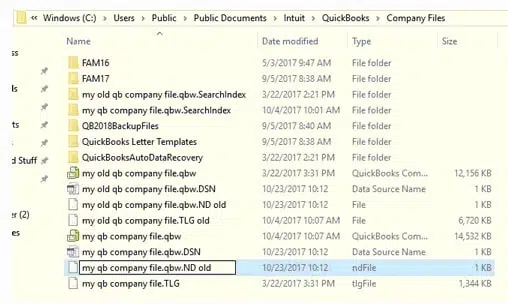
- Add .old at the end of the file name.
- You then need to repeat the same process for .TLG file.
- Open the QuickBooks desktop company file through QuickBooks.
- Re-scan the company file making use of the database server manager.
- First, stop the database server process.
In case of Windows 10 & 8
The steps to end the database process in Windows 8 and 10 are as under:
- You should press Windows key and then type in Task manager.
- Click on the Task manager and then click on More details.
- Once done with that, you should select the Details tab.
- Locate the QBDBMgrN.exe and also right-click the same.
- Select End task.
- Repeat the same steps until all the instances of QBDBMgrN.exe have been stopped.
- Close the Task manager.
For Windows 7
For disabling the database process via task manager in Windows 7, the instructions are given below:
- In case you are using Windows 7, then in that case, we suggest you to press Ctrl + Alt + Delete keys.
- Select open the Task manager.
- Click on Image name column heading from the Processes tab.
- Right-click the QBDBMgrN.exe and click on End task.
- Repeat the steps to stop all instances of QBDBMgrN.exe.
- Finally, close the Task manager.
Restarting the QuickBooks services
- Here you are supposed to press Windows + R keys, in order to open Run window.
- Type service.msc and then press Enter tab.
- Select the Name column heading to sort the entries alphabetically from the Services window.
- Right-click on the Convenient service for QuickBooks desktop version and then choose Start tab.
- QuickBooks Desktop 2024 or QB Enterprise 23.0: QuickBooks DB34
- QuickBooks Desktop 2023 or QB Enterprise 23.0: QuickBooks DB33
- QuickBooks Desktop 2022 or QB Enterprise 22.0: QuickBooks DB32
- QuickBooks Desktop 2021 or QB Enterprise 21.0: QuickBooks DB31
- QuickBooks Desktop 2020 or QB Enterprise 20.0: QuickBooks DB30
- QuickBooks Desktop 2019 or QB Enterprise 19.0: QuickBooksDB29
- QuickBooks Desktop 2018 or QB Enterprise 18.0: QuickBooksDB28
- QuickBooks Desktop 2017 or QB desktop enterprise 17.0: QuickBooksDB27
- QuickBooks Desktop 2016 or QB Desktop Enterprise 16.0: QuickBooksDB26
- The last step is to Close services.
Re-scanning company files
- You are required to open QuickBooks database server manager.
- To scan, you need to Browse for the location of the QuickBooks company file.
- Also close QuickBooks QuickBooks database server manager.
- The final step is to open the company file.
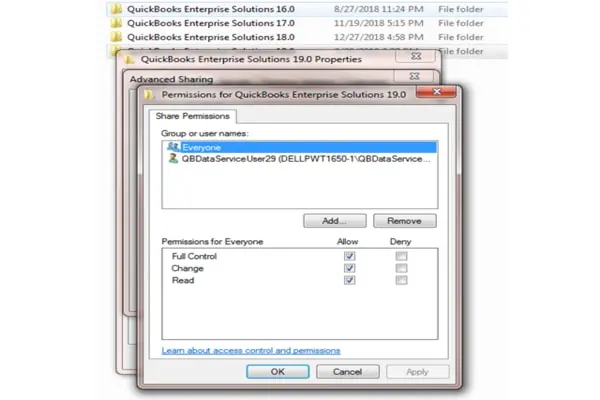
Step 2: Setting up proper folder permissions
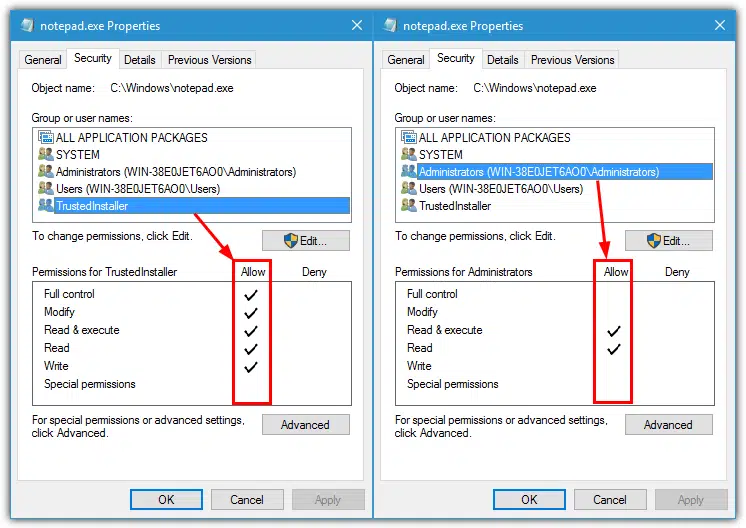
It should be noted that the folder containing the QuickBooks desktop company file is present on the host system. Moreover, all the users must be provided Full control this, includes the database server manager user. [This step might harm your company file or remove it from the directory so it is not recommended by Intuit, you can perform this step at your own risk]
Read Also: How to Access QuickBooks Database?
Step 3: Moving the company file to a different location
In order to see whether there is any issue with the file path, you can move the file to a different location, then open it from that location to check if it works. If it didn’t help you, then perform the below-given steps to rectify the error message 6123.
Step 4: Checking Firewall & Antivirus Ports
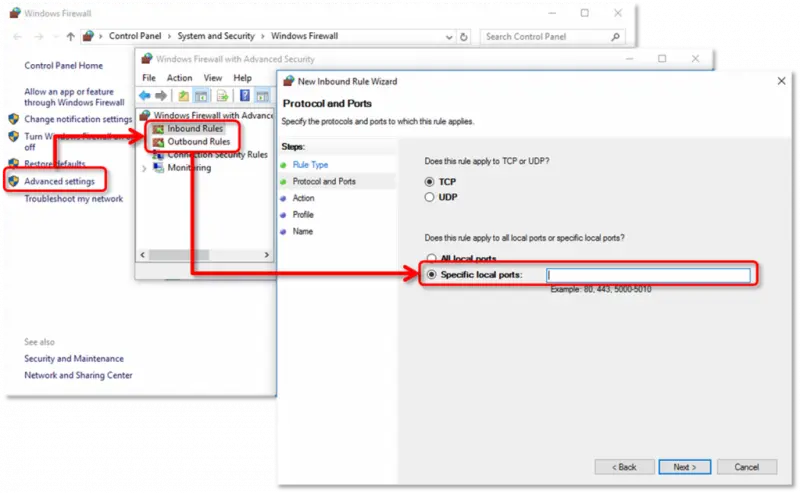
At times, the firewall and antivirus programs might block the program from accessing the company file. You can check configure firewall and internet security settings for QuickBooks desktop to further prompts.
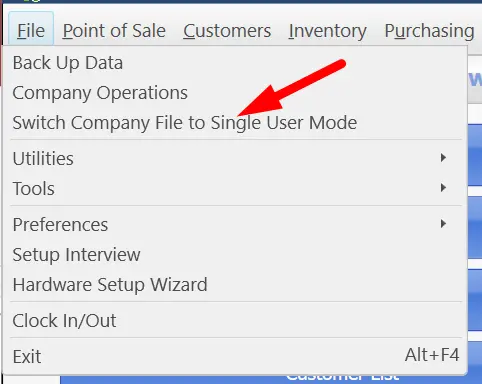
Step 5: Toggle Hosting settings in QuickBooks
- At first, open the company file.
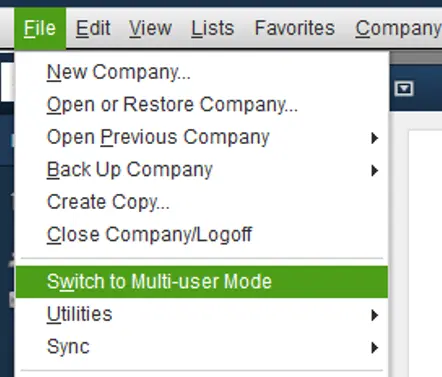
- Choose the File > and then choose Switch to single-user mode.
- After that, select File tab > Utilities and also select Stop hosting multi-user access.
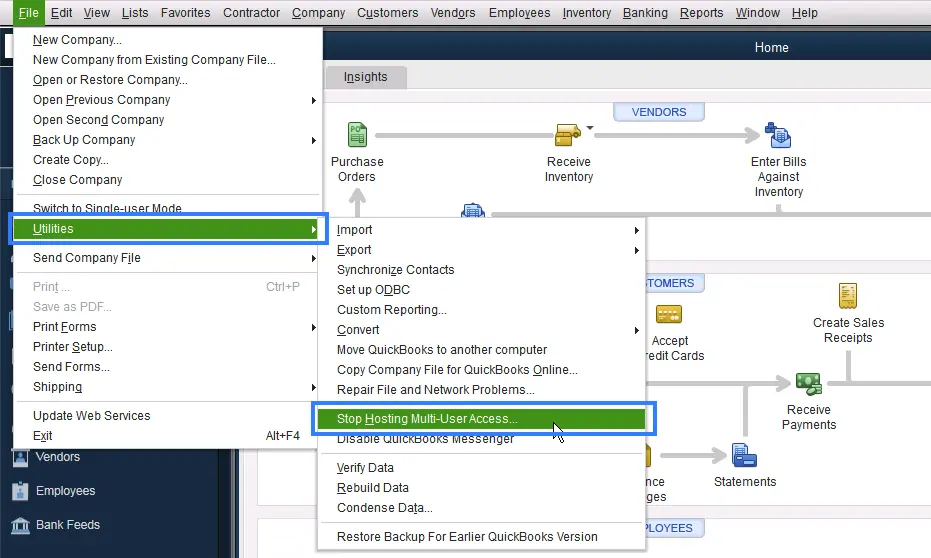
- You are then required select File > Utilities > Choose host multi-user access.
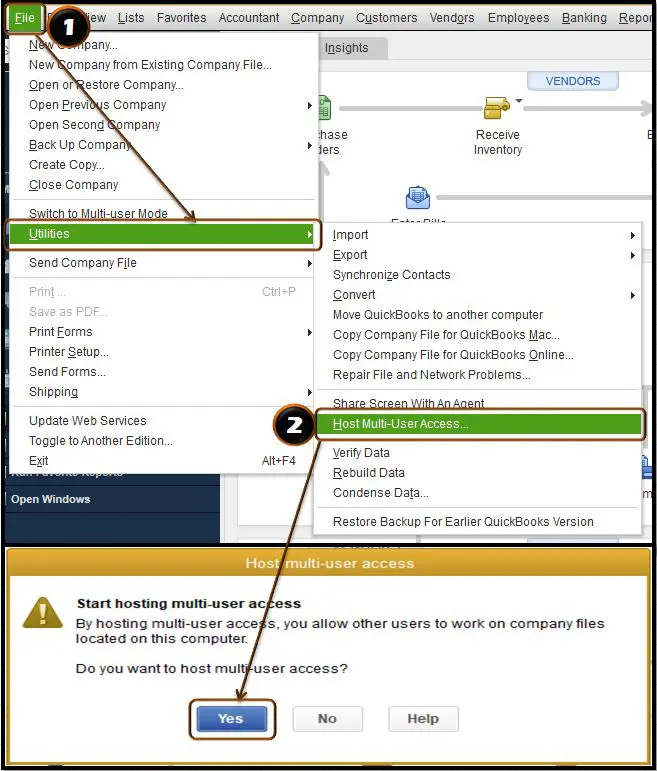
- Finally, you must select the File and go for Switch to multi-user mode.
See Also: Methods to resolve QuickBooks error code 6189, 816
Wrapping up!
Fixing QuickBooks error code 6123 doesn’t involve any rocket science. Carrying out the simple procedures listed above can help you in getting rid of the problem. However, if none of the methods worked in your favor, and this error continues to trouble you, then in that case, feel free to speak to our QuickBooks enterprise support professionals team.
Connect with us by dialing our customer support line, i.e., 1-800-761-1787, and let us manage the issue for you. Our certified accounting professionals are available to assist you whenever you require us.
Read these articles also:
How to Solve QuickBooks Payroll Error PS034?
Steps to Fix script error when accessing QuickBooks desktop
How to Update and Use the New Built-in Browser for QuickBooks Desktop?