Why and How to transcode Canon DSLR’s H.264 .MOV files for editing
Update 15th July 2011: Since this article was written, Adobe Premiere Pro CS5.5 has been released which, on my system at least, provides much smoother playback of Canon DSLR .mov files without transcoding, to the point where I would now only recommend the below process for those on CS5 or earlier, or if your system still doesn’t play smoothly in CS5.5.
For tutorials on how to further optimize CS5.5 for smooth playback and editing, see this link.
I’m fairly new to shooting video on DSLRs, but video editing and encoding is something I’ve been doing for a longer time, so I had an idea of what the limitations of the video format the Canons DSLRs record in would be. This is aimed at PC and Premiere Pro users – Mac users would use a different intermediary codec for editing in Final Cut Pro, and there are Mac specific tutorials out there for that.
We’ll make transcoded copies of your original files, use these transcoded files as intermediary files for editing, then at the end, link the project back to your original non-transcoded files so that you’re outputting from the highest quality source files (the originals). There are other tutorials for this out there, but most (not all) don’t make any nod to discarding the transcoded files and bringing your originals back in to the project before the final export – this is insane. If you take a file highly compressed to 10mb and lightly compress it again to 100mb, you still lower the quality. So, here’s my tutorial with that final critical step.
Why Transcode?
Firstly we’ll get the “Why” out of the way. The .MOV files from your camera already import into Premiere Pro (or other chosen NLE) fine, why change format? In addition, chances are you know enough about video to know that taking a video compressed in one lossy format and compressing it again to another lossy format is a Bad Thing. The reason is that the compression artifacts from the first round of lossy compression (in our case Canon’s chosen H.264 codec) are already there in the video. Compressing it using another codec doesn’t remove these original H.264 compression artifacts – it only adds more.
Well, with your original H.264 files imported into a timeline in Premiere Pro (or other NLE), you’ll already have noticed they don’t play smoothly. Often frames are held while the audio plays ahead, chunks of frames are skipped and syncing any movement or action is generally a nightmare (I’ve been working on a couple of music videos recently – try syncing drum hits to the audio track with this jumpiness!). You can see this by watching the time counter in the bottom of the preview window – rather than smoothly counting up it jumps and leaps and stutters.
Why does it do this? Well the H.264 codec is intended for playing back video for the end user. This means that like most video codecs it uses some fancy tricks to minimize file size – one of these tricks is that it doesn’t actually store the information for each frame. It stores the information for every, say, 15th frame, then for each of the following 14 frames it only stores the information on what has changed since that 15 frame keyframe. When playing back a video in a linear way (say, watching Star Wars from beginning to end) there’s enough processing power and time for your computer to turn this into smooth video.
For editing, however, this is a nightmare. Imagine driving from Town A to Town B, you’re half way there, and instead of looking at where you are on the map to decide on your next turn, you have to look at where you came from, then trace the long route you already came, then decide on what happens next. This is what’s happening when you skip around in a file using this key frame system, and it’s why it’s unsuitable for editing – where you skip around constantly.
So we need a codec that doesn’t use this key frame system, but instead stores full information for each frame individually. For this tutorial we’ll use DVCPRO, though there are a couple other suitable formats for PC.
How to Transcode
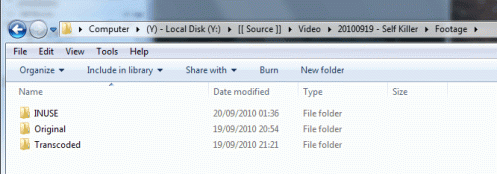
Firstly, within your video project directory, create a sub-folder called “Footage”. Within this folder, create three sub-folders; “Original”, “Transcoded” and “INUSE”. You can name any of these to your preference, but this is the naming convention I’ll be using here. Also note that this work flow will use about a third more disk space than is absolutely necessary, in return for greater convenience and flexibility and without having to un-link and re-link in Premiere Pro. We’ll cover that later.
Copy all your .MOV video files from your Canon DSLR into the “Footage/Original” directory. These files are in a .MOV container using the H.264 codec, the key framed codec unsuitable for editing.
So let’s fix that; go to http://www.squared5.com/ the website of a program called “MPEG Streamclip”, and download and install the windows version (it’s free and lightweight), then run it.
Since we’ll have dozens of files to convert, not just one or two, we’ll go under the “List->Batch List” menu (Ctrl+B shortcut). Click on “Add Files”, and browse to the “Footage/Original” directory within your project directory. Select all the .MOV files in there and hit “Open”.
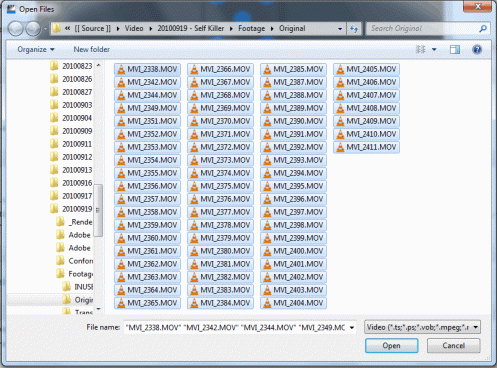
You’ll be asked to “Chose a task” – make sure “Export to Quicktime” is the selected option, and importantly, that “Join all the files” is unchecked – leaving this checked would cause your files to be coalesced into one big long file, a Bad Thing. You’ll now be asked to chose a destination folder where the transcoded videos will be written to. Well done at the back, you guessed right – select the “Footage/Transcoded” folder within your project directory that you created earlier.
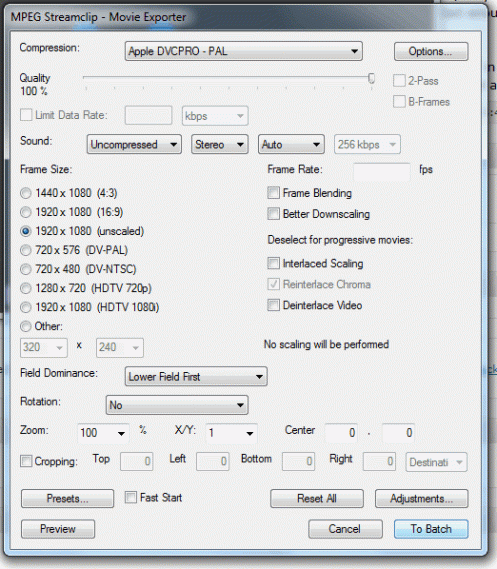
After you’ve done that the important dialogue will display; this is where we select the format for export. From the drop-down box at the top, select one of the Apple DVCPRO entries. There will be a PAL and NTSC option – each seems to have a slightly different pixel aspect ratio (one is wider than the other), though neither uses the correct 1:1 ratio – I’ll cover the problems that presents later. For now the below options will do;
Under the “Options” button you can change the scan type to Progressive and the ratio to 16:9, set the resolution to 1920×1080 (unscaled)and uncheck the boxes under “Deselect for progressive movies”. At this point we don’t actually have to care about quality – as mentioned at the top these transcoded files are going to be used purely as intermediary files for editing and aren’t going to be included in the final export, so you can get away with lowering the quality to 0% for the sake of saving space. However, I always use 100% as even then they process fast enough, and disk space is cheap.
A CRITICAL point here is the sound. If your original .MOV videos had sound recoded, you must not select “No Sound” in the drop down on this dialogue, even if you plan on discarding the sound and not using it. The reason is that if your original files have sound and your transcoded files have none, when you later try to swap the transcoded files out and your originals back in before doing your final export, Premiere Pro will complain that the files don’t match and won’t swap them. Your editing work will be lost. If your original files have no sound (the “Record Sound” option was off in your camera menu), you can set No Sound here.
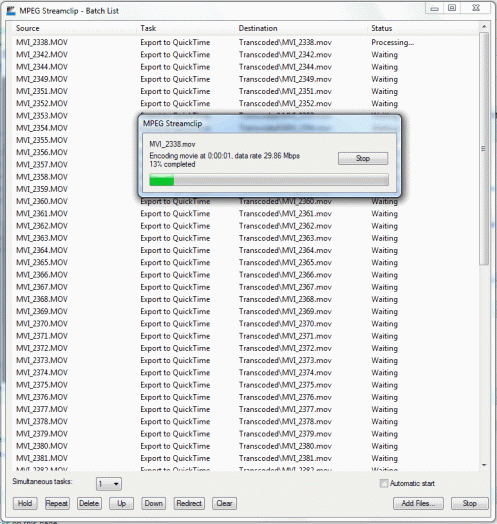
When you’re done here, hit “To Batch”. You’ll now have a bit list of all of the files to be transcoded and we’re good to go. Hit “Go” here. This will take a while – even on my overclocked quad core with hyperthreading is takes between an Age and a Bloody Age – working with video always does, so go get yourself a coffee and a sandwich.
When that’s done, you’ll have what look externally to be the exact same files in your Footage/Transcoded directory as in your Footage/Original. They have the same filenames and the same file extension, but these new ones are your editing suitable ones. Select everything in your Footage/Transcoded directory, and copy them, then paste them into Footage/INUSE. This is the step that isn’t entirely necessary and uses a third extra disk space – but when we come to swap out the transcoded files for the originals to do a high quality export at the end, we’ll see why this is handy.
After this step, your H.264 files are in “Footage/Original” and your transcoded files are duplicated in “Footage/Transcoded” and “Footage/INUSE”. Perfect.
Now fire up Premiere Pro (or your other chosen NLE).
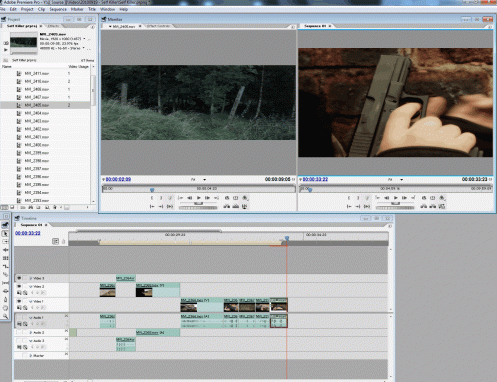
Within Premiere Pro, you’re going to completely ignore the “Footage/Original” and “Footage/Transcoded” directories and import only the “Footage/INUSE” directory. Dump all the files from there into your library. You can test the smoothness by dropping one of the files into your timeline and playing it – it should be pretty obvious how much smoother the video is and how smooth the timer counts up whilst playing. The eagle eyed may notice at this point however, that the video is stretched.
This is the limitation I’ve found with DVCPRO – its pixel aspect ratio is not 1:1 as the Canons record at. It’s more like 1.2:1 – meaning even with a 1920×1080 image, it’s wider horizontally. The very edges of your videos will be cut off the sides when previewing in Premiere Pro. Now this isn’t a problem for exporting as we’ll switch back to our original files, but you may have trouble noticing if things are barely in or barely out of frame. If there’s a better codec to use that has the editing speed of DVCPRO but with a 1:1 pixel aspect ratio, please do let me know! Unfortunately ProRes is Mac only else we’d be using that like the Final Cut users.
For now, go ahead and edit your movie as you would normally, enjoying smooth playback and video that can easily be synced to other video and audio.
Exporting
When you’re finished your edit and you want to do a final high quality export for distribution, you’ll want to ditch the transcoded files and go back to the orginals, for the reasons outlined in the first paragraph – they’re just lower quality.
There are two ways to do this, the way Adobe intended, and the way that requires less clicks.
The way Adobe intended, was for you to right click on the video files in the Premiere Pro library on the left of the screen, select “Unlink Media”. Then right click on it again and select “Link Media” – this will bring up a dialogue that lets you choose the file to import in that files place. Here you would navigate to “Footage/Original” and select the corresponding file.
Why wouldn’t I do that? Because as far as I know there’s no good way to do a batch operation on that. If you have 100 files you’d have to do that 100 times. Who wants to do that? Far better is the Lazy Way;
- Close Premiere Pro.
- Navigate to your “Footage/Original” directory.
- Copy everything in this directory.
- Paste it to your “Footage/INUSE” directory. Overwrite all the files here – don’t worry you still have the transcoded files in “Footage/Transcoded” should you want to go back to them.
- Now re-open Premiere Pro and your project
All of the lower quality DVCPRO transcoded incorrect aspect ratio’d files have now been replaced with your original H.264 format files. Editing will be back to slow, but you’re done with the project, so now you can export and the original higher quality files will be used.
Should you need to go back and perform extensive editing in the future, you can just copy the files from “Footage/Transcoded” back into the “Footage/INUSE” directory and reopen your project.
And that is that. If you’re short on disk space you can delete the transcoded files now.
Happy editing, and let me know if I’ve overlooked anything in this tutorial – surely there’s a better codec than DVCPRO out there for PC editing?
Absolutely Fantastic !!!
Thanks Michael, glad you found it useful.
Cineform is a better codec. It’s not open source though, like DVCPRO.
Thanks a lot for this tutorial! 🙂
When I import this into Premiere Pro, what Sequence preset should I choose? I’m new to video editing and not sure of anything I’m doing.
Thanks!
You should just use the same sequence pre-set as you’d use if you weren’t using transcoded files, so whatever resolution and frame-rate matches your files. So if you captured them at 1920×1080 @24fps, there’s a preset in CS5 in the New Sequence window called “DSLR 1080p24” (under “Digital SLR/1080p”).
If your camera captured at some other resolution and frame rate, you can go to the General tab of the New Sequence window and manually enter the resolution and frame-rate there instead of using presets.
graemeh two question what program do you use to final encode your videos after editing them in your premiere pro or do you encode them using just Premiere Pro? and does the copy paste thing on your editing folder from original footage work on after effects??
Hi,
I used to use VirtualDub to do a final encode. Now I’ve upgraded to Premiere Pro CS5.5, I just encode from that using the H264 option.
And the copy + paste folder to replace files should work on After Effects, yes, but test it out with just one file first to make sure, before you do it with dozens of files 🙂
Cheers, -G
graemeh another question 🙂 it worked for after effects. after copying all the original footage to inuse folder what format do you you use to export the video for final encoding using your nle software? and last question what is the format you used for final encoding using your virtualdub tnx so much 🙂
Before Premiere Pro CS5.5, when I was using v1.5 and CS5, I would export it with “Format” set to “Microsoft AVI” and “Video Codec” set to “None” to generate an uncompressed file. That would generate a massive ~60gb file (for a 3-5 minute video). I would then import that into VirtualDub and export compressed to the XVID format, or if you have the program “fddshow” installed, you can export from VirtualDub to H.264 format.
Now, with CS5.5, I just export from Premiere Pro straight to H264 by setting “Format” to “H.264″, and skip the extra step. Much simpler.
I think H264 exporting was a bit broke in earlier versions of Premiere Pro for me, which is why I used to do it the longer way.
thank you sooo much for the quick response. after i upgrade to 64 bit i wont be having this problem anymore but thank you so much. 🙂
Excellent, straightforward tutorial, thank you, where can we get more tutorials by you?