

Introduction: How to Make a Tesla Turbine (Greenest Turbine)


If you like this instructable please vote for it in the Epilog Challenge coming up. I have spent alot of time and effort trying to make this easy to understand and easy for anyone out there to do. I hope you enjoy and please rate and vote.
This Instructable will show you how to construct a turbine from reused parts and a couple of new materials. This turbine can achieve speeds of up to and possibly accede 15,000-20,000 running speed rpm's and top rpm's reaching around 30,000 to 35,000. This project can be run on about 40 psi but I have run mine on up to 100 psi and it will really started to scream (I would not sugest running it with that much pressure for more than a few seconds, I was just testing it to see what it could do, it was very dangerous and it could have or was close to flying apart). But to make this project even greener you could run it on steam. Or put it downstream and direct water flow to it and run it just as a hydroelectric plant, this turbine is very strong and versitile. Also please rate this instructable.
The reason for making this instructable is because I have been scanning the internet and to make one of these and the outcome of it will either not look very nice or they are very hard to find materials to make them or the materials are too expensive and usually the directions are very complicated and leave parts out. If any of you feel that I have left any parts out please leave a comment and I will try to put them into my instructable and if you have any trouble with any of this please make me aware of it and I will help you out.***PLEASE READ THROUGH THE ENTIRE INSTRUCTABLE BEFORE STARTING YOUR BUILD.
Also something that I would love to see done is to have someone build a boiler, this turbine and a small r/c vehicle that could be powered by this. You could even put a generator on the turbine to power the electronic parts of the car. Although you would need to gear it down a bit so it has more torque and less rpm's but if anyone does this or has seen it done please let me know so I can see it.
I am not liable for your versions of this and for this failing horribly and hurting someone so please do not run this on any more than about 70 psi and don't run it too long with that much pressure it will spin at around 15,000 rpm's at about 40 psi which should be good enough unless you are showing it off to friends or family, then crank it up but don't blow it up.
***Update, After seeing what this project could do I am now deciding what kind of motor to put onto this to actually power something and I am working on a copper exhaust system that will come together like the headers of a car to direct the exhaust flow upwards instead of straight out. I will be putting on how to build and attach these things within the next two to three weeks. I will post sometime soon.
Step 1: Parts


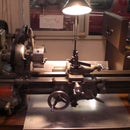
Here is a picture of all of the parts and tools needed for the construction of your turbine. 10 hard drives, which if you go to your local high school they will willingly give you however many hard drives that you want just be polite and let them know what you are doing with them (you only need nine but just in case you mess up). You will then need two pieces of 1/4 inch plexi-glass that are 7x7 inches. Then about a 2.2 " piece of 4 inch diameter schedule 40 pvc pipe and if you want you may be able to find clear pipe for a better look. An exacto-knife or sharp knife. Safety glasses. A small bench-top lathe or mini-lathe. Then eight bolts that are 31/2 inches long and anywhere from 1/4 to 3/4(which is unnecessary but if that is what you have go ahead) inches in diameter. Then you will need 8 bolts and 16 washers to go along with them. Also, you will need some tubing; I am using 3/8 inch id 3/4 inch od plastic tubing. Then you should have two bearing and part of you project will be based on these so I chose two 1/4 inch id bearings with 5/8 inch od. These are Fafnir S1KDD7 bearings. You will then need some precision measuring equipment such as a micrometer and a good ruler. And on your lathe you should have a tailstock with a dead center or live center. And a 6-7 inch piece of 1-1/2 inch diameter Aluminum. The only parts out of the hard drive that you will be using are the platters and the spacer rings so save them and you can throw the rest out or save the very strong magnets in them for another project. I forgot to mention you do not need to have the same size bearings as I do just whatever you have lying around. But I have found that the smaller they are the higher speeds they can handle and if I were you I would not go under a 1/4 inch inner diameter. You should also have a set of drills and a drill. Just to be clear here is a list of materials. See pictures if you have trouble understanding what anything is.
Materials
-10 hard drives (local high school [tech department])
-8 bolts (I will be using 5/16) (hardware store or look around your house for some laying around)
-8 nuts (I will be using 5/16) (hardware store or look around your house)
-16 washers with a 5/16 hole in them (hardware store or look around your house)
-Some 4" pvc pipe (The finish length will have to be 2.2") (hardware store or ask a local plumber ,it is a small amount so they may give it to you for free just remember to be polite)
-2 pieces of plexi-glass that are 7x7" (hardware store)
-1 pieces of 1-1/2" diameter aluminum 6-7" long (probably will have to order off the internet like I did)
-2 ball bearing I am using some with an inner diameter of 1/4" and outer diameter of 5/8" (hardware store, you do not have to use the exact ones I am)
-About a foot of plastic tubing (hardware store)
-JB Weld (hard ware store but you can use almost any strong glue you have around such as super glue)
-Silicon sealant (automotive store, ex. Advance Auto Parts or maybe Lowes or a hardware store will have it) if you don't know what this is there is a picture of it in here
Tools
-Exacto-knife (almost any store)
-Safety glasses (almost any store)
-Some kind of lathe (I am using a South Bend) with a tailstock and dead center or live center (if you do not have a lathe try to get a machine shop to do it for you but you will have to pay them depending on the owner anywhere from $10 to $60 where I work you might get it done for $20)
-A micrometer and precision ruler (order off the internet buy a good brand don't cheap out so it will last a while if you do not have one but if you are giving it to a machine shop to do don't worry about these)
-A set of drills (hardware store)
-A drill press or milling machine would be nice but a hand drill will be fine (you probably know someone that has one that would let you use it if you do not have one)
Extras
-Krylon spray paint (hardware store)
-Lock nuts instead of regular nuts listed above in the materials section (hardware store)
Step 2: Make the Shank
This part will be very easy for anyone with some machining experience, for instance I am 15 and just purchased a South Bend benchtop lathe and this entire project was done with this. I will put some machinist drawings in to make this part of the project much easier. This took me about 7 hours on the lathe to make so make sure you have some time. This is where you with be using the 1-1/2 inch aluminum. You should put this piece into your lathe in between the chuck and the tailstock. Just follow the drawings for this step. Also the two ends of this shank will be fit into the bearings so machine them to the inner diameter of your bearing not mine, unless they are the same size, in that case make it like mine. Please click on the Machinist Layout file to get the dimensions of this part. Also if you have any trouble understanding these dimensions please contact me and I will try to help you out. Note that this picture is not drawn to scale.


Step 3: Retaining Ring
This ring will be the exact same size as the larger portion of the shank. All this will do is ensure that all of the hard drive platters and rings will stay onto the shank. I will once again put a machinist's diagram into the pictures to make it easier to understand. In this piece you will also have to drill and tap a hole for an 8-32 set screw. This will make sure that the ring does not come off. Again if you have any problems understanding the image please contact me. This picture is also not drawn to scale.
Step 4: Drill Holes in Hard Drive Platters


The drilling of these holes should be fairly easy, all you will need for this is a drill press, but a milling machine would make it easier. I just used a drill press. You will need to drill eight holes 25 mm from the center of the hard drive disk. These holes will be spaced 45 degrees apart. You can easily plot this out on a piece of graph paper with a protractor before you drill it to ensure it is correct spacing and everything. And it is ok if the holes are not at the exact space on every disk because they are not on mine and it works just fine; just make sure they are no more that .030" difference. When drilling these holes remember to use a sheet metal drill unless you figure out a way to keep them all together while drilling, because it will warp your hard drives. Also you may want to look at the hard drive layout file for some help on what to do to lay it out. You will need to make eight of these. Ohya and use a 3/8" drill bit for this. Also do not use the diagram that I made because the holes on that are too far off the make this project be same, it WILL be off-balanced if you were to use that it is just an example to help you.
Step 5: Drill Holes in Plexi-glass


This step will be based on the bolts that you used and the bearings that you used but it will consist of an eight hole pattern with the holes spaced 45 degrees apart just like the hard drives. Then you will drill a hole in the center of the sheet of 7x7" plexi-glass, I drilled a 5/8 inch hole because of my bearings and then you can just drill an appropriate sized hole for your bearings. In only one of the pieces of plexi-glass you will need to drill a few holes around the center hole for exhaust ports. The larger the hole the larger the high rpm's horsepower and the smaller the holes the more low rpm torque. I drilled four 3/8 inch hole around the center, 25 mm out from the center, so you could use the same pattern you did for your hard drive disks just skip every other hole. And four 3/8" hole is about right in the middle of the two rpm ratios. Also, use a 3/8 inch bit for the eight hole for the bolts to go through if you are using 5/16 bolts like me. These holes are 2.5" from the outside of the 5/8 inch hole you drilled in the center or if you did not drill a 5/8 inch hole they are 2.8125" from the center. This is another eight hole pattern like for the disks so like I said before space them 45 degrees apart.
Step 6: Cut Pipe and Drill Air Inlet


Cut your pvc pipe to 2.2" and then drill a hole the size of your tubing into the middle of your pvc pipe and offset it a little bit so it is at an angle so that when the air enters it, it immediately starts spinning inward. Once this pipe is cut to make sure the whole end surface is even, take it on the lathe and face it off until smooth, then take some 600 grit sandpaper and smooth the ends so no air can escape when the plexi-glass is put onto the ends. If you want to skip the sanding then just put some silicon or mopar sealer around the ends to keep the air from seeping out. On my project I did not do this, I just sanded it because in my opinion it gives it a better appearance. This step is pretty self explanatory.
Step 7: Put Bearings Onto Shank


When putting the bearings onto the shank just make sure to put some jb weld or some super glue on the inside of the bearing so it will not move once assembled, just put the glue on during the assembly process so everything lines up correctly. Remember that it will be spinning at around 15,000 rpm so if it would slip or run out of the bearing it would be very bad. These do not need to be put at any set position but when you do this make sure that they are not right up against the larger parts of the shank, I designed this so the bearings can have a little bit of room so do a dry assembly first to make sure everything fits then glue everything. And make sure that the bearings line up with the plexi-glass sheets you want them about centered in the plexi-glass, not too far in or too far out.
Step 8: Assembly


First put one of the hard drive disks that you have not drilled onto the shank. Then layer them with a spacer from the hard drive and then put a disk with the holes drilled in it, spacer, disk, spacer, disk and so one until you end up with just a spacer on the end(After you do a dry assembly then put a few drops of superglue between each disk and spacer so they will not spin on the shank, that is not what we want them to do. After you do this put the retaining ring on and tighten up the set screw. Once this is done you can put the rest of it together. The last picture in this setting is the assembled shank and disks sorry I do not have a better picture.
After this is done then take the piece of plexi-glass without the exhaust ports in it and put the eight bolts into the hole you drilled previously. Then flip this piece over so the bolt heads are on the bench or table you are using. Then lay the pvc pipe onto the piece of plexi-glass with the assembly of the shank and disks (look at the extras section first). Then you should take the other piece of plexi-glass (the one with the exhaust ports) and slide it onto the eight bolts that should be standing strait up now. After that take the last eight washers and slip them onto the bolts. Then put the eight nuts onto the bolts. The project should now be coming together. Then once you tighten up the nuts (remember to put the bearings exactly where you want them and then center your pvc pipe around the disks before tightening the nuts) then put your piece of tubing into the previously drilled hole and put a plentiful amount of silicon sealer all around the tube and the hole so no air will leak out from this area. Then put the appropriate air fitting that you have on the other end of your tube and you are ready to run it after the glue dries of course. On to taking it further.
Step 9: Taking It Further


Now what you may want to do and you may have noticed in the previous steps that throughout the instructable my pvc pipe transitioned from plain white to blue. If you plan on painting your project do this before assembly. I used Krylon because it is in my opinion the best spray paint out there and it will bond to anything.
Another thing to help your project stay together but is not necessary is to use lock nuts instead of regular nuts. I did switch over and use these after I thought about it for a while and I believe it will help to keep your project together longer.
Also one thing that I did not do and I am now wishing I did is polish the ends of my plexi-glass. This is something that I do not know how to do but I imagine that you should be able to easily find it somewhere on the internet.
Something else you may consider is making a steam boiler. This is something that I know how to do but it will take another instructable so if I get enough responses for me to make this I will so if you would like to see one on Instructables please let me know.
You may also want to make a Tesla pump which is just about the exact same thing as this except the water or fluid will enter from the exhaust ports and will exit from where we are putting the air inlet which is where the plastic tube is. Once again I am sorry but I do not know how to make one of these but If you do let me know of the site and I will post a link on how to do this, same for polishing the ends of the plexi-glass. And your turbine could power this too.
These are just add-ons so do not feel that you have to do these things to make your turbine run because I have only painted mine and made a boiler for it which make this project very green. Speaking of that you could also add on a small D.C. generator of some sort and light some L.E.D.'s with it and having your project run something else always makes it look better, please if any of you make one of these send me a picture and I will dedicate a section to all of you that make one.
***Note: you may want to make a ball valve system so you can quickly shut it off if something were to go wrong and it makes it nice to be able to control the speed if you want to I have a picture of this if you want to see mine.
Step 10: Copper Air Input Instead of Plastic Tubing


To make your finished turbine look better with a copper air input instead of a plastic tubing one you will need the following materials.
Materials
-9" of 1/2" copper pipe
-Pipe cutter
-45 degree copper coupling
-90 degree copper coupling
-Air fitting
-Coupling with threads to fit your air fitting
-Torch
-Solder
-Soldering paste
-Mothers mag and aluminum polish and a rag if you want to polish your cooper
-Teflon tape
-Silicon
-1/2" fasteners for copper pipe
Ok to start we will have to cut our old tubing about 2 inches out. And since that tubing fits perfectly into the 1/2" copper pipe will just slide it right over the tube that is already there so we do not have to drill out our pvc and take the whole turbine apart. Now cut your copper pipe into the following lengths: 5", 3", and 1/2". At this point in time put some teflon tape around your air fitting and thread it into the copper coupling with the threads. Now take the 5" copper pipe you previously cut and put some soldering paste onto it and slip it into the other end of the coupling with the air fitting in. Now fire up the torch and solder these two pieces together.
Take the 3" piece of copper pipe and solder the 45 degree coupling onto it. On the other end of the 45 degree coupling solder the piece of copper pipe that is 1/2" long (this is for the plastic tubing to fit into; it will not be a snug fit into just the coupling so we have to do this unless you want to waste a large amount of glue sealing the two together). Then on the other end of that same pipe solder the 90 degree coupling on.
Now take the 5" copper pipe with the air fitting on it and solder that to the 90 degree coupling that is already attached onto the other pipe. The copper pieces are now all together.
(***Skip this step if you do not want to polish your copper pipe) With all of the pieces of copper together take some mothers polish (if you want to) and polish the copper (I prefer a shiny finish because it will draw more people into looking at what you have really done).
Now slide your tubing into the copper pipe and re-silicon anything if it breaks loose and also put a little bit of silicon inside the copper pipe in the 45 degree angle piece so it make a better seal. Now let this dry overnight. Now that you have done this your project will look much better. Also if you see the pictures with the tape on them it is just holing the copper pipe there until I get some fasteners. But if you have already gotten them fasten away.
Participated in the
Epilog Challenge


