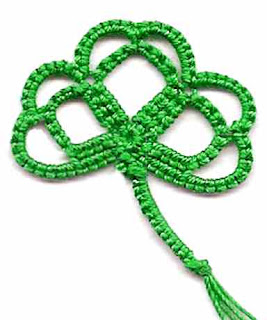
March 2 - One Ring Shamrock by Ruth

Copyright 2006 Ruth Perry

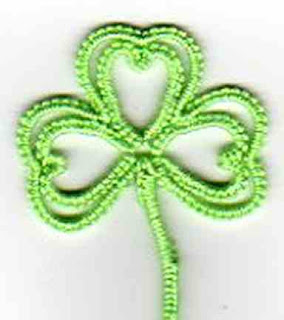
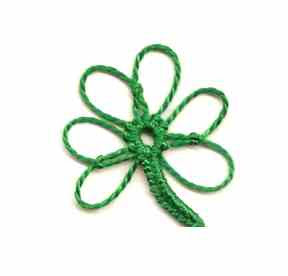
This interesting little Three Leaf Shamrock is something I designed while playing with Maltese rings. Begin with two pieces of green thread, each about a yard or so long. Great for using up bits of thread left over from another project. I do mostly finger tatting, but you could use two shuttles each with one of the threads wound on it. The two threads are not continuous.

The ring is tatted as a direct ring, that is all the stitches are reverse stitches like the second half of a split ring. The second thread is held in the pinch and is sometimes wrapped around the little finger like the ball thread when tatting a chain, when you tat over it along with the core thread of the ring.

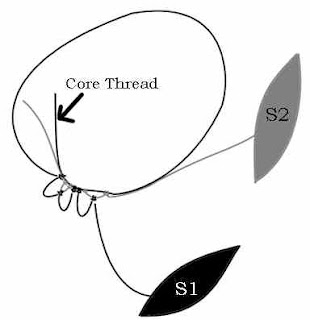
This diagram shows one leaf completed and one almost completed.


Shamrock Ring:

*[Sh1] 1 r st tatted over both threads

[S2] 1 r st tatted over core thread only

S1 picot about 1/2" long made by direct tatting 1 reverse stitch over just S2 thread
S2 picot about 1/4" long made by direct tatting 1 r st over the core thread

S1 picot about 1/2" long made by direct tatting 1 reverse stitch over both threads
*
Repeat between * * two more times then pull the core thread (see diagram) to close the ring

Direct Tat 15 r st over all thread ends with either shuttle to make the stem. Finish with a bead and work in the ends, or tie an overhand knot to make a small tassel.

March 5 - Daisy Picot Shamrock by Ruth

Copyright 2007 Ruth Perry


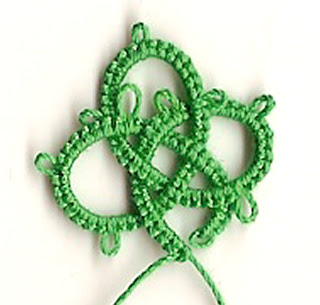
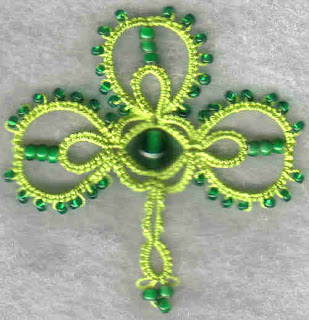
This little Shamrock is tatted with two shuttles both wound with green thread
Not continuous.

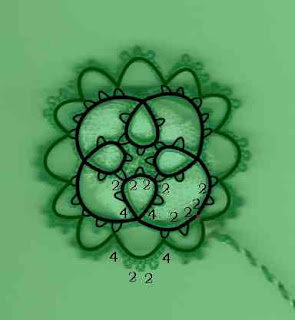
S1 Ring (1 ds [ S2 Daisy Picot 4 - 4 - 4 - 4] S1 2 ds [S2 Daisy Picot 4 + 4 - 4 - 4] S1 2 ds
[S2 Daisy Picot 4 + 4 - 4 - 4] S1 1ds)

Round 2
Chain ( 6 + 12 + 10 + 10 + 10 + 10 + 12 + 6 ) join as shown in photo
Tie ends at the beginning of this round, then tie in an overhand knot

Stem
Chain 12, Tie in overhand knot and cut threads for tassel

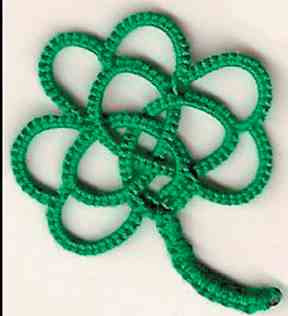
March 12 - Ruth's Celtic Shamrock

Copyright 2005 Ruth Perry

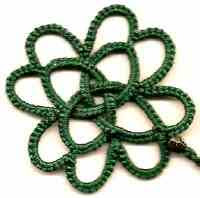
This green Clover, or Shamrock, with a 4 corner Celtic Knot in the center is a wonderful gift for anyone. Tatted in size 10 to 30 thread, it makes a nice bookmark or pendant. Size 50 to 100 thread is a nice size for earrings, but a bit fussy weaving the Celtic Knot.

Instructions:
Row 1 - Celtic Knot
Start with about a yard of thread wound on a shuttle, Continuous Thread Method (CTM) do not cut the thread from the ball of thread. Begin a chain on a paper clip, or begin with a picot.
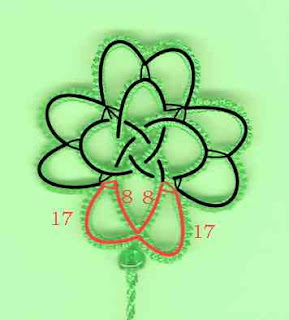
Chain ( 16 - 8 - 8 - 16 - 8 - 8 - 16 - 8 - 8 - 16)

Weave the Celtic Knot for the earring in the Celtic Tatting Knots & Patterns book. Tie the end to the beginning. Then adjust the knot so that there are three "loops" with three picots in each loop of the knot as shown here.


Row 2 - Leaf Outline
Chain ( 4 + 17 + 17 ++ [ Join to the picot of both the first and center loops here ]
Chain ( 17 + 17 ++ [ Join to the picot of both the center and third loops here ]
Chain ( 17 + 17 + 4 )
Join to the beginning picot

Stem
Chain 16, add a bead or two, then direct tat back over the stem.
Tie, Hide, Cut ends, or use the ends for twisted cord bookmark

March 11 - Beaded Shamrock by Marilee

Copyright Marilee Rockley


Abbreviations:
beg. beginning
bp bead picot
ch chain
cl close
cm centimeter
CTM continuous thread method
ds double stitch
j join
mm millimeter
p picot
R ring
sb seed bead
sh shuttle
/ separates stitches on each side of split ring, or sets of ric-rac tatting

ZZ zig-zag or ric-rac tatting of set stitches (first half of ds repeated a number of times, followed by second half repeated a number of times, completing one set)

Supplies:
Size 20 crochet cotton
12 size 8 seed beads
1 size 8mm round bead
42 size 11 seed beads
2 tatting shuttles

String the 42 size 11 seed beads and 3 of the size 8 seed beads onto the crochet cotton. Wind 2 shuttles CTM with the 42 beads on sh 2 and the 3 larger seed beads on sh 1.

Note: All joins in this pattern are shuttle joins made with sh 1.

Instructions:
Begin with an open end ch. Ch 7. R using sh 2 of 10, large p (about 18mm open), 10, cl. Ch 7. J large 8mm bead by slipping it onto the open end of chain, pull sh 1 through the open end and cl.

R with sh 2 of 10, large p, 10, cl. Ch 7. R with sh 2 of 10, large p, 10, cl. Ch 7. J to beginning.

Ch 9, j to base of r.
*Ch (3, bp) 7 times, ch 3. J to large p, placing 3 size 8 seed beads on the p before j. Ch (3, bp) 7 times, ch 3. J to base of same r. Ch 9. Rep. from * for a total of 3 “leaves”. J to beg.

(Stem) ZZ ch 2 sets of 4/4. R 7, p, bp of 3 size 8 seed beads, p, 7, cl. ZZ ch 2 sets of 4/4. J to beg.
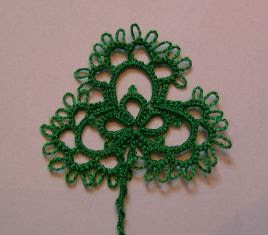
March 1 - Frilly Shamrock by Susan T.


Frilly clover Book mark
Susan Taliaferro 2/07 ( CW)

Standard abbreviations...

R 5-5-5-5
R 5+5-5-5
R 5+5-5-5 RW
C 5(-5)5 + to where last two rings are joined
C 5(-5)5 + to where first two rings are joined
C 5(-5)5 + to base if clover RW
C 4 +LPPC 2 (-2)3 +NPPC 4 + where last chain was joined to rings
Repeat 2 times but third is joined to base of rings.

For Tail of bookmark... tat a long loose chain... or wavy chain. Add
threads to base a and braid. It is your choice....

Enjoy.....

March 13 - Ruth's Celtic 4 leaf Clover

Copyright 2004 Ruth Perry


The 4 leaf variety of Celtic Clover is nearly the same as the 3 leaf Shamrock pattern we did yesterday. The diagram below shows the 3 leaf pattern in black with the added chain stitches in orange.


Shuttle and ball CTM
First row
Begin with a picot or on a paper clip to leave a small loop to join the end of the first row.
Chain ( 8 - 16 - 8 - 8 - 16 - 8 - 8 - 16 - 8 - 8 - 16 - 8 )
Weave the Celtic knot for the earring in the Celtic Tatting Knots and Patterns book
Tie the end to the beginning

Leaf Outline row
Chain ( 17 + 17 + 17 ++ [ Join to the picot of both the first and center loops here ]Chain ( 17 + 17 ++ [ Join to the picot of both the center and third loops here ]Chain ( 17 + 17 + 17 )
Join to the beginning picot

March 15 - Ruth's Shamrock Edging

Copyright 2007 Ruth Perry

One shuttle and ball of thread CTM

Instructions:

Ring ( 4 - 6 - 4 ) turn
Chain ( 4 - 4 ) turn
Ring ( 4 + 4 - 1 - 1 - 4 - 4 ) turn
Chain ( 4 - 4 ) turn
Ring ( 4 + 6 - 4 ) turn

*
Chain ( 14 - 14 ) turn
Dimpled Ring1 ( 10 + 8 - 8 + 8 - 6 - 4 )
Dimpled Ring2 ( 4 + 6 - 8 - 8 + 8 - 6 - 4 )
Dimpled Ring3 ( 4 + 6 - 8 - 8 + 8 - 10 )

reverse stitch Chain ( 14 + )
Chain 14 turn

Ring ( 4 + 6 - 4 ) turn
Chain ( 4 - 4 ) turn
Ring ( 4 + 4 - 1 - 1 - 4 - 4 ) turn
Chain ( 4 - 4 ) turn
Ring ( 4 + 6 - 4 ) turn
Chain ( 14 - 14 ) turn

*
Repeat between * * to desired length

March 14 - Ruth's Shamrock Sachet

Copyright 2004 Ruth Perry


This is a fairly easy little sachet or pin cushion to tat and stuff with a small "pillow" with scent or possibly some emery dust to sharpen your needles. Emery sand may be purchased from Georgia Seitz as well as instructions for a pin cushion filler.

One shuttle and ball of thread CTM

Begin the first row about where the twisted cord is located on the pic. Use a paper clip to hold a small loop of thread at the beginning of the first chain, or begin with a picot by tying an overhand knot in the thread and tatting the 1st ds a picot's distance from the knot which will not pull through the stitches.

Instructions:

First row
Chain ( 2 - 2 - 4 ) turn
Ring ( 4 - 2 - 2 - 2 - 2 - 4 ) turn
*
Chain ( 4 - 2 - 2 - 2 - 2 - 4 ) turn
Ring ( 4 + 2 - 2 - 2 - 2 - 4 ) [ join to the previous ring ]
turn
*
Repeat so there are 4 rings all joined together as shown. The 4th ring joins to both the previous ring and the first ring.

Chain ( 4 - 2 - 2 )
Tie the end to the picot or loop left at the beginning of this row.

Now tat another 1st row exactly the same as the one you just completed. Do not cut the threads, just continue tatting.

Outside row

Chain ( 4 - 2 - 2 - 4 ) Join to a picot of both of the first row pieces where shown in the photo.
Repeat this chain around joining where shown in the photo. Slip the pillow between the two first row pieces before the final two joins.

Tie the end to the beginning, and finish with spiral chain, twisted cord, or a ring to attach a ribbon. This may be used on a chatelain as a pin cushion, as a bookmark, or for a sachet for your hanky drawer. ( Who has a hanky drawer these days???)

March 4 - Shamrock by Jon

Shuttle and ball thread CTM

Instructions:
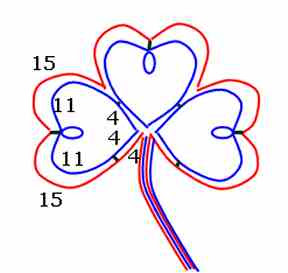
Round 1 - dimpled rings (shown in blue)
Make all the picots small
Leave a length of about 4 – 5 inches before starting.
Make ring (4-11-5+11-4), where the join is made to the 2nd picot of the same ring, before continuing with the rest of the ds.

To close the ring, I used a needle and pull up the thread at the bend in the ring and close the first half. Then I pull the thread from the shuttle to close the ring fully.

Repeat the ring with the same ds count, but make an additional join after the first 4ds to the last picot of the previous ring.
Make the third ring the same as the second ring. Cut off the thread about 4 – 5 inches from the rings.

Round 2 – chains only (shown in red)
Again, leave a length of about 4 – 5 inches before starting.
Make chain (4+15+15), 1st join to the first picot of the dimpled ring, 2nd join to the picot in the point of the dimple, and 3rd join to the joining picot between the two rings.
Continue the chain with (15+15+15+15+4) making the joins as shown in the diagram.

I did not use a shuttle join in here. Instead I pull the ball thread through the picot and slide the shuttle through the loop. When closing the thread for the join, I make sure that the shuttle thread is level with the ds and is not pulled through the picot.

At the end there will be four strands of thread measuring 4-5 inches, one shuttle thread and one ball thread coming out from the motif.
Make a series of half-stitch over the five threads using the shuttle. Cut off when you have reached the required length, or tie a knot to make a tassel at the end.